Archive for August 9th, 2009
#1- Template Peek: Fold N Go Gift for a New Home and a Giveaway!
Aug 9, 2009 Author: mytime | Filed under: Home decor/3-D items, My Timeless Templates, Papertrey Newsletter, TutorialsHi everyone!!!
I’m beyond excited to get the Papertrey Ink countdown started!
Now please note that most items featured in today’s post are NEW! (to be released) items from Papertrey Ink. Items will be released August 15th!
It’s the 10th so that means the samples begin, and I get to start sharing peeks of my NEWEST! My Timeless Templates © (releasing the 15th as well)
We have 2 great and practical templates this month! Each one has a standard template size, and the Pretty Petite version, also included in ONE download, for only $5! Remember you not only get unlimited use of the printable template, but the Idea Booklet, which includes 5 exclusive project ideas ONLY published for the download 😀 The idea book comes with a complete set of supplies and step by step instructions, for completing the samples in the book! Download also includes step by step photos/instructions for assembling your template. EASY PEASY!!
I have the honor of peeking one of Melissa Bickford’s new stamp sets called Sign Language😀 The minute I saw it the ideas just flooded my brain! One idea that stuck out the MOST though, was the idea to combine it with the lastest My Timeless Template © Fold n’ Go!
Now before I share my first peek, let me tell you about the first template being revealed!
Sometimes you just want a box with a fun closure! One where the top requires no fancy ribbon or anything else to hold it closed (unless you WANT to add it!), and opens with ease. I have always LOVED Gable style boxes, so I decided to gain some inspiration from that, to make another variation, that is funktified and modernized with a sleeker, less bulky look, and a cool handle. Now to package up a gift, all you have to do is Fold n’ Go!
Now, you may recall I gave you a little (early) peek at this template—> HERE! This project was inspired by a VERY early creation I made called a Boxed Bag Holder—> HERE! My Boxed Bag holder which was done almost 3 years ago! LOL!
This really is a fun template, that can hold so many amazing and fun gifts for ANYONE, which I will share over the next few days.
Now, on to the sample 😀
A gift for your New Home
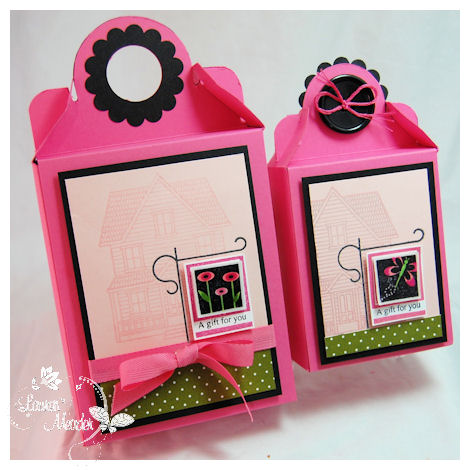
The idea for this particular gift, was for to hand deliver, OR hang on the door of our friends, who just moved to their very first NEW home!
I thought that using the Sign Language set, with house image from Boards & Beams was obviously perfection-since the sign is just like some of the yard signs in our neighborhood!
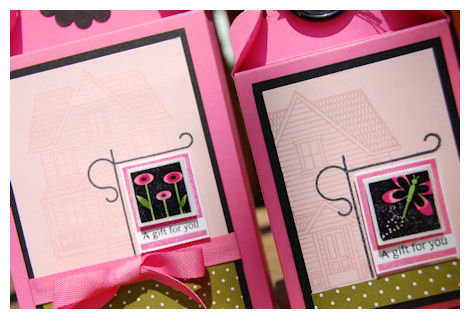
I wanted the SIGN itself to be the MAIN focus, so I stamped the house image in the new formula of Sweet Blush ink (its awesome!), onto sweet blush cardstock. The flag itself usess a fun technique that I’ll share further down this post.
I adore the ability to mix and match all the “flags” with sentiments for EVERY holiday! There are SO many cute ones too.
I of course chose to use my 2 favorite images for my “yard signs” to convey the message for these house warming gift packages.

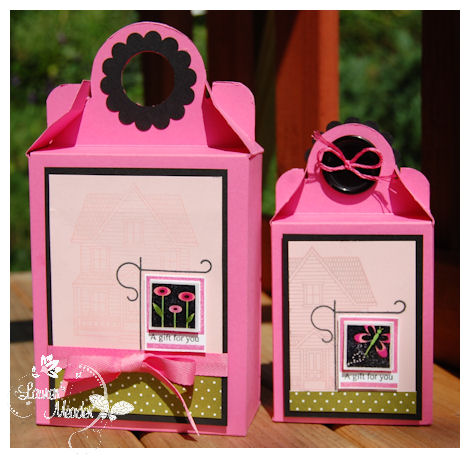
I made similar designs-one using the standard template size, and the other using the Pretty Petite version! This just shows you have versatile everything can be, and weather you decide to decorate a standard Fold n’ Go! template or the Pretty Petite version, both are FAB!
Now you may be wondering WHAT I put inside these gift boxes!
I didn’t get to get photos, as I was stopping off to pick up the gifts ON MY WAY to their house warming party, but in the Large version is a Door Knocker that is engraved with their last name, and in the other we put in a gift card to Lowe’s Home Improvement store! Owning a home you will need lots of stops to the home improvement store! LOL!
Now onto the details of my flags…………….
I always enjoy the look of the Epoxy like sticker embellishments you can buy in stores. Problem, they don’t generally suit my project, or MATCH what I want to do!
So I made my own
This is a VERY simple embellishment you can make, that packs a big punch!
1) Stamp your image in a permanent ink.
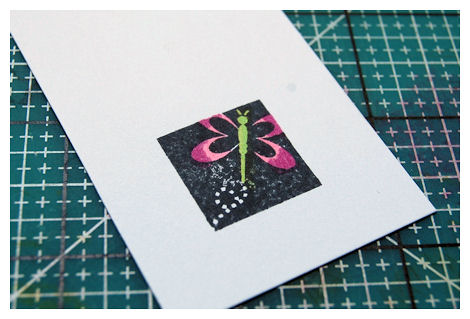
Color if needed or desired (Use a smudge-proof marker-like Copic’s)
2) Apply a liberal amount of Crystal Effects
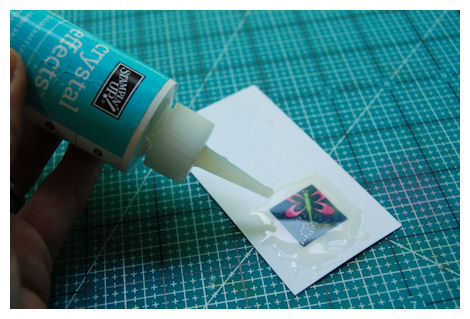
3) Allow sufficient time to dry. (My project was dry within an hour)
4) Use a punch or die cut that fits your image
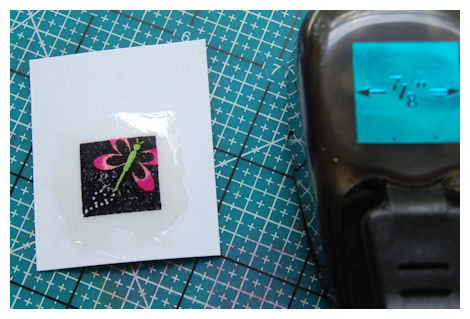
and punch out
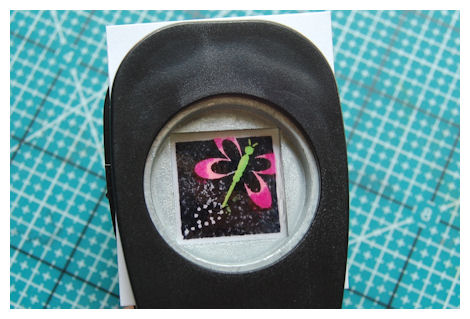
NOTE: The 7/8 square punch fits the flag images from Sign Language perfectly! It even gives you a perfect little border too!
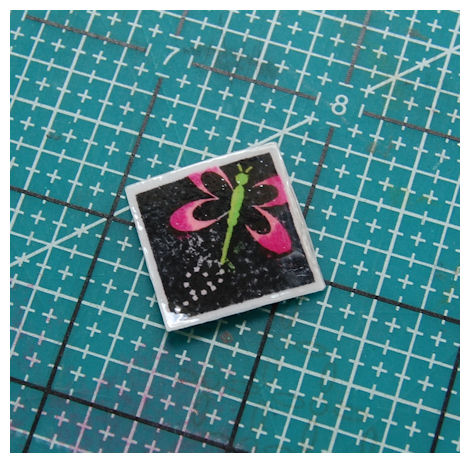
5) Once image is cut-layer onto project

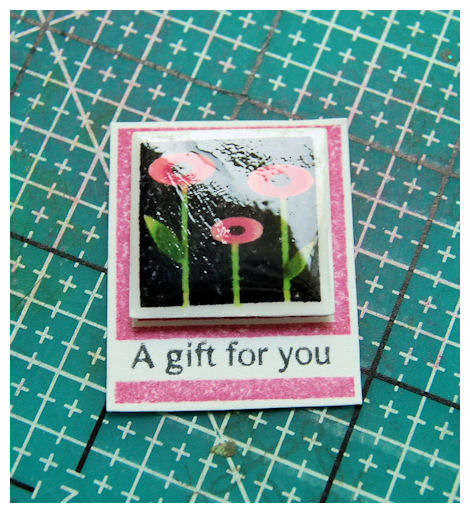
In this case, it is the hanging part of my sign, in which I stamped the border in Hibiscus Burst ink, and my sentiment in black ink, then trimmed out.
Then I added both of the Epoxy embellishments I made, to my completed projects
They really make a simple sign POP!
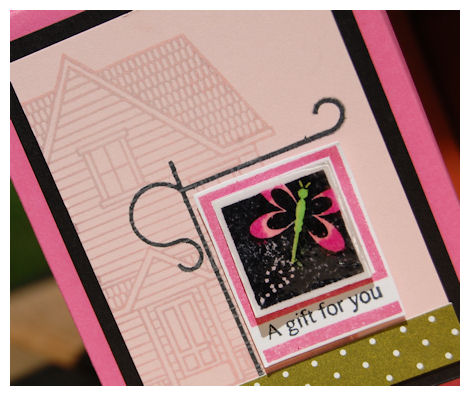
This is the butterfly on the Pretty Petite version of the Fold n’ Go! template
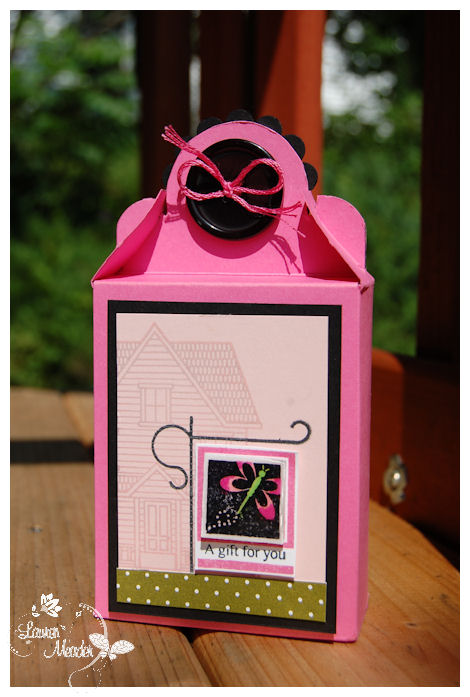
Now we have the flower flag image on the completed standard version of the Fold n’ Go! template
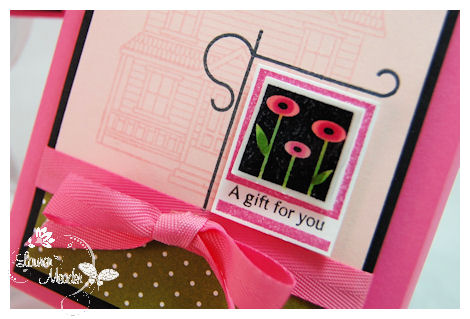
Together they make a real WOW! presentation for the perfect gift for those NEW! Home owners.
Now there is NO limit to the size of the epoxy like embellishments you can make! You are also saving so much money too 😀 Those sticker sheets can cost upwards of $3 for only a couple of images, that aren’t tailored to YOUR project!
Another option would be taking a page pebble, and add it over your image! Only “problem” would be that you are limited to the shape & size of your page pebble, and it does cost more to use them.
This is just a fun and easy way to really add another WOW! element to your completed template or card projects!
Well that is it for me. I’m excited to hear your thoughts about today’s projects!
Giveaway: Just leave me a comment here, and enter to win the Fold n’ Go template on Release night!
Winner will be posted on the 13th (my daughter Amber’s birthday!)
Lots more countdown peeks going on, so visit Nichole for more ideas and creative clicks! I also believe Melissa, Heather, Dawn and Tiffany(her first stamp set debut for PTI!) will have some eye candy as well! (I hope I’m not forgetting anyone :C)
Kelly has a *peek* at her project using Fold n’Go! today, as does this months My Timeless Template Guest Designer-Mona, so be sure to pay them a visit too!
More to come tomorrow as I reveal my next template for the month of August! Oh and have a giveaway for that one as well!
Supplies:
My Timeless Template: Fold N’ Go!
Stamps: Sign Language, Boards and Beams
Cardstoock: Hibiscus Burst, Sweet Blush, White, Black
Patterned Paper: Bitty Dots 2008
Ink: Black , Hibiscus Burst and Copic Markers
Ribbon: Hibiscus Burst
Vintage Buttons: Black
other: corner rounder, 7/8 square, crystal effects, scallop punch, 1 1/4 circle punch
Today I am off to shop for Amber’s 5th birthday!
How is it that 5 years can fly by SO fast?!
She really wants Hello Kitty roller skates, so fingers crossed I find them! That seems to be her #1 request. I searched online and didn’t see ANY Hello Kitty skates (EEK!)
OK time is tight, so I’ll make it quick.
I got SOOOOO many emails about the girls room photos I posted yesterday 😀 I just want to add, in response, that even though the Target Website doesn’t have the wall decals online, that IS where I got them 😀 ONLY $12 and you get a TON! I purchased 2 (and if you find them in store, I recommend you do the same, as you can always return it if you don’t us it :D) and did a very large girls room.
Tomorrow I have the first countdown peek for the Papertrey Ink Release, and a peek at my NEWEST! My Timeless Template 😀 I cannot even wait 😀
Now to ease my excitement, until tomorrow, I have a card to share with you all using the CHA exclusive set Floral Fusion.
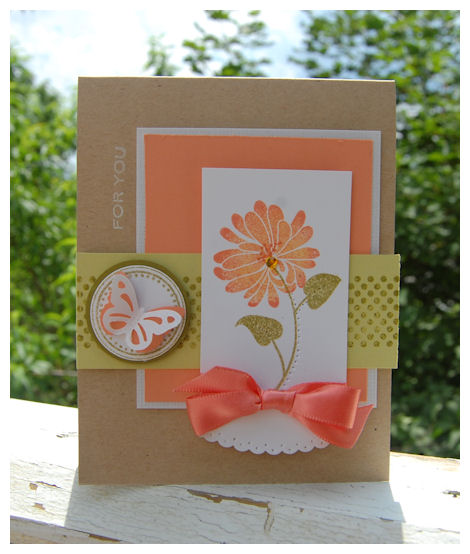
For you-
This is a REALLY pretty set. Don’t do a search for it, as it was ONLY available to those who attended CHA and place an order of $100 or more.
I did some paper piercing along the stem, and along the scalloped bottom of the layer.
I’m seriously over the moon for thiscolor combo-kraft, white, spring moss, and melon berry. Just so summer to me, and fresh looking.
I also used polka dot basics IIin the bkgd layer. I also used borders & corners circle for my butterfly frame.
My sentiment was stamped in white snow ink.
Just a simple card.
Well I am off.
Be sure to check in tomorrow for the beginning of a week full of ideas and projects 😀
My Etsy

Who I Designed For
Blogroll
- Alicia
- Alli Miles
- Ally Blankenship
- Amber
- Andi @ crafts on a whim
- Angel R
- Angie Z
- Anne Kranitz
- Becky O
- Bee
- Beth Silaka
- Bethany Paull
- Beverly Nash
- Bobbie
- Cambria
- Cammie
- Card of the Week
- Card Positioning System (CPS)
- Cards for Cancer
- Catherine Doucette
- Charmaine
- Cheryl Sims
- Chriss Rollins
- Christina
- Christine Ewing
- Christine Wooden
- Colleen Schaan
- Craft Critique
- Craft Gossip
- Crystal
- Dawn Easton
- Emily Giovanni
- Geny
- Holly
- Igne Groot
- Inspirational Craft Blogs
- Irene
- Jami Sibley
- Jeanne Streiff
- Jen del Muro
- Jeni Bond
- JenMarie
- Jenn Balcer
- Jenn Diercks
- Jenn O
- Jennifer E
- Jennifer Mick
- Jennifer Pereda
- Jennifer-Sweet Treat
- Joanne Basile
- Jodi Collins
- Julia Stainton
- Julie Masse
- Karen
- Kathryn Berthiaume
- Katie Cotton
- Kelley Holland
- Kendra
- Kim Scholfield
- Kris’s Color Stripes! Get inspired here
- Kristen Dubosque
- Kristin Eberline
- Kristine
- Laura @ Sunshine Stamper
- Laura Turnmire
- Laurie Schmidlin
- Lesa Rapp
- Linda Duke
- Linda-LSN
- Lindsey Botkin
- Lisa (lakind scs)
- Lisa Kind
- Lori Craig
- Maggie
- Mara Campbell
- Maria
- Maria Levine
- Mary
- MaryJo
- Melanie M
- Monique Hansen
- Moxie Fab World
- Pam Imholz
- PaperCrafts Connection
- Peppers and Pollywogs Kids party site
- Rebecca Grohall
- Rita
- Robyn
- Rose Ann
- Sarah Vrolyk
- Sharon Harnist
- Sharon Johnson
- Sharon Rivera (a chemisrty with paper)
- Sherrie
- Sophia Landry
- Storage Units, Ink, & More Blog
- Sue Berker
- Susan (Rainy)
- Tangii Crane
- Tracy
- Tricia Traxler
- Trudee
- Velta
- VivLyn
- Zena
MTME Pretty Palette Color Team
MTME Pretty Patterns Sketch Team
My Time Made Easy TM LLC
Shop till you drop!
Lauren Meader
About Me
Copyrighted material
Subscribe To My Blog
Pages
- About me
- Alexa’s Story!
- My Crafty Corner!
- My Time Made Easy™ LLC
- Our Make A Wish Trip to Disney!
- Resume/Publication List
Calendar
Archives
- August 2013
- July 2013
- June 2013
- May 2013
- April 2013
- March 2013
- February 2013
- January 2013
- December 2012
- November 2012
- October 2012
- September 2012
- August 2012
- July 2012
- June 2012
- May 2012
- April 2012
- March 2012
- February 2012
- January 2012
- December 2011
- November 2011
- October 2011
- September 2011
- August 2011
- July 2011
- June 2011
- May 2011
- April 2011
- March 2011
- February 2011
- January 2011
- December 2010
- November 2010
- October 2010
- September 2010
- August 2010
- July 2010
- June 2010
- May 2010
- April 2010
- March 2010
- February 2010
- January 2010
- December 2009
- November 2009
- October 2009
- September 2009
- August 2009
- July 2009
- June 2009
- May 2009
- April 2009
- March 2009
- February 2009
- January 2009
- December 2008
- November 2008
- October 2008
- September 2008
- August 2008
- July 2008
- June 2008
- May 2008
- April 2008
- March 2008
- February 2008
- January 2008
- December 2007
- November 2007
- October 2007
- September 2007
- August 2007
- July 2007
- June 2007
- May 2007
- April 2007
- March 2007
- January 2007
Categories
- About Me
- All That Scraps
- blogger challenge
- camera/photo play
- Cards
- Contests
- family stuff
- FOR SALE
- Home decor/3-D items
- How to FAKE it!
- Introduction
- JUGS Challenge
- JustRite Stampers
- Lizzie Anne Designs
- My family stuff
- My Stamping Space
- My Time Made Easy
- My Time To Color Challenge
- My Time to Create Challenge
- My Timeless Template Challenge
- My Timeless Templates
- Mytime Mail
- MYTIME MOVIE/VIDEOs
- Papertrey Newsletter
- Pink Cat Studio
- Pretty Palette Challenge
- Pretty Patterns Sketch
- Product Opinions and Must haves
- Recipe's
- Saturday Sketch
- Smilebox Creations
- Stampavie
- Tutorials
- Uncategorized
- videos
Most Popular
- Create your own Onesie Card Tutorial-and important NOTE! PLEASE READ (2529)
- Saturday Sketch-Boxed bag holder (2333)
- Going GREEN! Fancy Flower Flourish-Closure Video (1478)
- Fabulous Favorite - Giveaway! (1336)
- a Prayer Request (1232)
- QUICK-Easter Baskets from Nestabilities-PTI style-and blog challenge (1063)
- Teaser Sketch (999)
- February Release Giveway! (and a little peek) (996)
- Group Post and Rambling Rose Video Tutorial (985)
- GIVEAWAY! Who wants it all?! (895)
Recent Comments (RSS)
- 첫충사이트: 완전히 흥미로운 블로그 게시입니다. 저는
- sarah: Wow, Lauren, what a stunning
- hedie: خرید راهبند
- 야동: Love to read it,Waiting For
- 야동: This seller is in a
- 바카라사이트: 여기 처음 왔어요. 나는이 게시판을
- 야동티비: I was surfing the Internet
- 바카라사이트: 비슷한 주제에 대한 흥미로운 정보를
- 바카라사이트: "여기에 제공해 주신 귀중한 정보와
- 온라인홀덤: 유익한 웹 사이트를 게시하는 데
Copyright © 2007 - My Time, My Creations, My Stampendence - is proudly powered by WordPress
This blog has been Tweaked and Designed by Sara Williams