#1 Papertrey Ink Peek- In Bloom card set for Milk Made template
Jul 9, 2009Well today is the 10th!
That means I get to FINALLY give you a peek at a NEW! Stamp set from Papertrey Ink called In Bloom! It is over the top FABULOUS!! I love flower sets and this one is to DIE FOR! I was so excited when I saw it, and I think you will fall in complete LOVE with it too.
I used this NEW! In Bloom stamp set to create a FABULOUS gift! Of course that gift was made using one of my NEWEST My Timeless Templates: called Milk Made ©
I am seriously over the moon for the projects I have to share over the next few days! ALL of the My Timeless Templates © really do make your gift giving easier, more creative, affordable, and FUN!
NOTE! These items peeked will not be released until July 15th! Links are provided for those browsing in the future 😀
This template is just fabulous!
About Milk Made ©
I always love little containers! The traditional cardboard “Milk Carton” is included in the fun gift box idea! Many types of candy is packaged in the “milk carton” style boxes nowadays, but they are very unattractive! While I liked the idea, I didn’t like the packaging. So I designed my own! I loved the name “Milk Made”, since it was inspired by the traditional Milk carton! Now these little treat boxes are easier than ever! The Milk Made carton is perfect to present on its own. But, good things come in multiples, right?
Now, what could make it MORE fun, than my own little Milk Crate to carry them in?!
Included in this template you will also receive the template for the cutest “milk crate”. Complete with matching decorative layer.
You can make 2 “milk crates” and adhere them back to back! Then you have 4 milk cartons, all presented in an even more adorable Milk Crate!
Now seriously, who would have thought that a MILK carton could be MADE so cute?
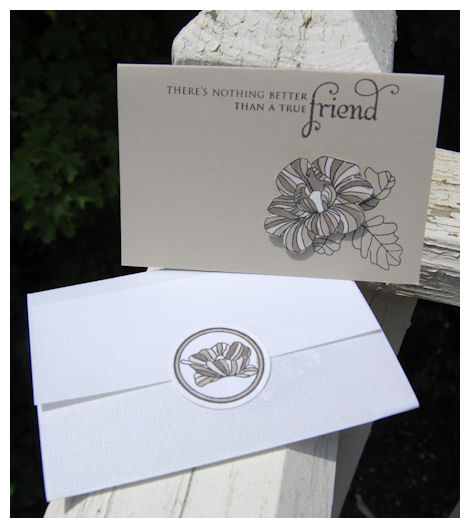
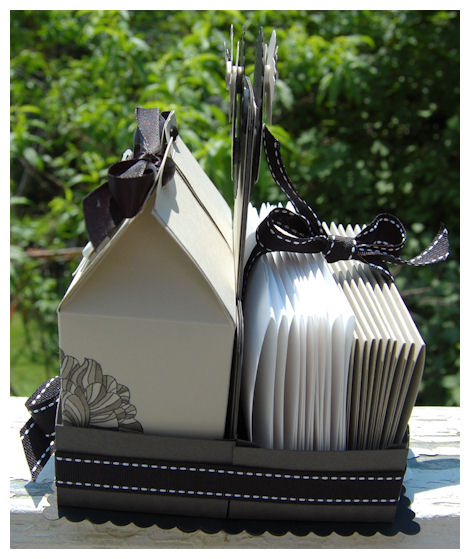
So today what you are going to see the the Milk Made © Carton (2 created), with the Milk Made © Crate(adhered back to back) to create a fabulous gift set of 2 Cartons (to fill with whatever you heart desires), a set of 10 custom designed cards, and 10 envelope slip-covers-that fit PERFECTLY into the Milk Made © Crate!
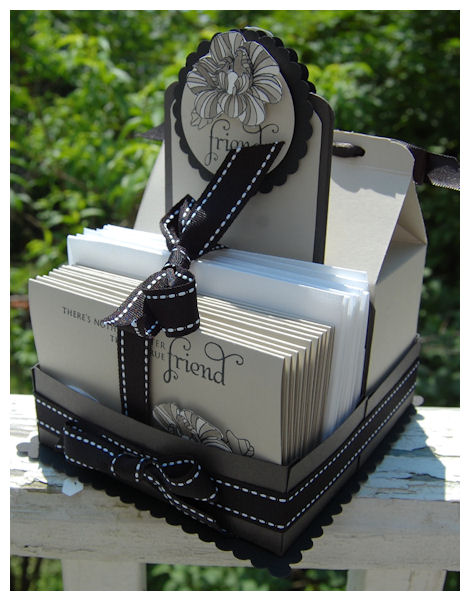
True Friend Crate Card Set

Here is my completed project!
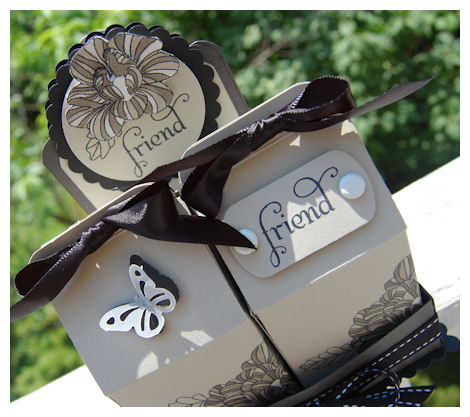
Here you can see the 2 Cartons in one side.
Then on the other side……I custom designed this card set to fit PERFECTLY into the Milk Made © My Timeless Template!
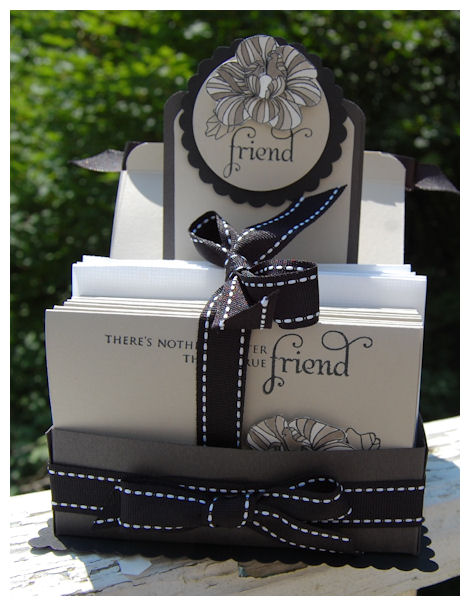
I went with a monochromatic color scheme for an easy, and elegant look, that just makes you say WOW!
The flowers/leaves are truly stunning, so I wanted to make them POP!
My colors are : Soft Stone, Sahara Sand (From SU!), Smokey Shadow, and True Black-with a small pop of white!
Now let me share the HOW TO!
Set of 10 Cards and Vellum Slip-cover envelopes/label tabs
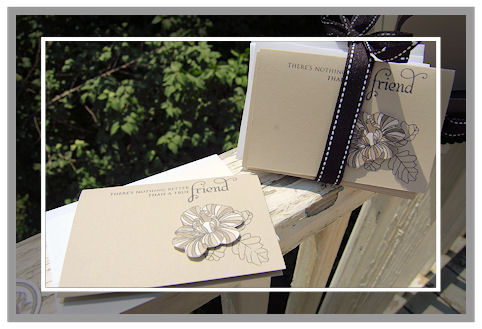
To create the note cards that fit into Milk Made ©
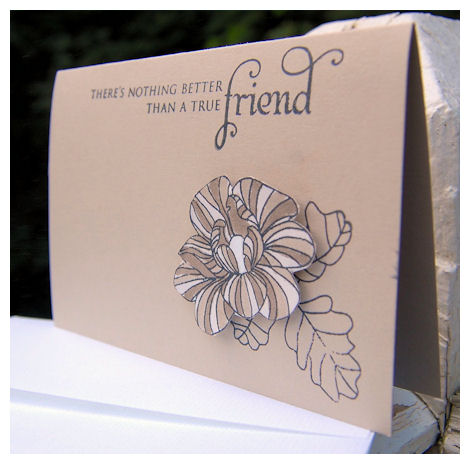
Finished Card size 3 X 4 1/2
Cut 5 sheets of cardstock to 6 X 9
Along 6 inch side -score at 3 inches
Along 9 inch side – cut in half at 4 1/2 to get your 2 pre-scored cards!
NOTE: You will then have a set of 10 cards
Stamping:
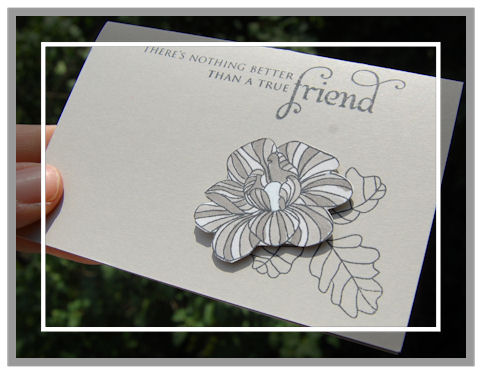
Stamp Flower image onto Soft Stone card-stock in black ink
NOTE: Stamp as many as you will want to create-for this exact project 14
10 for the cards, 2 for the Milk Made © centerpiece images, then 2 more to layer on a dimensional center for the main images
Color images with Copic Markers. I used the T4 and T6 colors.
Color flower center with white gel pen.
NOTE: Since I stamped it on the Stone color I didn’t have to use another marker.
Cut out images, and apply dimensionals.
Simply stamp leaf image, in black ink into lower right corner of cards.
Stamp sentiment at top.
Layer on 3D flower
DONE!
Vellum Slip-Cover Envelope & Label Tags
Simple Slip-Cover Envelope
You will need 5 sheets of Lined vellum cardstock.
Cut the 5 pieces of lined vellum cardstock to 8 1/2 X 9 1/2
Along the 8 1/2 inch side-Score at 3, then 6 1/2.
Cut along the 9 1/2 inch side, in the middle at 4 3/4.
NOTE: This gives you 2 envelope slip covers per piece of cardstock.
Fold on score lines.
Now you will have 10 envelope slip-covers!
Labels
Stamp circle from Borders & Corners Circle set, in black ink.
Stamp smallest flower into center.
Color with markers listed above.
Punch out with 1 3/8 circle punch!
Tie card/slip cover envelope set with a pretty black Saddle Stitched Ribbon!
Done ![]()

Now it fits all nicely into the Milk Made © Crate template!
Now on the other side we have 2 of the Milk Made © Cartons
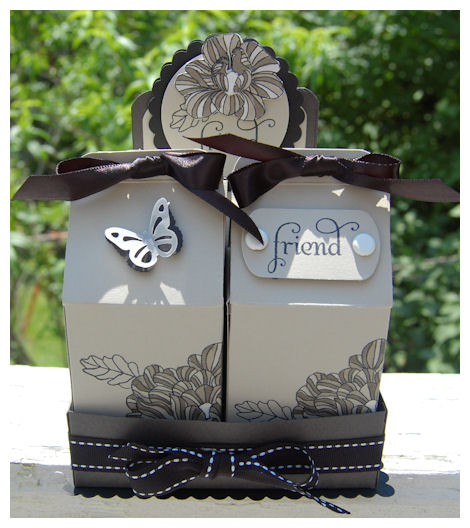
You can put the label stickers you made in here, along with stamps, address labels, paper clips, buttons, ribbon….. whatever!!
They are a great size, so the sky is the limit!

Here is one carton out.
You can see the pretty curves that back panel the Crate has, complete with decorative panel!
Carton Duo

I printed the Milk Made ©Cartons onto the Soft Stone cardstock.

I stamped my In Bloom image, onto the corner of template prior to assembly.
The flowers are SO easy and FUN to color! Obviously I had a BLAST making this 😀
I used the largest flower in the set, then colored the image just like the other flowers, only direct ON the template.
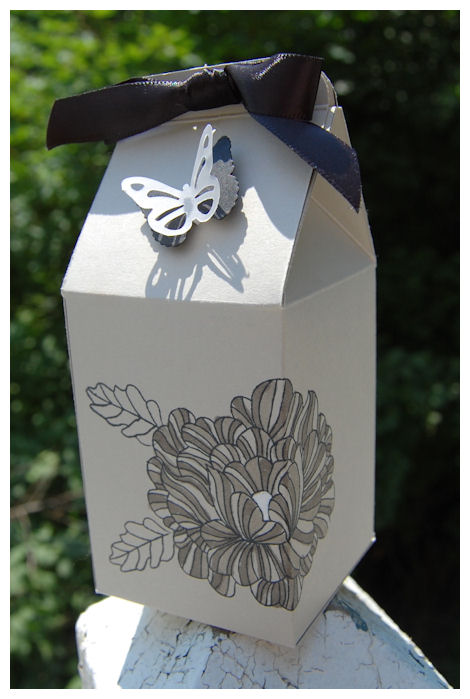
I then assembled the template, as directed.
They both look so pretty in here.
Can’t you see this sitting on desks all across the country?! I know I can 😀
This is the side view of the 2 Milk Made © Crates together
Milk Made Crate:
My Milk Made ©Crate was printed (2 X’s) onto Smokey Shadow Card-stock, then assembled.
Both Crates were adhered back to back!
They have a very prety rounded style/design on the back panel.
I just created the 2 base templates, and adhered them together.
I then tied around my ribbon.
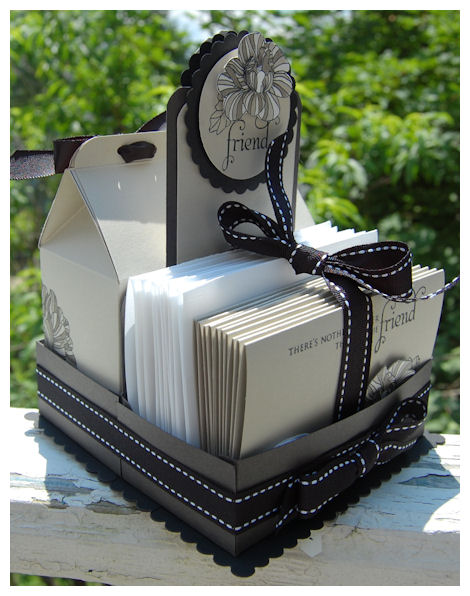
I created a scallop bottom for another pretty detail for my carton, and to continue the Sahara, Stone, Smokey Shadow and Black color combination.
I also made the same center piece for both sides, of the top of my carrier! It’s ALL about the details, and ALL sides looking clean, and professional!
Center piece is stamped/colored/cut. I also added an additional center layer for additional POP!
I think it looks so elegant!
SUPPLIES:
My Timeless Template: Milk Made ©
Stamps: NEW! In Bloom, Borders & Corners Circle
Cardstock: Smokey Shadow, Soft Stone, True Black, Lined Vellum, Adhesive Labels
other: Sahara Sand
Ink: True Black
Copic Markers: T4, T6
Ribbon: Saddle Stitch Grosgrain and Satin in True Black
Nestabilities-Tall/Long Rectangle (largest) die cut X3 for scalloped bottom on template base 😀
Punches:2 inch circle, Mega (pink)Scallop by Marvy, Key Tag punch, X2 butterfly punches by Martha Stewart
White brads
So now comes the question I’m dying to know the answer to-
What do you think?! Do you like it?!
I HOPE so! I really can’t wait to share more with you!
Let’s not forget I have ANOTHER template to share too!! But that has to wait for now 😀
In the meantime check out Catherine at The Dancing Pear, this month’s Template Guesat Designer!!
Nichole’s blog(I know you already know this! LOL!), Dawn and Lisa, also have stamp sets this month-So check it out.
That’s all for today! More to come tomorrow 😀

My Etsy

Who I Designed For
Blogroll
- Alicia
- Alli Miles
- Ally Blankenship
- Amber
- Andi @ crafts on a whim
- Angel R
- Angie Z
- Anne Kranitz
- Becky O
- Bee
- Beth Silaka
- Bethany Paull
- Beverly Nash
- Bobbie
- Cambria
- Cammie
- Card of the Week
- Card Positioning System (CPS)
- Cards for Cancer
- Catherine Doucette
- Charmaine
- Cheryl Sims
- Chriss Rollins
- Christina
- Christine Ewing
- Christine Wooden
- Colleen Schaan
- Craft Critique
- Craft Gossip
- Crystal
- Dawn Easton
- Emily Giovanni
- Geny
- Holly
- Igne Groot
- Inspirational Craft Blogs
- Irene
- Jami Sibley
- Jeanne Streiff
- Jen del Muro
- Jeni Bond
- JenMarie
- Jenn Balcer
- Jenn Diercks
- Jenn O
- Jennifer E
- Jennifer Mick
- Jennifer Pereda
- Jennifer-Sweet Treat
- Joanne Basile
- Jodi Collins
- Julia Stainton
- Julie Masse
- Karen
- Kathryn Berthiaume
- Katie Cotton
- Kelley Holland
- Kendra
- Kim Scholfield
- Kris’s Color Stripes! Get inspired here
- Kristen Dubosque
- Kristin Eberline
- Kristine
- Laura @ Sunshine Stamper
- Laura Turnmire
- Laurie Schmidlin
- Lesa Rapp
- Linda Duke
- Linda-LSN
- Lindsey Botkin
- Lisa (lakind scs)
- Lisa Kind
- Lori Craig
- Maggie
- Mara Campbell
- Maria
- Maria Levine
- Mary
- MaryJo
- Melanie M
- Monique Hansen
- Moxie Fab World
- Pam Imholz
- PaperCrafts Connection
- Peppers and Pollywogs Kids party site
- Rebecca Grohall
- Rita
- Robyn
- Rose Ann
- Sarah Vrolyk
- Sharon Harnist
- Sharon Johnson
- Sharon Rivera (a chemisrty with paper)
- Sherrie
- Sophia Landry
- Storage Units, Ink, & More Blog
- Sue Berker
- Susan (Rainy)
- Tangii Crane
- Tracy
- Tricia Traxler
- Trudee
- Velta
- VivLyn
- Zena
MTME Pretty Palette Color Team
MTME Pretty Patterns Sketch Team
My Time Made Easy TM LLC
Shop till you drop!
Lauren Meader
About Me
Copyrighted material
Subscribe To My Blog
Pages
- About me
- Alexa’s Story!
- My Crafty Corner!
- My Time Made Easy™ LLC
- Our Make A Wish Trip to Disney!
- Resume/Publication List
Calendar
Archives
- August 2013
- July 2013
- June 2013
- May 2013
- April 2013
- March 2013
- February 2013
- January 2013
- December 2012
- November 2012
- October 2012
- September 2012
- August 2012
- July 2012
- June 2012
- May 2012
- April 2012
- March 2012
- February 2012
- January 2012
- December 2011
- November 2011
- October 2011
- September 2011
- August 2011
- July 2011
- June 2011
- May 2011
- April 2011
- March 2011
- February 2011
- January 2011
- December 2010
- November 2010
- October 2010
- September 2010
- August 2010
- July 2010
- June 2010
- May 2010
- April 2010
- March 2010
- February 2010
- January 2010
- December 2009
- November 2009
- October 2009
- September 2009
- August 2009
- July 2009
- June 2009
- May 2009
- April 2009
- March 2009
- February 2009
- January 2009
- December 2008
- November 2008
- October 2008
- September 2008
- August 2008
- July 2008
- June 2008
- May 2008
- April 2008
- March 2008
- February 2008
- January 2008
- December 2007
- November 2007
- October 2007
- September 2007
- August 2007
- July 2007
- June 2007
- May 2007
- April 2007
- March 2007
- January 2007
Categories
- About Me
- All That Scraps
- blogger challenge
- camera/photo play
- Cards
- Contests
- family stuff
- FOR SALE
- Home decor/3-D items
- How to FAKE it!
- Introduction
- JUGS Challenge
- JustRite Stampers
- Lizzie Anne Designs
- My family stuff
- My Stamping Space
- My Time Made Easy
- My Time To Color Challenge
- My Time to Create Challenge
- My Timeless Template Challenge
- My Timeless Templates
- Mytime Mail
- MYTIME MOVIE/VIDEOs
- Papertrey Newsletter
- Pink Cat Studio
- Pretty Palette Challenge
- Pretty Patterns Sketch
- Product Opinions and Must haves
- Recipe's
- Saturday Sketch
- Smilebox Creations
- Stampavie
- Tutorials
- Uncategorized
- videos
Most Popular
- Create your own Onesie Card Tutorial-and important NOTE! PLEASE READ (2529)
- Saturday Sketch-Boxed bag holder (2333)
- Going GREEN! Fancy Flower Flourish-Closure Video (1478)
- Fabulous Favorite - Giveaway! (1336)
- a Prayer Request (1231)
- QUICK-Easter Baskets from Nestabilities-PTI style-and blog challenge (1063)
- Teaser Sketch (999)
- February Release Giveway! (and a little peek) (996)
- Group Post and Rambling Rose Video Tutorial (985)
- GIVEAWAY! Who wants it all?! (895)
Recent Comments (RSS)
- 야동: Love to read it,Waiting For
- 야동: This seller is in a
- 바카라사이트: 여기 처음 왔어요. 나는이 게시판을
- 야동티비: I was surfing the Internet
- 바카라사이트: 비슷한 주제에 대한 흥미로운 정보를
- 바카라사이트: "여기에 제공해 주신 귀중한 정보와
- 온라인홀덤: 유익한 웹 사이트를 게시하는 데
- 홀덤나라: 나는 당신의 블로그를 정말 좋아합니다.
- lisa: Technology, too, has left an
- 주소모음: 흠 !! 이 블로그는 정말
Copyright © 2007 - My Time, My Creations, My Stampendence - is proudly powered by WordPress
This blog has been Tweaked and Designed by Sara Williams
70 Responses for "#1 Papertrey Ink Peek- In Bloom card set for Milk Made template"
…falling off my chair…
Lauren – I say this all the time but you have out done yourself… again! This is just absolutely, positively GORGEOUS!
Your templates are just out of this world! ♥ Congratulations on another fabulous release of your templates!
Hugs,
Renee
oh my goodness. i am in complete awe of your great crafty talents! this is INCREDIBLE!!! haha, like it, i adore it! absolutely fantastic job 😀
Simply WOW, Stunning, beautiful, gorgeous!!! You’re AMAZINGLY creative!!! Another great template!
Thanks for the inspiration!
—Jacqui
I absotively LOVE it! You amaze me….I am speechless!
I completely agree with everyone who has already commented! This is AMAZING! How fun!!!
Oh my gosh gorgeous!
Too cool! Another winner! Thanks for your creative brilliance, Lauren!
Two Thumbs UP ;0)
Ok, first, let me pull my jaw off of the floor. How in the world do you come up with all of these fabulous templates my friend? Wow!!! Ken says you could fill up those milk cartons with jelly beans for presents too. Oh my goodness, the cards you made to go with them are just fabulous as well.
Just amazing!
How you continue to come up with such fabulous designs and then still take even those to the next level just baffles me! Looks so classy!!!
Wow, you did an amazing job. So pretty.
absolutely stunning as always Lauren!!
AMAZING is the word….love it!
Oh this is beautiful. I love your templates, I can’t wait to get one.
Beautiful, elegant, AMAZING!!!!!!!!!!!!!!!
You’ve done it again. Another beautiful project! I’m in awe of your ability to design such incredible templates each month.
I do like it! I immediately thought of this template for the halloween treats I make for the neighbor kids!
So fun!!!!!!!!!!!! (and you’ve sold me on the stamp set too!)
Oh! I love it!! Thanks for letting me play along this month, I had a blast!! And this IS a great template!
Love your new template and I like the color combination too!
That is just Beautiful! Love it.
oH MY! You are out of control crazy awesome!! This rocks!
Love it!!! Another must have. I love how you created this set in a beautiful soft way. The stamps are gorgeous too. This is a fun, fun way to give a gift. Off topic: I used a template of yours in a project that I created for a report on Craft Critique. I would love it if you would check it out!!
xoxo, Christine
Absolutely gorgeous. I love all of the details. The colours are great, and the colouring must have been time consuming, but it is amazing. I absolutely love this new template.
Over the Moon and back again! SO FUN! Love the Milk Made containers and can see them as wonderful additions to baby showers or children’s treat days as school! THANKS for yet another wonderful template filled with possibilities….and oh my goodnesses I LOVE those flowers in mono-color! eh gah. So much for the budget this month.
Love this new template. There are so many possibilities.
Lauren, this is simply ????? Actually, words CANNOT express how awesome this project is. I haven’t bought any of your templates before, not because they’re not super fantastic but because I’m intimidated and feel like I won’t be able to make them and definitely not be able to make something as stunning as you make.
Anyway, I think this month is going to be the month that I get out of my comfort zone. I LOVE this template and what you’ve done with it. Thanks so much for sharing this.
Oh, Lauren….Please understand my grandfather owned a dairy farm so….the milk template hits close to home! Love it I would love to make it with the colors of my Grandpa’s milk bottle tops…red, white & blue. Excellent design
Wow! Could I really do this?
I CANNOT wait until this template is released. Lauren, you are so very talented. Not many people can design in dimension the way you do. Congrats on another great project!
SO COOL!! I love the classic colors you used, too. I think I’m already going to get myself in trouble this release!
***THUD***
You just TOTALLY amaze me.
So pretty and elegant! That flower set is a definite must, and the templates always are! You can’t beat the price or all the ideas they come with! Thanks so much Lauren!! :o)
Beautiful project!!!!
I love this! The milk crate is such a cute idea! I can hardly wait to get my hands on this template.
This is fabulous Lauren!! Love it!
This is just wonderful!!! I love it! I am such a fan of your templates. I love creating boxes and such (have created a few of my own), but I don’t know how to create a template, so my boxes are simple score lines. Anyway, I am wondering what size the milk carton ends up being. Your guest designer had cookies in hers so I am assuming it’s at least a 3″ wide base?
Can’t wait to see your other template!!
~Lacey
Ohhhhhhh. I am about to FAINT. This is THE most stunning template yet. I am in LOVE!!!!!!
I love all of your templates, but this, I think this is the best one so far. I can’t wait to be able to purchase and make this.
Love it! Love the colors, love the style, love the flowers, love the ribbon, love it all! Feel free to send it to me when you’re done with it! I don’t want to make my own; I want this exact one! Lol
Oh my gosh Lauren, this is gorgeous. I cannot wait to get my hands on the template. I know the perfect person to make this for and I am excited to start! Thank you for inspiration!
That is so cool Lauren! Can’t wait to give it a try myself. Thank you!
Absolutely adorable! What a lucky friend to get such a fun gift that is more about the wrapping than the stuff inside!
oooooh…so Elegant!!!
Beautifully done Lauren!!
TFS
Absolutely gorgeous. What a wonderful gift this would be.
i absolutely love everything about it – the colors are nice and neutral but the gorgeous flower adds a nice little flair – you are amazing!
Um… how ’bout WOW!
Diane
I think you’ve outdone yourself this time. These are just spectacular!
Oh my! You’ve done an amazing job! What a gorgeous set!! I just can’t stop ooohhhhing and aaaawwwing over it. You are a very talented lady and I’m glad I can copy you. And I’m glad you sell your plans. And I’m glad you have a blog with so many amazing ideas! Thank you, thank you!
Have wanted to know how to make a milk carton for place settings at showers/birthdays and here you’ve done it! Thank you so much, can’t wait for the 15th!
Stunning Lauren, absolutely stunning!
Many Blessings,
M.
Lauren you have a real gift. Your ideas are spectacular. Thank you so much for sharing this gift with us.
Lauren – congratulations on yet another stunner….will definitely be downloading this little gem.
This is just gorgeous Lauren! You always seem to choose the right colors but the execution of this is flawless.
This is beautiful!
Beautiful! I already have Inking Idaho’s milk carton tutorial, so am going to incorporate this idea of stationery with the pattern I already have.
Lauren, this is over the moon gorgeous.
Oh. Oh. Oh…oh…oh!!! Lauren, this project is stunning and I love the templates. Yep, I’ll definitely be adding these to my “Lauren’s templates I MUST have” list!!! 🙂
I love all of your templates, but this is by far my favorite. You have outdone yourself. This project is just stunning. What a beautifully gorgeous set you have put together.
I’m in awe of your talent.
Each month you surprise me more and more with your talent. This one is absolutely beautiful!
WOW LAUREN!!
Wow–actually wow to the nth power!!!! This is a fabulous project. What impressed me most was how lovely the monochromatic theme was. I am just so impressed–hope you don’t mind if I use some of your color ideas. Thanks so much.
I LOVE this set! For me, the only thing that would make it better would be to add a bit of red to it. :0)
Swedie
This is beautiful!!!
simply awesome…is this on etsy yet?? LOL
MUST HAVE…must give to all my gal pals!
So fun! I wonder if I could fit a jar of jam in this carton.
This goes without saying, You are awesome!
Thanks for loving paper so much and sharing with us!
Have a great Sunday!
Ooohhh, another Timeless Template & stamp set I have to get – whoohooo, can’t wait!
Hi Lauren
I just had to take a moment to thank you for some really great ideas.
I plan to use your Milk Made templates to capture all the cute little things my kids say, which an idea you had a week or so ago.
I just think this will be the perfect little combo for my 2 boys – 2 milk made templates – bundled together so it is on display so we can be sure to write down those quirky things anytime it happens.
I’ll also plan on gifting this to some of my friends.=A0 I just know they will love it. Thanks so much.
Annie
I love this milk carton template & what you have created with it. Great work of inspiration! You are definitely an enabler! TFS 🙂 Mona
Love it! When you say “template” does that mean that It is cut and assembled by hand? Or is this a cricut type of project that is cut on Cricut?
Leave a reply