2nd NEW! Release Template Peek
Apr 11, 2009OK I know you have all been chomping at the bit here for the next peek at the 2nd NEW! Release from My Timeless Templates © from Papertrey Ink, which will become available with the next release on the 15th! WAHOO!!
First, let me say Happy Easter to everyone! I so enjoy this time of year. I am so happy because we are having my mom over for the day and some dinner. She won’t have to cook a thing. Just relax. She is usually the one always running on the holidays. We are also celebrating her birthday today too (it was the 8th). Plus I get to hoard my niece Gabriella who is getting SOOOOOO big. The kids are obviously excited for the day too, since my mom and the baby are coming 😀
We are going to have a fun egg hunt in the yard, and just a day of fun and family. I hope you have a nice day too.
OK, now let me get this done so I can do up their Easter Baskets! Its like SO late here, and Im already exhausted.
Sooooooo…………………the next template is called “From the Desk of“.
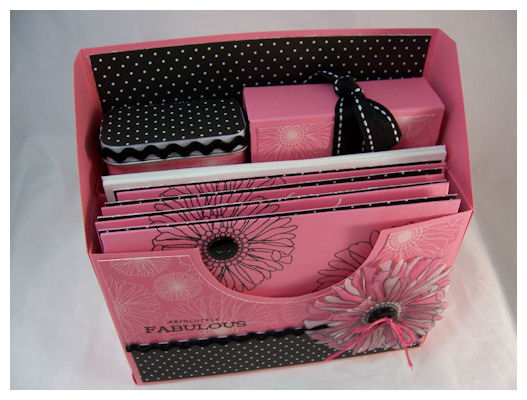
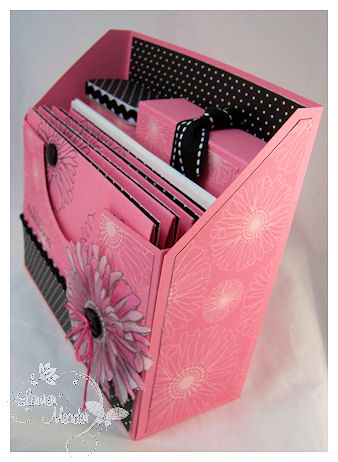
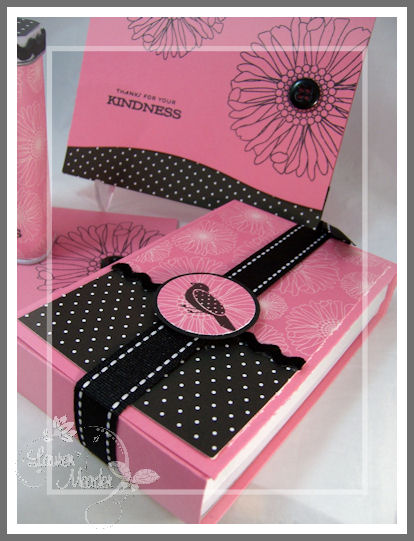
Crazy for Daisy Gift set
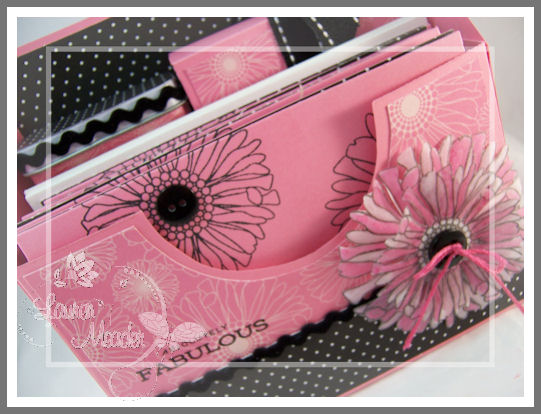
This is a FABULOUS template, that YES! Sits out on a desk!
The idea of the name was because I made this box for my friend Robyn (I’ll share that later). I personalized it “From the desk of” then added her name. My thought was HOW cool to make this set for everyone?! AND make it personal, hence the name.
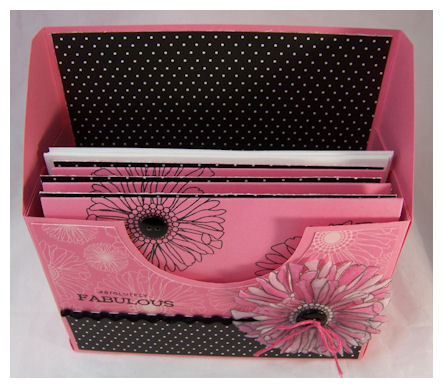
You can fill it with cards, stationery, organize your supplies, and as you will SOON see, SO MUCH MORE (as always).
Are you able to see I was on a serious “desk” gift set kick ?
I don’t know, I just LOVE giving and receiving great cards and gift sets. I love when things are packaged all pretty. It just speaks volumes to the thought and time you put into these gifts. Especially when you take the time to MAKE cards of other items, they deserve to be represented properly!!
OK so with this $5 template purchase- you get the PRINTABLE template for the base, as well as the 2 angle cut decorative side panels, and the decorative front panel layer as well! So no fussing with the perfect decorative layers!!! You also get the option of including a center divider panel for the inside of the template. Let’s not forget the EXCLUSIVE Idea Catalog-with 5 projects, that include photos, step by step instructions, and a complete supply list-to make gift ideas even easier 😀
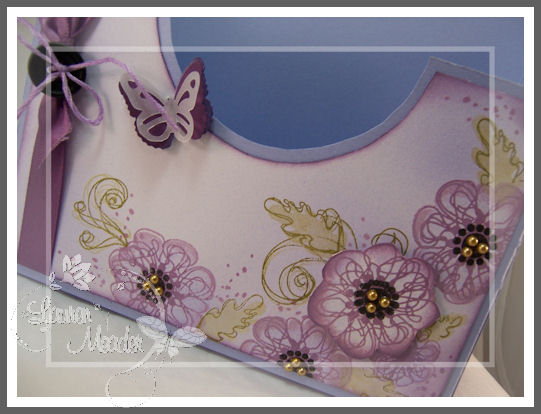
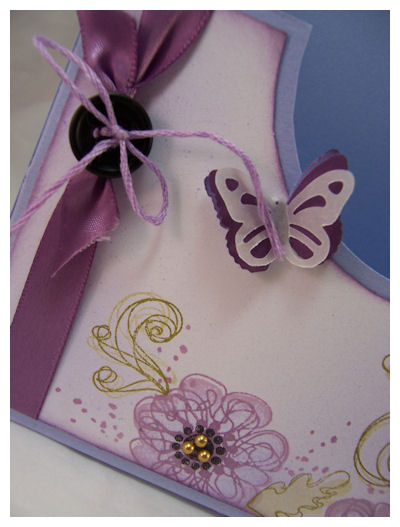
So lets see the SAMPLE!!
Who wouldn’t FREAK if you presented this to them?
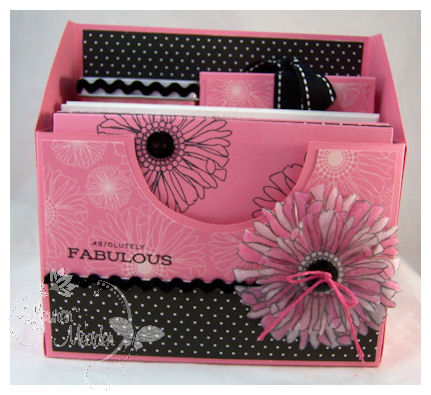
This is the photo of the front view.
Here is the top view
Now I will show you the side panels
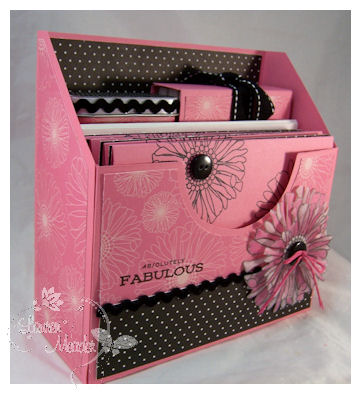
This is the other side.
Here is the set with the card sample out
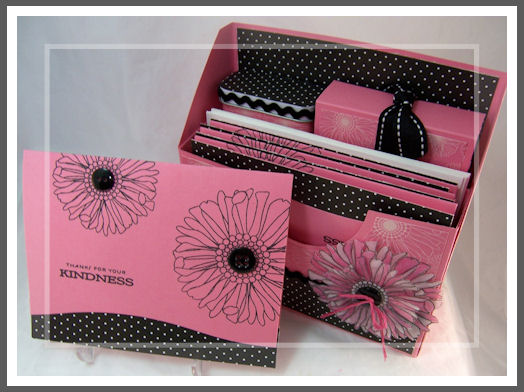
Now this desk set will easily fit your A2 size cards, and envelopes, but also, so much more 😀

This is the collection of items featured in the desk set I made. (only 2 cards featured in photo).
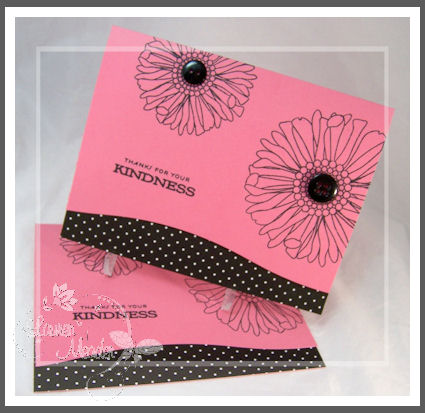
In this set I included 8 handmade cards to match-with the envelopes as well.
I love the card design. Clean and simple-yet nicely detailed.
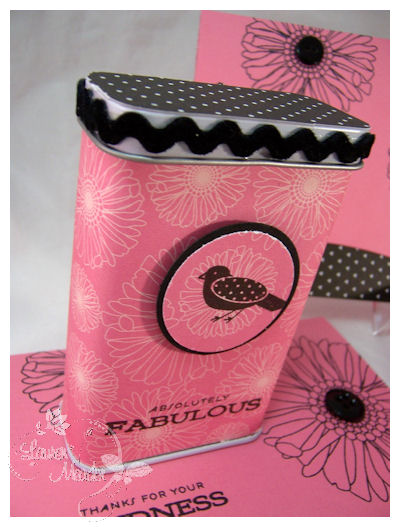
I altered a Band-Aid tin (for stamps to mail the cards or little return address labels!)
In the box I cut down a Square trendy tube so make the little tin raise up higher
I covered 3 little white notepads, so you can keep notes, or jot down addresses or events!
I think this is so pretty.
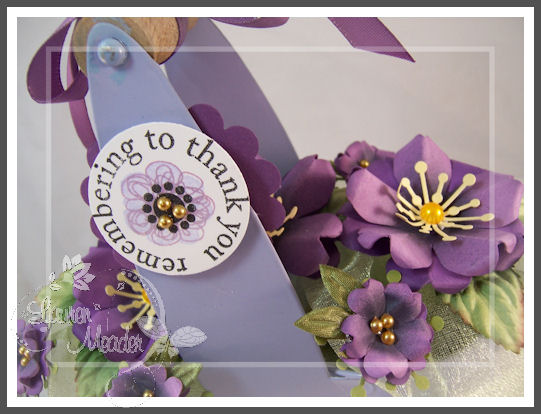
Here is the flower detail on the box
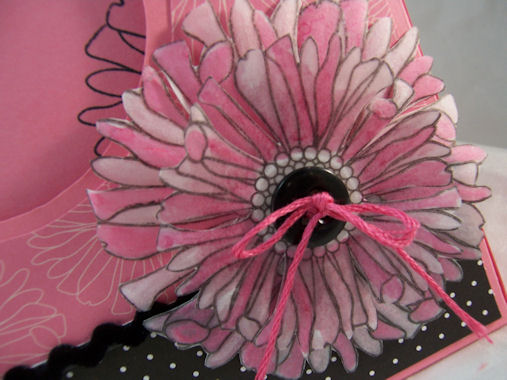
I stamped it on vellum cardstock, dry embossed from the back, then colored with varying shades of Copic markers.
I then layered the 2 flowers, and added a button center! I love this box.
Now this is a photo with the band aid tin and notebook out.
Supplies:
Stamps: Friends Till the end , Everyday Classics (unavailable for purchase-Anniversary set)
Cardstock: Hibiscus Burst, Vellum cardstock
Patterned Paper:2008 Bitty Dots, Friends til the end
Ink: Black
Buttons in true black
Trendy Tube (not shown)
Copic markers
circle punches
May Arts velvet ric rac ribbon
Band Aid tin
There is the option of adding a divider panel in the center, as I did use for this project.
So……………what do you think?
Do you like it? LOVE it? Not sure if you NEED it?
Well, then lets do another project!
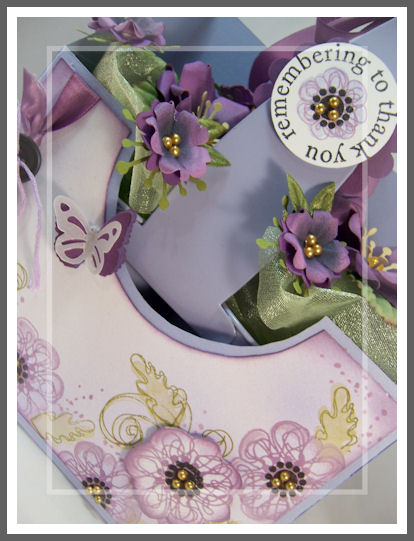
This one used JUST the template base as a gift box.

Now I think THIS alone is FABULOUS.
That is what is SOOOOO great about the templates. The IDEA of WHAT kind of gift presentation is done for you. That is the hardest part. All YOU have to do is decorate it, in your own style. Personalized gifts, every time. IN MINUTES!!
Anyone who has bought a template Im certain, can say they were amazed at how fast and easy these are to put together. Its made many ONLY card makers GIFT makers! From little kids to beginner stampers, to seasoned paper crafters. You have not idea how much hearing stuff like that means to me. It means MY DREAM of helping everyone be able to make more affordable gifts, has become a reality!
Now looking at this in a GIFT BOX way, I’m sure your brain gets FLOODED with ideas. If not, no worries! Over the enxt few days I will share MANY ideas for this template that is sure to spark SOMETHING that suits your own creative ventures in gift giving.
Here is the detail photo
I love the cut out flowers. I airbrushed the originally white panel, so soften it, and layer onto my Amethyst box base.
Having the decorative cut out templates makes what would be the hard work, easy. No messing up and cutting 6 pieces to make it all perfect! I already did that for you! LOL!
Now what to put IN the box?!
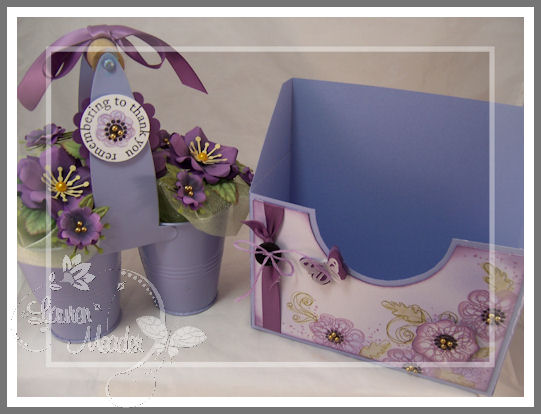
How about a dual planter, with paper flowers!
I got this mini plater at the Christmas Tree Shop! I knew I wouldn’t DIRTY it up with REAL flowers that I could kill! LOL! So I make a paper bouquet, based on a seed packet of flowers I purchased *just* for flower inspiration!
Here is the basket

I have to say I jumped up and down when this was completed.
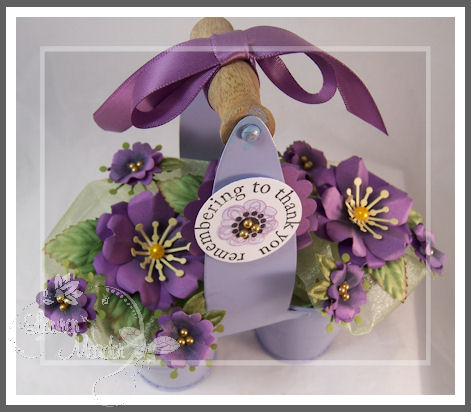
How much more pretty can paper flowers be? I mean REALLY!
What a great MAIL-ABLE, gift! No wilting, no watering.
Now you may not believe that it actually FITS in the box!
But, it does, I swear!

See!
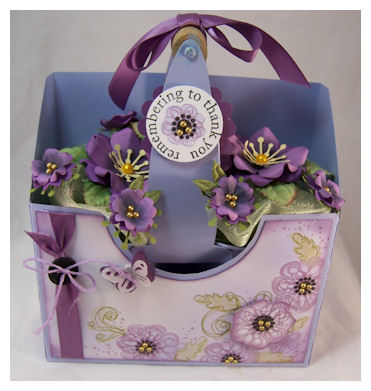
Its just so pretty in here
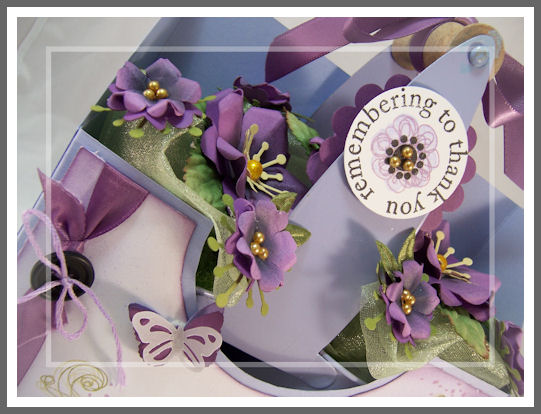
And a side view so you see its not SQUISHED in there. It fits perfectly.

That hardest part to remember is to NOT pick up the handle! To carry the box base. If you pick up the handle then the flower planter, obviously comes out.
Supplies:
Stamps: Remember
Cardstock: Amethyst (non-PTI) White, Plum Pudding
Ink:True Black, amethyst, plum pudding, lavendar moon
Ribbon: Plum Pudding Satin, leaf couture ribbon
Buttons in true black
Copic markers/air gun
Adhesive pearls
Martha Stewart Butterfly punch, scallop circle punch, circle punch
planter
various punches
So there you have it! My first peeks of “From the Desk of“! One being a desk set, and the other SO NOT a desk set, but rather a gift box. A very pretty gift box at that.
The ideas for this one are ENDLESS!
Add ribbon handles, punch a handle in the back-put them together…………….OOPS! I gave away another peek idea!
More on that tomorrow 😀 and many more ideas to follow.
Now you know WHY I’m so insanely busy 😀
So PLEASE share your thoughts on this here! I love to hear what you think. Plus I busted my butt on these samples, so its nice to know if you like them 😀 I think we all like that validation at times. After the loss of mojo I had post surgery it was hard getting back into it. I’m actually still struggling a bit to get caught up, but it will happen………….. eventually!
In the meantime, check out Kelly’s blog for her peek at this template ![]()
Also check in on Nichole, Dawn , Heather and Lisa,as they are all sharing samples too!
Enjoy the holiday.
Till tomorrow…..

My Etsy

Who I Designed For
Blogroll
- Alicia
- Alli Miles
- Ally Blankenship
- Amber
- Andi @ crafts on a whim
- Angel R
- Angie Z
- Anne Kranitz
- Becky O
- Bee
- Beth Silaka
- Bethany Paull
- Beverly Nash
- Bobbie
- Cambria
- Cammie
- Card of the Week
- Card Positioning System (CPS)
- Cards for Cancer
- Catherine Doucette
- Charmaine
- Cheryl Sims
- Chriss Rollins
- Christina
- Christine Ewing
- Christine Wooden
- Colleen Schaan
- Craft Critique
- Craft Gossip
- Crystal
- Dawn Easton
- Emily Giovanni
- Geny
- Holly
- Igne Groot
- Inspirational Craft Blogs
- Irene
- Jami Sibley
- Jeanne Streiff
- Jen del Muro
- Jeni Bond
- JenMarie
- Jenn Balcer
- Jenn Diercks
- Jenn O
- Jennifer E
- Jennifer Mick
- Jennifer Pereda
- Jennifer-Sweet Treat
- Joanne Basile
- Jodi Collins
- Julia Stainton
- Julie Masse
- Karen
- Kathryn Berthiaume
- Katie Cotton
- Kelley Holland
- Kendra
- Kim Scholfield
- Kris’s Color Stripes! Get inspired here
- Kristen Dubosque
- Kristin Eberline
- Kristine
- Laura @ Sunshine Stamper
- Laura Turnmire
- Laurie Schmidlin
- Lesa Rapp
- Linda Duke
- Linda-LSN
- Lindsey Botkin
- Lisa (lakind scs)
- Lisa Kind
- Lori Craig
- Maggie
- Mara Campbell
- Maria
- Maria Levine
- Mary
- MaryJo
- Melanie M
- Monique Hansen
- Moxie Fab World
- Pam Imholz
- PaperCrafts Connection
- Peppers and Pollywogs Kids party site
- Rebecca Grohall
- Rita
- Robyn
- Rose Ann
- Sarah Vrolyk
- Sharon Harnist
- Sharon Johnson
- Sharon Rivera (a chemisrty with paper)
- Sherrie
- Sophia Landry
- Storage Units, Ink, & More Blog
- Sue Berker
- Susan (Rainy)
- Tangii Crane
- Tracy
- Tricia Traxler
- Trudee
- Velta
- VivLyn
- Zena
MTME Pretty Palette Color Team
MTME Pretty Patterns Sketch Team
My Time Made Easy TM LLC
Shop till you drop!
Lauren Meader
About Me
Copyrighted material
Subscribe To My Blog
Pages
- About me
- Alexa’s Story!
- My Crafty Corner!
- My Time Made Easy™ LLC
- Our Make A Wish Trip to Disney!
- Resume/Publication List
Calendar
Archives
- August 2013
- July 2013
- June 2013
- May 2013
- April 2013
- March 2013
- February 2013
- January 2013
- December 2012
- November 2012
- October 2012
- September 2012
- August 2012
- July 2012
- June 2012
- May 2012
- April 2012
- March 2012
- February 2012
- January 2012
- December 2011
- November 2011
- October 2011
- September 2011
- August 2011
- July 2011
- June 2011
- May 2011
- April 2011
- March 2011
- February 2011
- January 2011
- December 2010
- November 2010
- October 2010
- September 2010
- August 2010
- July 2010
- June 2010
- May 2010
- April 2010
- March 2010
- February 2010
- January 2010
- December 2009
- November 2009
- October 2009
- September 2009
- August 2009
- July 2009
- June 2009
- May 2009
- April 2009
- March 2009
- February 2009
- January 2009
- December 2008
- November 2008
- October 2008
- September 2008
- August 2008
- July 2008
- June 2008
- May 2008
- April 2008
- March 2008
- February 2008
- January 2008
- December 2007
- November 2007
- October 2007
- September 2007
- August 2007
- July 2007
- June 2007
- May 2007
- April 2007
- March 2007
- January 2007
Categories
- About Me
- All That Scraps
- blogger challenge
- camera/photo play
- Cards
- Contests
- family stuff
- FOR SALE
- Home decor/3-D items
- How to FAKE it!
- Introduction
- JUGS Challenge
- JustRite Stampers
- Lizzie Anne Designs
- My family stuff
- My Stamping Space
- My Time Made Easy
- My Time To Color Challenge
- My Time to Create Challenge
- My Timeless Template Challenge
- My Timeless Templates
- Mytime Mail
- MYTIME MOVIE/VIDEOs
- Papertrey Newsletter
- Pink Cat Studio
- Pretty Palette Challenge
- Pretty Patterns Sketch
- Product Opinions and Must haves
- Recipe's
- Saturday Sketch
- Smilebox Creations
- Stampavie
- Tutorials
- Uncategorized
- videos
Most Popular
- Create your own Onesie Card Tutorial-and important NOTE! PLEASE READ (2529)
- Saturday Sketch-Boxed bag holder (2333)
- Going GREEN! Fancy Flower Flourish-Closure Video (1478)
- Fabulous Favorite - Giveaway! (1336)
- a Prayer Request (1231)
- QUICK-Easter Baskets from Nestabilities-PTI style-and blog challenge (1063)
- Teaser Sketch (999)
- February Release Giveway! (and a little peek) (996)
- Group Post and Rambling Rose Video Tutorial (985)
- GIVEAWAY! Who wants it all?! (895)
Recent Comments (RSS)
- 야동: Love to read it,Waiting For
- 야동: This seller is in a
- 바카라사이트: 여기 처음 왔어요. 나는이 게시판을
- 야동티비: I was surfing the Internet
- 바카라사이트: 비슷한 주제에 대한 흥미로운 정보를
- 바카라사이트: "여기에 제공해 주신 귀중한 정보와
- 온라인홀덤: 유익한 웹 사이트를 게시하는 데
- 홀덤나라: 나는 당신의 블로그를 정말 좋아합니다.
- lisa: Technology, too, has left an
- 주소모음: 흠 !! 이 블로그는 정말
Copyright © 2007 - My Time, My Creations, My Stampendence - is proudly powered by WordPress
This blog has been Tweaked and Designed by Sara Williams
124 Responses for "2nd NEW! Release Template Peek"
What a beautiful gift! I love your flower bouquets. Have a Happy Easter with your munchkins and enjoy the baby. Hugs Ann Lind
Oh I love all of your samples. I am watching the Ten Commandments. I watch it every easter. Easter basket is done.here. Have a Happy Easter . Susan
Hope you have a very blessed Easter!
Love these gorgeous projects!! Especially the second one, it just takes your breath away it’s so pretty!
This is an amazing template. Your samples would thrill any gift recipient. WAY TO GO!!!
Wow, Lauren! These are gorgeous projects! Can’t wait to try my hand at that template.
Lauren! These are two beyond incredible projects!! They are so gorgeous!!
Lauren, your projects are incredible…all I can say is WOW every time I check your blog…you just amaze me, and you make it to where I want to make paper projects like this. Whishing you and your family a very Happy Easter.
Lauren, you are incredibly, insanely talented! I am so amazed by each of your “productions” – thank you for sharing your creative ideas and your happy spirit with the rest of us. These ‘From the Desk Of’ projects are beautiful – simply gorgeous. I am so inspired and awed by your talent. I don’t know how you do it, but keep up the fantastic work!
Every month I think , Wow, this is the best template yet and then the next month you come out with a better one!! You are amazing and I love how you just make paper flowers whenever you have a project! The planter is just gorgeous. Wishing you a blessed Easter day with your family.
Love it? ♥ I WANT it! ♥
Oh my goodness – looking at these everyday would just make me smile! Heck, I’m almost ready to make it my wallpaper for my computer!
Hugs!!!
Happy Easter to you and the family Lauren!! Another fabulous template. Your samples are both AWESOME! Each for their own reasons…I love that stationary set – the colors, the whole thing…and then the planter?!?! GET OUT! Those flowers are incredible. Just love it.
Way to go girlie!
Lots of ideas for teacher gifts here!! Oh my goodness the flower planter…. So. Totally. Amazing!!! Those flowers are incredible. And your stamping on the gift box is fabulous too. I’m always blown away by your creativity when I see your projects. Happy Easter!
Lauren-
Thanks so much for sharing your wonderful creations with us! 🙂 I will definitely be getting this template also! 🙂 FUN!
How do you come up with all this amazing stuff? I wish my brain worked that way. LOVE this new template. I will definitely be making this on the 15th!
Lauren, you are incredible. Most people would slow down after surgery and you have pushed yourself and come up with such a winner of a template. Those paper flower are to die for. I work with a lady whose excuse for not doing something is always, “I just don’t have the time.” She even said that about putting on LIPSTICK!!!! She would think you are bionic to accomplish so much. You put us ALL to shame. Thank you for sharing and please, take care of yourself.
Happy Easter Bunny! I hope he brings you lots of chocolate – remember dark chocolate is GOOD for you – no guilt! 🙂 🙂 🙂 Have a wonderful holiday with your family. You’re a sweetheart to prepare dinner for your mom – it does seem like the moms (me in our family) usually prepare all the big family meals.
Love, love, love this new template. I think you have topped yourself this time. These two creative projects are insanely gorgeous! Can’t wait to see your other samples!
I love these boxes. They came out sooo nice. I did notice your matching purple nail polish! hehee Very nice!
Well your butt busting paid off! Both projects are just gorgeous. I have most of your templates and I’ll be getting this one too. You’re right: people love getting sets like this. I especially like your altered bandaid tin idea for labels or stamps.
Lauren this looks fabulous! I can’t wait to add it to my basket on the 15th. I couldn’t do any of these lovely packages without your templates. You truly have an amazing gift!
Actually, I really don’t know how you find the *time* to do all of these fabulous things. Each month I am amazed. I love your templates and the DT is so generous to include samples for inspiration. These are both very beautiful. Easter Blessings to you and your family, Lauren.
So Beautiful~ here’s all he validation that you need! love ya!
Honey – You bust your butt ALL the time! Fabulous, gorgeous, amazing samples! I am always in awe of what you come up with. And so thankful for your generosity in sharing it all with us. Blessings to you and your family,
Melissa
Wow! These are simply amazing! Both samples are absolutely beautiful! I especially like the planters. Those flowers remind me of violets, my favorite flowers! Thanks for sharing your talent with us mere mortals.
WOW!! Absolutely stunning. I love the pink and black colour combo. All of the projects are fabulous.
AMAZING!!!! I LOVE this new Timeless Template.
I have been looking for an elegant and simple gift for my Director and DD’s teacher and… BAM! there it is!!!
Beautiful application, wonderful design, abundant possibilities… you have out done yourself this time Lauren.
Thank you and I can’t wait to get my ‘Timeless Template’ on the 15th. Marilyn
Absolutely gorgeous! I love your samples. They are stunning and make beautiful gifts. Your creativity is inspiring.
Renee S.
OH my gosh-love this template!! So many ideas about gifts that I can handmake for secretaries day and look like it came from a high dollar fancy shop all because of your AWESOME templaes!!! Your AMAZING girlie!!
Happy Easter!!
Hope
Lauren you have created another must have template. I am flying to Texas next month for my sister’s 60th birthday. I would love to get off the plane and hand her your flower version of the new template. A video on how to make the flowers would be awesome. Your love for your work shows.
Your projects are fabulous! Thanks so much for encouraging PTI customers to purchase your templates; you have done another great job creating beautiful gifts.
It’s gorgeous! Definitely getting this one!
You are RIGHT! This could be one of your best!! I am LOVING this! And, that first set you made, the colors were fabulous! I am doing this for sure!! Thanks so much!
WOWOW! I think you just solved about 5 of my “gift giving” for those friends who have everything! These are gorgeous and perfect for home or office desk tops! Thanks so much for sharing your talent. Happy Easter to you and your family.
I don’t know how you continue to come up with these wonderful ideas each and every month. These are beautiful and once again I can’t wait until the 15th! Thanks again for sharing your wonderful creativity with us all.
Hope you and your family have a blessed Easter.
WOOOW really love everything you did..
Waiting for your new work 😉
God Bless you
What a wonderful talent you have and thanks for sharing it with us.
Hope you and your family have shared a Happy Easter together.
more awesome creations, so love that planter and the flowers are just gorgeous!!!
Wow Lauren! YOu have outdone yourself again! Simply gorgeous! Can’t wait until the 15th to buy these babies!!!!
Happy Easter to you and your gang!!
Diane
I am a huge PTI fan but haven’t tried your templates yet- being busy I keep thinking I won’t get the projects finished. But you’ve got me on this one and I will definitely purchase it to try. Your creativity, honesty, and excitement keep me reading your blog. Thank you for being you!
Lauren this has to be the best template yet!!!!!! I am going to use this to make stationary for a silent auction at the elementary school this Friday. Oh the 15th can’t get here fast enough!!!
Lauren,
Your template is great and your projects are beautiful. Who wouldn’t love receiving gifts like this. I can’t wait until the 15th. This will be the first item in my cart. Thanks for all of your hard work.
Wow Lauren – all I can say is this template looks fabulous and your projects are great. I think I will have to get this one to make end of year teacher gifts for my girls teachers. Each month your templates just keep getting better and better. Thanks for all you do and have a happy Easter with your family.
AMAZING!!!!! That planter is Spring to the nth degree. It is so fabulous, I just love it. I am on my way to Easter luncheon with family, but it makes me want to get my supplies ready for the 15th.
*THUD* Both of the projects are stunning! I must say that with having the house on the market and being mostly packed up – I haven’t tried your templates yet. HOWEVER – now that I am all settled in the new house, this just may be the one I start with.
Happy Easter to you and your family!
This set is precious… I especially like the lavendar set and paper flowers. I wish this idea had been around when my daughter was in school. Her sorority’s flower was African Violets and she would have loved to receive this as a gift.
Lauren, you are so creative and busy too. I don’t see how you do all that you do not to mention the role of wife and mother as well.. I so appreciate you and others that can do all of this….it’s a juggle, I know, I’ve been there. God Bless you!
Phenomenal! Just absolutely amazing, Lauren! Can’t wait to get my hands on your template. And you’ve just GOT to do a video on those flowers. Ever so pretty!
Hey Lauren! I love this ideas, they are cute and adorable. Happy Eater… and many blessings for you and your family
Oh my gosh! My head is spinning from all this fabulous creativity you bring with each template release! WHERE do you come up with these awesome ideas?! Girl, you are brilliant!
AMAZINGLY BEAUTIFUL! I am so in love with all of your templates, and I am so thankful for all of the inspiration you and the other DT members give each month! btw, Happy Easter to you and yours! :o)
Lauren…Your desk template is Great!!
The results….Your projects are Fabulous!!!
My eyes were delighted with the Pink/Black..
and also loved it as a planter gift set…
the flowers …so pretty 🙂
*May you and your family enjoy a wonderful day..
and Happy Easter to all!! God Bless!
I love this. Can’t wait to try one.
Lauren, these are simply fabulous! I like them both, but the purple gift holder is to die for!
I love these ideas Lauren! Can’t wait for the template to be released! Happy Easter!
Lauren, first of all Happy Easter to you and your family! Second, you are truely amazing! Another great template! I like making cards but I LOVE making boxes and other creations out of paper. Thank you for all your time, energy, ideas, and creations. You are such an inspiration to me. Thanks again!
THUD…the sound of my jaw hitting the desk. These are simply spectacular! Especially the purple flowers – gojus!!
Happy Easter to the whole family and enjoy the day!
Oh my! I’m in LOVE with your creations! Can’t figure out which is my fave though, they’re both gorgeous! Thanks for sharing!
Happy Easter from my family to yours!
Wow! You are so incredibly talented and creative. I now know what I’m giving as teacher gifts!!!! Thank you for all your hard work, and the inspiration!
Lauren, these are gorgeous samples! Your mojo is definitely back! Can’t wait to get my hands on this one!
LAUREN>.. oh my gosh.. LOVE this~ I LOVE all your templates.. you talent amazes and INSPIRES me daily!
so cant wait for the 15th!!!
Happy Easter!!!
What beautiful projects, Lauren! I always love to see what you’ve been creating. Enjoy your day with family.
Can you just like, come over to my house and make something so I can watch? 🙂 Happy Easter to you and your family! Great template!
Happy Easter! I love your templates. I think is one is my favorite, but then I thought the last release was my favorite.
Lauren, WOW, you have been busy! I absolutely love the From the Desk Of!!! Incredible detail on each of these projects. I can certainly see some wonderful gift ideas here. I love all of your templates and will add these new ones to my collection. It is so appreciated to have a template to just go to a project….saves me lots of time and I know that they go together with such ease.
absolutely adorable – not usually a purple/lavendar fan – but the little paper flower gift set is super cute….
love…love…love the daisy samples……..my favorite for sure….
Just amazing, Lauren – your idea for new templates are fabulous and your finished product is so professional looking and clever!
Wonderful projects, Lauren! I sure wish I had an ounce of your creativity! Since I don’t, I’ll have to settle for using yours as inspiration! Truly amazing.
Please, please, please share how you made the flowers…like what punches you used…maybe it could be the topic of one of your videos?? (hint, hint)
Happy Easter to you and your family!
Holy Cow this is amazing. I can’t wait to download this. This is so ME!
Those samples are just wonderful, amazing, and beautiful! WTG!!!
Lauren, this is an awesome template! Thank you for creating and sharing. Your samples are beautiful.
WOW! I am loving these projects! Those paper flowers are SO amazing! I love all the stamping and details that went into these two projects, they are so fabulous!
STUNNING! AWESOME STUFF!
Happy Easter!
YEAH !!!! Finally !!! I’m so pleased to see this Template is finally going ~public~ 🙂 {I had the huge thrill of seeing this creation before it’s release, and it’s beyond stunning!}
I adore all of it Lauren, and I know the rest of your *Peeps* will too. Another ingenious creation girl 😉
Love this template–so amazing! And your color selections are just fabulous. Don’t know how you kept coming up with these wonderful designs–you are truly amazing!!
Lovin the gift packaging for the flower pot version! How on earth did you make those flowers!?
OH MY GOODNESSES! While I love the new box I have to tell you I LOVE this “from the desk of” set! HOW AMAZING is this? I am always trying to think of new ways to box up card sets or gift sets…and now my mind is just racing with ideas as to how I could use this set! THANKS SO MUCH for your continued inspiration! Happy Easter!
Fantastic Ideas! And the colors you did them in are beautiful! You have another great template, Lauren.
Those project are so awesome!!! Happy Easter to you!
I dont know HOW you do it Lauren!LOL!! Fabulous creations!! Happy Easter to you and your family!
Lauren, what a fabulous job you have done for this month’s template. I love the desk set idea and will be using it as soon as it hits the PTI site. Both of your projects are beautiful.
OMG!!! Lauren I just love it. You amaze me. What you must have rolling around in your head< :}.. Keep the great templates coming I will be purchasing this one one the 15th. Great teacher gifts for end of the year.
Steph
Love the new template! What great examples too….The flower pot one is sooooo pretty. I can’t believe you did the flowers too! You just keep getting better and better. I hope you start feeling like that more and more too! The from the desk of example is gorgeous as well. Both winners!!
Hope you have enjoyed your day with family and had a blessed Easter!
Cynde
Lauren, both of these sets are amazing!!You continually surprise me with your fabulous ideas!
Happy Easter! I love the flower idea. Where exactly did you get the container or what is the dimensions so that I can go hunting for the container soon?
Thanks in advance for your help.
It’s a good life!
Terri E.
Lauren I really love your samples with this template. It is another fabulous creation from you. You are so amazing. I can’t wait to get this one
Darling projects Lauren! I really love the look of the vellum flower – beautiful!
Happy Easter Lauren!
There aren’t enough hours in the day for me to play with all of these wonderful templates! Love the new template and the new projects. Most people dread April 15th, but I’m counting down the days until then! :o)
Lauren, I always can’t wait to see your blogs, esp the new template ideas you have. Your ideas are wonderful and everything you have made are beautiful!! I will definitely be buying these templates and make these for myself first. Then I’ll make it for other people. I can’t wait for these releases!! I love those vellum flowers. what a marvelous idea!! Hope you had a lovely day with your family on Easter. Take some new pics of everyone, esp the growing Gabriella?
Lauren, I love this template! I wish I had had it last week when I was looking for something in which to put some thank you cards I made for my sister’s birthday. She’s having hip replacement surgery on Monday and I wanted to give her some hand made cards for her to use to thank those people who are doing nice things for her! I used your All Boxed Up template to package the cards I sent her. Maybe I’ll get this one too and send her another set!
LOVE it! And i already know how i’m gonna use it! 🙂
Wow Lauren, what a great template and the samples are just amazing
I’m not sure if I’ve seen your work before. Wow, I know I have missed a lot!
And you said your MOJO isn’t quite up to par? Oh, I am breathless after looking at the beautiful cards, flowers, and BOXES! I love them. All of them.
Not sure I could do them, but I’d like to give it a try!
SuzyQue in Texas
YOU’RE AMAZING!!! I don’t know how you come up with these ideas. Great work!
Well Lauren, if you want to know what we consumers think – I think g-e-n-i-u-s is spelled L-A-U-R-E-N!!! OMG, I should only hope to have an nth-degree of your creativity!!! Your templates & your projects leave me just stunned!!!
Absolutely awesome! Can’t wait till the 15th so I can snag this one!
Template boxes are just GORGEOUS! How could anyone not love and appreciate them! Thanks for the look-see!!!
LOVE the pink and black set. SUPER CUTE!
Your mojo is ridiculously amazing! If there is a such thing :O) OMG…I can’t get over some of this stuff you come up with…it’s beyond me. LOVE LOVE LOVE your samples. Soooo professional and pretty :O)
Lauren – this is so cool! I love it! The pink/black is so gorgeous and I love purple, so I liked your second one also.
I love the project ideas! I am really loving your paper flowers. Any chance you will do a tutorial on those? Thank you for sharing your wonderful ideas with us. I hope you and your family had a blessed Easter, Jeanne
How do you do it???!!!! I love this template and all your projects.
Great job Lauren.
Now you’ll have to do a tutorial on the paper flower bouquet. Pretty Please.
Janet
[…] local residents. Distribution CenterThe distribution Usefull Posts Christmas Tree Dog Treats…2nd NEW! Release Template Peek – My Time, My Creations, My Stampendence…Madrid’s Holiday Market and Christmas Tree Shopping – Notes from Madrid…Significance Of […]
Okay, I know I already commented on this project, but I was just purchasing some more templates and I decided to peruse your template gallery for inspiration on which templates to buy. This project seriously makes me gasp every time I see it. I love how delicate everything is, from the flowers to the layered butterfly. This is something I would gasp at if I were in a Hallmark store…and I would probably buy it! I think it’s my favorite so far…
[…] 2nd NEW! Release Template Peek – My Time, My Creations, My … reddit_url=’http://www.baby-parenting.com/baby/babyname/PeggySue’ reddit_title=’Baby name meaning and origin for PeggySue’ […]
[…] 2nd NEW! Release Template Peek – My Time, My Creations, My … […]
Nice article , thank you for sharing your article. I genuinely enjoyed it. I place a url to my website to right here so other group men and girls can research it.
oh, Great articl! I will keep this post.
Easily, the post is in reality the sweetest on this deserving topic. I concur with your conclusions and will eagerly look forward to your approaching updates.cheap Prada handbags
Thanks a lot for enjoying this beauty article with me. I am enjoy it very much! Looking forward to another great article. Good luck to the author! all the best!discount gucci bags
You made fantastic nice points here. I performed a search on the issue and discovered almost all peoples will agree with your blog. cheap prada handbags
Thanks for taking this opportunity to converse about this, I feel strongly about this and I enjoy learning about this subject.
I am extremely impressed thanks for sharing all information. It is a great post for the people to get the proper information.Prada handbags 2011
Thanks very much for this wonderful blog;this is the kind of thing that keeps me going through the day.The North Face Canada
i’m happy to see this post because i made of the best actress that i can be proud of it.cheap handbags outlet
Iam glad l came across this post, very educating. I will subscribe to your rss for future update.Ralph Lauren outlet
I like this concept. I visited your blog for the first time and just been your fan. Keep posting as I am gonna come to read it everyday.chaussure Nike Air Max
I like your information so much. It is something worth appreciating by us. discount uggs It is very kind thing to see your wonderful post! I’ll come back when I have time.that is very kind cheap oakleys of you to do this for us, thank you very much, you can have a look at the cheap and nice ugg boots cheap oakley sunglasses at this website.I thank you for your sharing represents Christian lonbout, we will continue to share the your resources the north face outlet expect your friends, more excellent article!
Christian Louboutin
If you want to find the most suitable shoes for yourself, the only way is trying. Christian Louboutin shoes can supply you all kinds of shoes. Like sneakers shoes, Christian Louboutin high heels and other styles shoes and so on. As long as you try to put on them, you always can find what you want to have.
80% off sale Discounts
Clean up the warehouse, discount promotions,
the latest 2011 super cheap high heeled shoes
http://www.highheels-outlets.com
cheap high heeled shoes
If you are a smart and fashionable woman, then you must have heard about Christian Louboutin pumps. Actually this brand has turn out to be the zenith choice when women think about getting a new pair of shoes. No matter you are attending a formal social gathering or going on for some kind of lunch, this Christian louboutin shoes can help you in turning out to be attention grabbing.
Its Pleasure to understand your blog.The above articles is pretty north face jackets on sale extraordinary, and I really enjoyed reading your blog and points that you expressed. I really like north face outlet to appear back over a typical basis,post a lot more within the topic.Thanks for sharing. Strange this post is totaly unrelated to what I was searching google for, but it was listed on the first page. I guess your doing something right if Google likes you enough to put you on the Cheap North Face jackets first page of a non related search. You certainly have some agreeable opinions and views. Your blog provides a fresh look at the subject. keep writing!!!
This is positively one of the most remarkable blogs I’ve seen. It’s so easy to tune out, but there is really some supreme material online, and I think your blog is one of the few!
Oakley Frogskin Sunglasses Tony Leung’s edition of” Ye Wen” and” a technology of Master – photo show” design possess a prepared pen A technology of master” introduced the routine for that simultaneous coverage of the Tony Leung Ye Wen photo edition of mentoring. images of Tony Leung dark gown, sitting in a very set of disciples. through the images reveal the time and ” Wing Chun clique of Hong Kong and his pictures” inscription, now that Ye Wen has experienced ups and downs, and taught in Hongkong opening. in contrast to the trailer boxing heavy foot hard, an irresistible force, once the ” Yip” reserved calm, master mojo four, allow us after once again to determine the movie” a technology of master” design possess a prepared pen, can place can receive.The marketplace inexpensive Cheap Oakley Frogskin Sunglasses is valued” a technology of master”North and south numerous cinemas management on” a technology of master products fixed” celebrate the brand new yr need to communicate their views.Beijing Xinyinglian chairman Liu Hongpeng said:” this routine is pretty appropriate,Oakley Frogskin Sunglasses Outlet, prior to the trailer has allow us see” a technology of master” wonderful, marketplace with this movie pretty a lot searching forward to. that is Wong Kar Wai to put together for any prolonged time the voluminous works, now the marketplace capability can be growing,” Oakley Frogskin Sunglasses Sale,a technology of master” arranged in the most suitable time, wish he can produce a home made motion picture box-office miracle
Aw, this has been an incredibly nice post. In concept I would like to put written in this way furthermore – spending time and real hard work to generate a excellent write-up
this thing is worth to read. we enjoy it.
Leave a reply