Archive for February 9th, 2009
#1-Meet the Moon’s-video
Feb 9, 2009 Author: mytime | Filed under: Home decor/3-D items, My Timeless Templates, MYTIME MOVIE/VIDEOs, Papertrey NewsletterMeet the Moon Family
OK I have the first peek at ourPapertrey Ink countdown AND My Timeless Templates ©
All I can say is I am just over the moon for today’s post!! I hope you will be too.
That is a HUGE hint 😀
The stamp set I am peeking today is from a new sentiment set called Handwritten Notes. It has handwritten sentiments from EACH design team member.
I am sharing one of MY contributions of the sentiment set –>”I’m over the moon”
If you read my blog you know I say this A LOT. I think it comes from my watching the movie “It’s a Wonderful Life” a million times with my mom, since I was a little girl. When Mary gives George the picture of him lassoing the moon for her. I loved that.
Anyway-its a cute set, that we all hope you will enjoy.
Now comes my project!!!
[veoh v17412221edFGthbs]
When I think of “moon’s” I also think OWLS! I don’t know why I just do.
Anyway, Amber came home from school the other day with a paper-bag owl project that was just the cutest thing ever!! I fell in love with it. (You will see the owl in the video :D) When looking at it I thought “How can I make my own version of this cute owl?”
Well, wouldn’t you know I was ALSO working on my newest My Timeless Template © peeks for this week when I “saw” it!! My Rounded Wrap Up! boxlet would be PERFECT! So I went to work.
Now this template will be releases on the 15th. It’s a super cute and versatile template.
If you are new to the templates you may want to watch THIS VIDEO. It takes you through the HOW TO on how the templates work.
Details about the TEMPLATE itself will be provided with tomorrows post. Today I want to focus on the step by step of this project.
Meet the Moon Family!
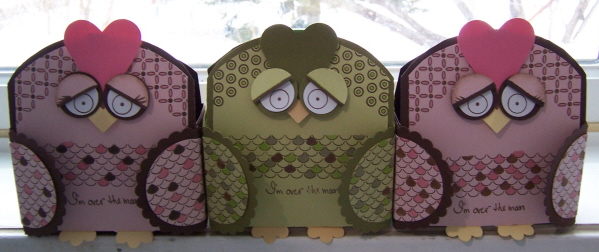
There is Owlette the “mommy”-named by Amber. Whootie-the “daddy” named by Alexa
and little baby Owlivia named by me ![]() (and Noah approved)
(and Noah approved)
Once upon a time there was a little pink owl named Owlette Branch. She was lonely and needed someone to love.
One moon lit night, in her favorite Oak tree, she met a stunning mate name Whootie Moon!
They shared some mice for dinner, and have been together ever since.
They were just “over the moon” for each-other!
They fell in love, and before you know it, one starlit night, then came Owlivia.
They are such a happy little family!
They bring smiles and treats where ever they go!
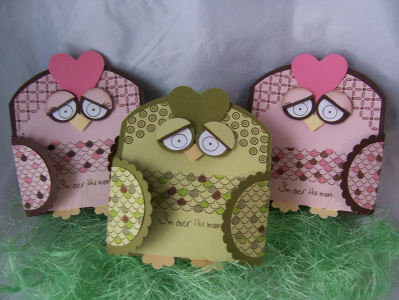
Now for some detail photos of Owlette Moon

Supplies
Rounded Wrap Up! © (available on the 15th)
Printed on dark chocolate, and copy paper (or back of sweet blush cardstock)
Stamps: Handwritten Notes, Border Basics: Retro (released on the 15h)
Cardstock: Sweet Blush, Berry Sorbet, Lemon Tart, Dark Chocolate
Ink-Dark Chocolate and copic markers
Photo of punched pieces needed
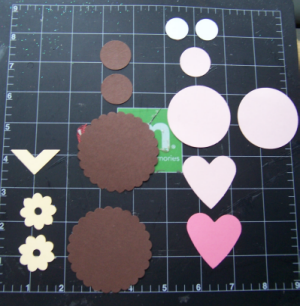
1- photo corner punch to create beak
2- little scallops or scallop flower to create the feet (here is a cute one)
3- 2 Giga scallop circlesfrom dark chocolate cardstock-for wings
4-2 sweet blush 2 inch circles for wing centers
5- 2 (large) hearts punch in sweet blush (makes a tail-optional) and berry sorbet (makes front piece)
6- 2- 1 inch circles from dark chocolate-makes eye base
7-1-1 inch circle from sweet blush (will be cut in half) to make eyelids
8- 2 3/4 inch circles-for eyeballs
DIRECTIONS (for those who can’t view the video)
BODY
Print your Rounded Wrap Up! ©on dark chocolate cardstock.
Cut score and assemble per instructions. Set aside
On copy paper print the Rounded wrap up again. You will cut out JUST the front portion of the template onto sweet blush cardstock. This creates your owl body.
Stamp the scallop border pattern from Border Basics: Retro in dark chocolate ink x2, onto belly, and again on 2 of the punched 2 inch round circles. Color with markers.
Stamp sentiment from hand written notes-under belly using dark chocolate ink.
Stamp choice of other border pattern on sides of box to create head/face. Color as desired
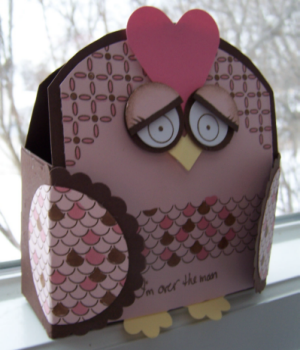
EYES / BEAK
Stamp circle from border set onto 3/4 white circles.
Layer near bottom of dark chocolate 1 inch circle.
Cut/punch 1 inch circle from sweet blush. Cut in half. Draw on lid and eyelashes with marker. Layer on eye lids with dimensionals.
For beak use photo corner punch from lemon tart cardstock. Layer onto face with dimensional, then layer on eyes.
Apply heart punched from Berry Sorbet cardstock to top of head, between eyes.
FEET
Use scallops or flowers for feet. Score bottoms so they bend forward, and layer behind owl body. Adhere body to Rounded Wrap Up! © box template.
WINGS
Layer 2 inch stamped circles (that you stamped/colored in steps above)onto dark chocolate giga scallop circles.
Score from between scallops to other side, and adhere stamped pieces to center.

Adhere to sides of Rounded Wrap Up! ©
Now fill with choice of candy or other treat! Use paper clip or item of choice to hold top closed (if you choose)!
So there you have it!!
This takes about 25 minutes to make, but that is for a tutorial!! If you go and mass produce these Im sure its much quicker with practice. My 3 came together in well under an hour.
That is HOW you make my Owlette!!!
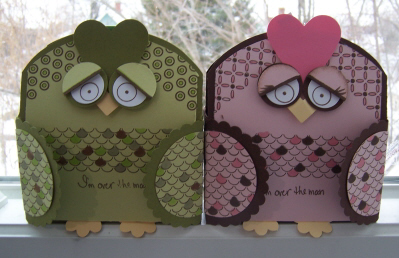
This is the “boy” version–> Whootie done in green for my son Noah.

He loves green and told me that was what I had to use for his owlette treat holder! He actually thought this was a parakeet! LOL! I guess it COULD be!! I also see making bunnies, and chicks with the box template 😀
Now don’t think this template is JUST for character boxes! Oh! NO!! So much more to come. Just wait and see what the peeks bring OK. This was just one of those “ideas” that popped into my head. This would be a super cute party project for kids even. Its really that easy! You just pre-stamp it. They can color and assemble-maybe?
I love to hear your thoughts on today’s post and the template peek!
Thank you for reading.
Don’t forget to check in with Nichole and see what she has to share, as well as other creative clicks for today.
Thanks for all the kind words and support!
Owl Hugs from the Moon Family!!
I haven’t made an ATC (for those of you wondering Artist Trading Card size 3 1/2 X 2 1/2) in YEARS!!!!!!!! I use to join Jen del Muro’s exclusive ATC swaps years ago, and that was the ONLY time I would make them. That was FOREVER and a day ago. WOW! Time flies. We are all now so busy, I think swapping is the LAST thing on our minds (or to do lists).
Nichole had the girls on the Papertrey Ink team partake in a special project-for some lucky winner 😀 Read about that HERE!!!
We each had to create an ATC.
Our ATC is suppose to be a mini canvas, that should represent us and our personal style. It also had to be signed (OYE! I HATE my handwriting but OK!)
Anyway I KNEW exactly what I wanted to do!!!
I think this is very reflective of me, my personality, and stamping style.
My favorite colors these days are Raspberry Fizz, Ripe Avocado, and a pop of black!
I’m in LOVE with the new With Sympathy set.
I love butterflies so that was a no brainer. I had to make it 3d with some sparkle of course!!
I love flourishes, and tulips are my FAVORITE flower-so I used the blossom from Borders & Corners Rectangle set
The sentiment from Out on a limb sent is the perfect message I hope to convey to the world every day! I try to do that myself.
So this is what I came up with.
Live the life you imagined.
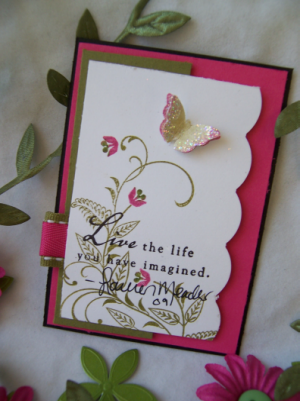
Aside from my signature-I love it and feel it is reflective of me.
What do YOU think?
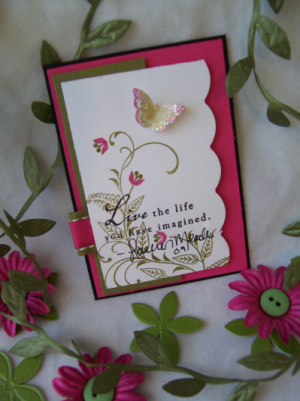
I had SOOOOO much fun making an ATC again. I love to then take the mini masterpiece and layer it onto a card.
One more view.
Now time to see what everyone else did.
Its an amazing collection of our personal style’s I feel. You will be amazed at how different such a small area to work with can actually be.
Thanks for stopping by.
Now I would LOVE to know-
What would YOU include in a mini “masterpiece” that YOU feel is a reflection of yourself , personal style (like colors, simple layout etc) and what you love?
My Etsy

Who I Designed For
Blogroll
- Alicia
- Alli Miles
- Ally Blankenship
- Amber
- Andi @ crafts on a whim
- Angel R
- Angie Z
- Anne Kranitz
- Becky O
- Bee
- Beth Silaka
- Bethany Paull
- Beverly Nash
- Bobbie
- Cambria
- Cammie
- Card of the Week
- Card Positioning System (CPS)
- Cards for Cancer
- Catherine Doucette
- Charmaine
- Cheryl Sims
- Chriss Rollins
- Christina
- Christine Ewing
- Christine Wooden
- Colleen Schaan
- Craft Critique
- Craft Gossip
- Crystal
- Dawn Easton
- Emily Giovanni
- Geny
- Holly
- Igne Groot
- Inspirational Craft Blogs
- Irene
- Jami Sibley
- Jeanne Streiff
- Jen del Muro
- Jeni Bond
- JenMarie
- Jenn Balcer
- Jenn Diercks
- Jenn O
- Jennifer E
- Jennifer Mick
- Jennifer Pereda
- Jennifer-Sweet Treat
- Joanne Basile
- Jodi Collins
- Julia Stainton
- Julie Masse
- Karen
- Kathryn Berthiaume
- Katie Cotton
- Kelley Holland
- Kendra
- Kim Scholfield
- Kris’s Color Stripes! Get inspired here
- Kristen Dubosque
- Kristin Eberline
- Kristine
- Laura @ Sunshine Stamper
- Laura Turnmire
- Laurie Schmidlin
- Lesa Rapp
- Linda Duke
- Linda-LSN
- Lindsey Botkin
- Lisa (lakind scs)
- Lisa Kind
- Lori Craig
- Maggie
- Mara Campbell
- Maria
- Maria Levine
- Mary
- MaryJo
- Melanie M
- Monique Hansen
- Moxie Fab World
- Pam Imholz
- PaperCrafts Connection
- Peppers and Pollywogs Kids party site
- Rebecca Grohall
- Rita
- Robyn
- Rose Ann
- Sarah Vrolyk
- Sharon Harnist
- Sharon Johnson
- Sharon Rivera (a chemisrty with paper)
- Sherrie
- Sophia Landry
- Storage Units, Ink, & More Blog
- Sue Berker
- Susan (Rainy)
- Tangii Crane
- Tracy
- Tricia Traxler
- Trudee
- Velta
- VivLyn
- Zena
MTME Pretty Palette Color Team
MTME Pretty Patterns Sketch Team
My Time Made Easy TM LLC
Shop till you drop!
Lauren Meader
About Me
Copyrighted material
Subscribe To My Blog
Pages
- About me
- Alexa’s Story!
- My Crafty Corner!
- My Time Made Easy™ LLC
- Our Make A Wish Trip to Disney!
- Resume/Publication List
Calendar
Archives
- August 2013
- July 2013
- June 2013
- May 2013
- April 2013
- March 2013
- February 2013
- January 2013
- December 2012
- November 2012
- October 2012
- September 2012
- August 2012
- July 2012
- June 2012
- May 2012
- April 2012
- March 2012
- February 2012
- January 2012
- December 2011
- November 2011
- October 2011
- September 2011
- August 2011
- July 2011
- June 2011
- May 2011
- April 2011
- March 2011
- February 2011
- January 2011
- December 2010
- November 2010
- October 2010
- September 2010
- August 2010
- July 2010
- June 2010
- May 2010
- April 2010
- March 2010
- February 2010
- January 2010
- December 2009
- November 2009
- October 2009
- September 2009
- August 2009
- July 2009
- June 2009
- May 2009
- April 2009
- March 2009
- February 2009
- January 2009
- December 2008
- November 2008
- October 2008
- September 2008
- August 2008
- July 2008
- June 2008
- May 2008
- April 2008
- March 2008
- February 2008
- January 2008
- December 2007
- November 2007
- October 2007
- September 2007
- August 2007
- July 2007
- June 2007
- May 2007
- April 2007
- March 2007
- January 2007
Categories
- About Me
- All That Scraps
- blogger challenge
- camera/photo play
- Cards
- Contests
- family stuff
- FOR SALE
- Home decor/3-D items
- How to FAKE it!
- Introduction
- JUGS Challenge
- JustRite Stampers
- Lizzie Anne Designs
- My family stuff
- My Stamping Space
- My Time Made Easy
- My Time To Color Challenge
- My Time to Create Challenge
- My Timeless Template Challenge
- My Timeless Templates
- Mytime Mail
- MYTIME MOVIE/VIDEOs
- Papertrey Newsletter
- Pink Cat Studio
- Pretty Palette Challenge
- Pretty Patterns Sketch
- Product Opinions and Must haves
- Recipe's
- Saturday Sketch
- Smilebox Creations
- Stampavie
- Tutorials
- Uncategorized
- videos
Most Popular
- Create your own Onesie Card Tutorial-and important NOTE! PLEASE READ (2529)
- Saturday Sketch-Boxed bag holder (2333)
- Going GREEN! Fancy Flower Flourish-Closure Video (1478)
- Fabulous Favorite - Giveaway! (1336)
- a Prayer Request (1232)
- QUICK-Easter Baskets from Nestabilities-PTI style-and blog challenge (1063)
- Teaser Sketch (999)
- February Release Giveway! (and a little peek) (996)
- Group Post and Rambling Rose Video Tutorial (985)
- GIVEAWAY! Who wants it all?! (895)
Recent Comments (RSS)
- 첫충사이트: 완전히 흥미로운 블로그 게시입니다. 저는
- sarah: Wow, Lauren, what a stunning
- hedie: خرید راهبند
- 야동: Love to read it,Waiting For
- 야동: This seller is in a
- 바카라사이트: 여기 처음 왔어요. 나는이 게시판을
- 야동티비: I was surfing the Internet
- 바카라사이트: 비슷한 주제에 대한 흥미로운 정보를
- 바카라사이트: "여기에 제공해 주신 귀중한 정보와
- 온라인홀덤: 유익한 웹 사이트를 게시하는 데
Copyright © 2007 - My Time, My Creations, My Stampendence - is proudly powered by WordPress
This blog has been Tweaked and Designed by Sara Williams