Archive for February 6th, 2009
Perfect Match Box © goes Organizer!
Feb 6, 2009 Author: mytime | Filed under: Home decor/3-D items, My Timeless TemplatesHi everyone!!
Am I busy? Yes.
Should I be blogging? No. Not really.
But I love what I do and sharing here, so I figured if that is what I want to do, then I am gonna do it 😀 Its like a break from the craziness KWIM?
(I feel like a little kid who broke the rules! LOL!Now I know WHERE my kids get it from)
Plus I was SOOOOO excited I HAD to share my latest creation !
WARNING: This is what happens when you are SUPPOSE to be doing something, then you get sidetracked doing something else, that you AREN’T suppose to be doing-its like stampers ADD! LOL!
You know how much I LOVE organization right? Well when you combine it WITH stamping I REALLY love it. There is nothing like being able to create something that allows you to personalize your crafting area. Oh, and give as gifts 😀
Anyway I was in Michaels and I saw a 4 drawer organizer that I liked. Problem-it was like $17. Now for only chipboard covered with a UGLY pattern paper on it-NO WAY! I looked at it and thought-WOW! I could make that EASY PEASY!
On my drive home (without the organizer) I realized that my Perfect Match Box © template would make it SOOOOO much easier, so I flew home and grabbed some Amy Butler paper (I have a handbag to match :D) and whipped up my own in less than a 1/2 hour!
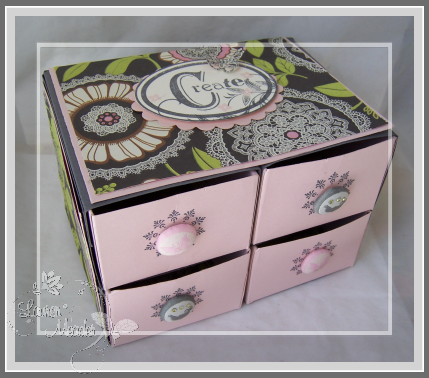
Create and Store
SO for the cost of a few pieces of paper, and some fabric brads-I have my very own PRETTY 4 drawer organizer!!!
OK I should have pushed the drawers in more! SORRY! I was just so excited I HAD to get it photographed and uploaded.
(This doesn’t match my stamp room actually! LOL! I just loved the paper and colors :D)
I printed my Perfect Match Box template 4 times.
The base was in gray (4x’s) and the slider box was in sweet blush (4x’s).
SO I print, cut, scored and assembled each box as directed by the instructions.
NOTE: Before putting the slider box together (pink insert), I stamped the FRONT with my Simple Stationery circle in gray ink, then applied my fabric covered Amy Butler brads (pink one’s have butterflies, gray ones have birds :D)
I then lined my drawers with the patterned paper.
Now once you have your 4 gray base templates done, you just adhere them ALL together!!!
LOTS of redline tape 😀
I then prettied it up by covering the top and sides with patterned paper (Amy Butler).
This also strengthens it, and covered the fact that it is 4 boxes stacked 2 X 2.
Think of the possibilities now!
You can make MORE drawers, or a 3 drawer stackable unit. Whatever you want!!
I think that is really cool.
You can make them for everyone. Even TEACHERS!! Beats the usual coffee mug.
They can keep it on their desk. Maybe even cut a slit in the drawer front, and fill it with ROLLS of those REWARD stickers teacher’s always give out. (OH!!! I am so going to do that for end of the year gifts-good idea)
Can you tell I have WAY too much fun creating with my templates? Seriously! Sometimes my brain just won’t stop spinning. I wish I had the TIME to execute the ideas I have sometimes. I usually have to just write it down, and save it for another day.
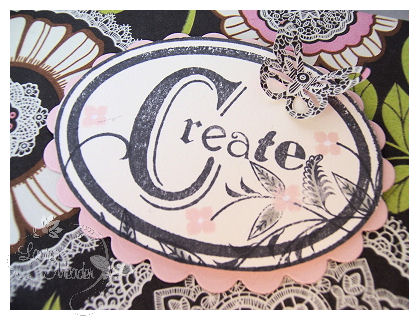
Anyway I wanted a design on the top so I used my Harmony Classic Oval II in gray ink for the “create” sentiment.
I love the way it turned out.
With Sympathy matched my paper PERFECTLY!!! So I stamped it on gray and added a soft gray to the leaves. Flowers stamped in sweet blush.
I layered it on an oval scallop for some more POP! This is on dimensionals as well.
I also punched a butterfly from the paper, to match my theme.
Then I was done.
Now this idea sparked ANOTHER idea that I will most likely share Sunday 😀 You won’t want to miss that.
Easy Peasy 😀
OK I gotta run, but some back tomorrow for my Saturday Sketch 😀
Thanks for checking in today. Have a great Friday.
My Etsy
My Time Made Easy © LLC
Who I Designed For
Blogroll
- Alicia
- Alli Miles
- Ally Blankenship
- Amber
- Andi @ crafts on a whim
- Angel R
- Angie Z
- Anne Kranitz
- Becky O
- Bee
- Beth Silaka
- Bethany Paull
- Beverly Nash
- Bobbie
- Cambria
- Cammie
- Card of the Week
- Card Positioning System (CPS)
- Cards for Cancer
- Catherine Doucette
- Charmaine
- Cheryl Sims
- Chriss Rollins
- Christina
- Christine Ewing
- Christine Wooden
- Colleen Schaan
- Craft Critique
- Craft Gossip
- Crystal
- Dawn Easton
- Emily Giovanni
- Geny
- Holly
- Igne Groot
- Inspirational Craft Blogs
- Irene
- Jami Sibley
- Jeanne Streiff
- Jen del Muro
- Jeni Bond
- JenMarie
- Jenn Balcer
- Jenn Diercks
- Jenn O
- Jennifer E
- Jennifer Mick
- Jennifer Pereda
- Jennifer-Sweet Treat
- Joanne Basile
- Jodi Collins
- Julia Stainton
- Julie Masse
- Karen
- Kathryn Berthiaume
- Katie Cotton
- Kelley Holland
- Kendra
- Kim Scholfield
- Kris’s Color Stripes! Get inspired here
- Kristen Dubosque
- Kristin Eberline
- Kristine
- Laura @ Sunshine Stamper
- Laura Turnmire
- Laurie Schmidlin
- Lesa Rapp
- Linda Duke
- Linda-LSN
- Lindsey Botkin
- Lisa (lakind scs)
- Lisa Kind
- Lori Craig
- Maggie
- Mara Campbell
- Maria
- Maria Levine
- Mary
- MaryJo
- Melanie M
- Monique Hansen
- Moxie Fab World
- Pam Imholz
- PaperCrafts Connection
- Peppers and Pollywogs Kids party site
- Rebecca Grohall
- Rita
- Robyn
- Rose Ann
- Sarah Vrolyk
- Sharon Harnist
- Sharon Johnson
- Sharon Rivera (a chemisrty with paper)
- Sherrie
- Sophia Landry
- Storage Units, Ink, & More Blog
- Sue Berker
- Susan (Rainy)
- Tangii Crane
- Tracy
- Tricia Traxler
- Trudee
- Velta
- VivLyn
- Zena
MTME Pretty Palette Color Team
MTME Pretty Patterns Sketch Team
My Time Made Easy TM LLC
Shop till you drop!
Lauren Meader
About Me
Copyrighted material
Subscribe To My Blog
Pages
- About me
- Alexa’s Story!
- My Crafty Corner!
- My Time Made Easy™ LLC
- Our Make A Wish Trip to Disney!
- Resume/Publication List
Calendar
Archives
- August 2013
- July 2013
- June 2013
- May 2013
- April 2013
- March 2013
- February 2013
- January 2013
- December 2012
- November 2012
- October 2012
- September 2012
- August 2012
- July 2012
- June 2012
- May 2012
- April 2012
- March 2012
- February 2012
- January 2012
- December 2011
- November 2011
- October 2011
- September 2011
- August 2011
- July 2011
- June 2011
- May 2011
- April 2011
- March 2011
- February 2011
- January 2011
- December 2010
- November 2010
- October 2010
- September 2010
- August 2010
- July 2010
- June 2010
- May 2010
- April 2010
- March 2010
- February 2010
- January 2010
- December 2009
- November 2009
- October 2009
- September 2009
- August 2009
- July 2009
- June 2009
- May 2009
- April 2009
- March 2009
- February 2009
- January 2009
- December 2008
- November 2008
- October 2008
- September 2008
- August 2008
- July 2008
- June 2008
- May 2008
- April 2008
- March 2008
- February 2008
- January 2008
- December 2007
- November 2007
- October 2007
- September 2007
- August 2007
- July 2007
- June 2007
- May 2007
- April 2007
- March 2007
- January 2007
Categories
- About Me
- All That Scraps
- blogger challenge
- camera/photo play
- Cards
- Contests
- family stuff
- FOR SALE
- Home decor/3-D items
- How to FAKE it!
- Introduction
- JUGS Challenge
- JustRite Stampers
- Lizzie Anne Designs
- My family stuff
- My Stamping Space
- My Time Made Easy
- My Time To Color Challenge
- My Time to Create Challenge
- My Timeless Template Challenge
- My Timeless Templates
- Mytime Mail
- MYTIME MOVIE/VIDEOs
- Papertrey Newsletter
- Pink Cat Studio
- Pretty Palette Challenge
- Pretty Patterns Sketch
- Product Opinions and Must haves
- Recipe's
- Saturday Sketch
- Smilebox Creations
- Stampavie
- Tutorials
- Uncategorized
- videos
Most Popular
- Create your own Onesie Card Tutorial-and important NOTE! PLEASE READ (2529)
- Saturday Sketch-Boxed bag holder (2333)
- Going GREEN! Fancy Flower Flourish-Closure Video (1478)
- Fabulous Favorite - Giveaway! (1336)
- a Prayer Request (1231)
- QUICK-Easter Baskets from Nestabilities-PTI style-and blog challenge (1063)
- Teaser Sketch (999)
- February Release Giveway! (and a little peek) (996)
- Group Post and Rambling Rose Video Tutorial (985)
- GIVEAWAY! Who wants it all?! (895)
Recent Comments (RSS)
- 야동: Love to read it,Waiting For
- 야동: This seller is in a
- 바카라사이트: 여기 처음 왔어요. 나는이 게시판을
- 야동티비: I was surfing the Internet
- 바카라사이트: 비슷한 주제에 대한 흥미로운 정보를
- 바카라사이트: "여기에 제공해 주신 귀중한 정보와
- 온라인홀덤: 유익한 웹 사이트를 게시하는 데
- 홀덤나라: 나는 당신의 블로그를 정말 좋아합니다.
- lisa: Technology, too, has left an
- 주소모음: 흠 !! 이 블로그는 정말


