My Time for a template peek!
Dec 10, 2008To start-Many of you always ask about Alexa (thank you!) she had a great appointment, things are good, and Amber’s Christmas recital went great too.
OK let the My Timeless Template excitement begin! I am so over the moon with this template.
PLEASE NOTE: The template shared today will not be available for download until the 15th.
If you are new to this whole template thing-read this.
Got some questions? Maybe they are answered here. Also you can email me anytime at [email protected] for any questions you may have as well.
Want to see some samples with the past templates go HERE, and don’t forget each download has an exclusive full color idea booklet with supplies/instructions.
First I really, from the bitty bottom of my heart-want to say thank you to all of you who have purchased/used my past templates! I can’t tell you how great it feels to see that, and I love hearing your feedback 😀 Because of that we are including general instructions for assembly with the templates, and (for some) if needed, photos for some of the steps, if it sounds like it is confusing.
If you missed it Julie Campbell wrote a super sweet critique on the My Timeless Template line HERE! I’m still in awe over it! I think it also helps reading reviews of “customers” not my, the creator, who of course loves what I do.
Today I will get to share my first of several peeks. Now, like ALL my templates, it starts with a concept, and a catchy title, but each template can be much more versatile than the given name! So don’t get hung up on the “name”! Just sit back and watch all that can be done with each template (outside its given title) as the days progress.
Well its about that time of year when you give homemade treats, or like to package up some goodies in a fun new way! It’s not too late to use these templates for the holidays either. Now don’t just think holidays! Think-any occasion. The friend who is sick, someone did something nice for you, someone had a baby, a birthday, surgery………you name it. Maybe there is NO reason.
I love presenting simple things in a fun, creative way. I say this repeatedly but, it really IS all about the PRESENTATION!! Oh and our time. That too is precious. My idea is based on the concept for you to maximize creative time !!
Now speaking of easy, and home made, I often make home-made chocolate lollipops (I loathe cooking so these are so up my alley) Im always stumped as to HOW I present them. I designed this template to make just a gift like that presentable, fun and functional!
Now everything being said-let me introduce you to the Lollipop Along ©!
This template totally rocks ![]() Wait until you see what I have up my sleeve over the next couple of days with this one
Wait until you see what I have up my sleeve over the next couple of days with this one ![]()
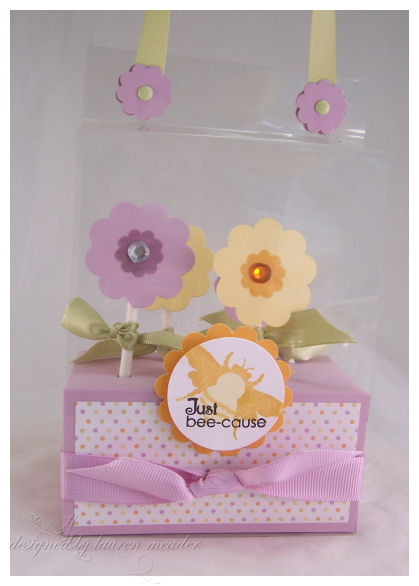
This was my template concept project. Every template design starts with an idea and actual project. Then I go on from there. Now these concpet samples are one’s that I don’t put much time and effort into these samples, as they are just a quick way to get my concept out into a tangible template!
The flowers are made using the cuttlebug #1 flowers die cut. I stamped my Beautiful Blooms flower in the center, then popped out. They are covering the flat lollipops you buy at the store. I KNOW! I said home made lollipops, but we don’t always have time for that either.
All you do is insert the sticks into the holes, and just use the handle to carry it to where ever you are going, to present it! I thought a sweet lil tag in the front would be cute. So I used honey bees & sentiments, since I wanted this to be similar to a paper garden!
Just a cute way to present one of those everyday items you may like to give out.
How cute would this be from the tooth fairy, or placed on the desks for some co-workers?
Side view.
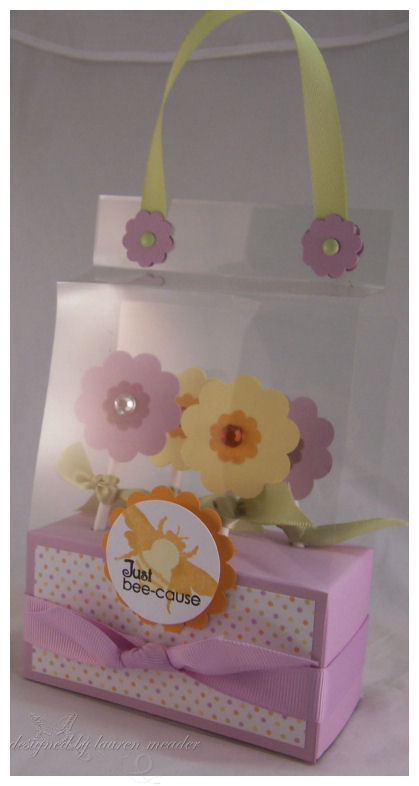
Its super cute and sturdy. You can make it hold up to 6 pops. Depending on how you want them presented.
You can reach right in the side, and grab a pop, or remove the ribbon – and the box bottom holder can slide out the side! OR undo the top closures and it can open from the top. You can adhere the bottom to the wrap base if you wish, or secure in there as I did with the ribbon. Its all about creative liberty, and depending on what you are putting inside. There is no right and wrong to the templates! Use them in a way that suits you and your creative style.
You may be wondering HOW do I print my template on acetate?
Well you don’t! You print it on your copy paper, and since you can see through it, you use it as your cutting/scoring guide for your acetate. Same thing with vellum. You can print direct on cardstock for your cover wrap if you wish.
Even if your printer doesn’t take cardstock, you can still use all my templates! Just print onto copy paper, and layer it over your patterned paper or cardstock, and use it as a guide to cut, and score where necessary. Easy peasy. I like to use removable adhesive (just like what you most likely already use-it just says removable) to keep mine perfectly together as I go along. Throw the cut/scored copy paper template in the trash when done. You aren’t double cutting or printing if you layer it over what you want to use and use it at the same time.
Many people asked me what type of printer I own that prints on cardstock:
I own a Canon Pixma IP 4000, and it does print on PTI cardstock. It works like a dream 😀
Now onto another sample.
Now so you aren’t stuck on the name “Lollipop Along” let me share more with you!
Right now you *may* be thinking “How is a lollipop holder versatile? Seriously! What am I going to do with that after the ONE time I give out some suckers?”
Well how about altering that bottom box, and making it into a bucket style holder (insteqad of a abox base) for some bath and body products? Maybe a pedicure kit. Instead of acetate, use vellum cardstock (or patterned paper/cardstock)!
Happy Lil Target Take Along

Yes! That is a fabulous idea!!
How can you NOT feel happy looking at this?
Again I was inspired by Target 😀 for my creation
I took the bottom pattern from my template, and made it into a sturdy little box-ket (aka box/basket) to hold some super smelling foot scrub, a pumice stone, toe separators, nail files, chapstick and nailpolish from the Target $1 spot! Can you believe how cute this looks?
Here is a peek inside
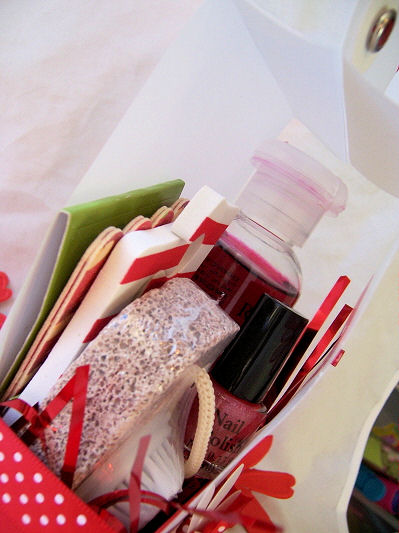
That makes these gifts SOOOOOO affordable people!
The files, toe separators and nail polish were in one kit for $1. Then the foot scrub and pumice stone were each a $1! So for $3 I packaged these contents for a FRACTION of ANY gift set you could actually buy. Given that my template cost is only $5 and you can use it forever, I didn’t put a price on the end gift-but one use pays for itself. Even for $8 (cost with template included) this is a rockin gift for anyone who loves to be pampered! That doesn’t count the fact you can use the template in many ways, over & over!!!!!!!!!!
Just personalize it to suit the person or the fragrance, and you are on your way to be the QUEEN of gift giving 😀
Now, as you can see, I used vellum cardstock on my wrap instead of acetate!

I used last months release set-Out of the box. Stamped in Pure Poppy ink, then dry embossed from the back-for some POP! Stamped “happy” in white StazOn.
I tied around a poppy polka dot ribbon, and tied it through asheeer pretty white prima blossom! A perfect match to my stamp 😀 A pretty bella bauble for the flower center
View from the top!
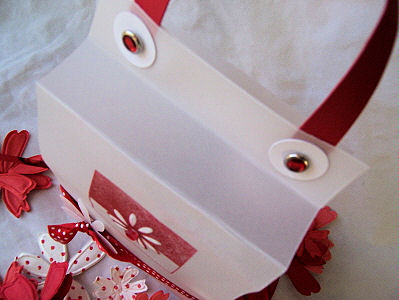
Just grab the handle and go……
AND YES! You should use a redline tape or scor-tape for these projects! The bottom holds this stuff no problem.
I like to use cardstock, or even ribbon for my handle. Depends on the weight of your items inside. I just secure it in place with brads! By adding cardstock or other accents you not only make it purty, but you hide the ugly backing of the brad!
So there you have it! That is the peek of the day.
I hope you are excited about this. I can’t wait to hear your thoughts.
Now, just wait until you see my other projects with this template! WOW! I’m letting them get better as we go! LOL!
Tomorrow I have a peek using my other template 😀 So, ya’ll come back now ya hear!
For more peeks also be sure to check Nichole, Heather & Lisa’sblog
Till tomorrow.

My Etsy

Who I Designed For
Blogroll
- Alicia
- Alli Miles
- Ally Blankenship
- Amber
- Andi @ crafts on a whim
- Angel R
- Angie Z
- Anne Kranitz
- Becky O
- Bee
- Beth Silaka
- Bethany Paull
- Beverly Nash
- Bobbie
- Cambria
- Cammie
- Card of the Week
- Card Positioning System (CPS)
- Cards for Cancer
- Catherine Doucette
- Charmaine
- Cheryl Sims
- Chriss Rollins
- Christina
- Christine Ewing
- Christine Wooden
- Colleen Schaan
- Craft Critique
- Craft Gossip
- Crystal
- Dawn Easton
- Emily Giovanni
- Geny
- Holly
- Igne Groot
- Inspirational Craft Blogs
- Irene
- Jami Sibley
- Jeanne Streiff
- Jen del Muro
- Jeni Bond
- JenMarie
- Jenn Balcer
- Jenn Diercks
- Jenn O
- Jennifer E
- Jennifer Mick
- Jennifer Pereda
- Jennifer-Sweet Treat
- Joanne Basile
- Jodi Collins
- Julia Stainton
- Julie Masse
- Karen
- Kathryn Berthiaume
- Katie Cotton
- Kelley Holland
- Kendra
- Kim Scholfield
- Kris’s Color Stripes! Get inspired here
- Kristen Dubosque
- Kristin Eberline
- Kristine
- Laura @ Sunshine Stamper
- Laura Turnmire
- Laurie Schmidlin
- Lesa Rapp
- Linda Duke
- Linda-LSN
- Lindsey Botkin
- Lisa (lakind scs)
- Lisa Kind
- Lori Craig
- Maggie
- Mara Campbell
- Maria
- Maria Levine
- Mary
- MaryJo
- Melanie M
- Monique Hansen
- Moxie Fab World
- Pam Imholz
- PaperCrafts Connection
- Peppers and Pollywogs Kids party site
- Rebecca Grohall
- Rita
- Robyn
- Rose Ann
- Sarah Vrolyk
- Sharon Harnist
- Sharon Johnson
- Sharon Rivera (a chemisrty with paper)
- Sherrie
- Sophia Landry
- Storage Units, Ink, & More Blog
- Sue Berker
- Susan (Rainy)
- Tangii Crane
- Tracy
- Tricia Traxler
- Trudee
- Velta
- VivLyn
- Zena
MTME Pretty Palette Color Team
MTME Pretty Patterns Sketch Team
My Time Made Easy TM LLC
Shop till you drop!
Lauren Meader
About Me
Copyrighted material
Subscribe To My Blog
Pages
- About me
- Alexa’s Story!
- My Crafty Corner!
- My Time Made Easy™ LLC
- Our Make A Wish Trip to Disney!
- Resume/Publication List
Calendar
Archives
- August 2013
- July 2013
- June 2013
- May 2013
- April 2013
- March 2013
- February 2013
- January 2013
- December 2012
- November 2012
- October 2012
- September 2012
- August 2012
- July 2012
- June 2012
- May 2012
- April 2012
- March 2012
- February 2012
- January 2012
- December 2011
- November 2011
- October 2011
- September 2011
- August 2011
- July 2011
- June 2011
- May 2011
- April 2011
- March 2011
- February 2011
- January 2011
- December 2010
- November 2010
- October 2010
- September 2010
- August 2010
- July 2010
- June 2010
- May 2010
- April 2010
- March 2010
- February 2010
- January 2010
- December 2009
- November 2009
- October 2009
- September 2009
- August 2009
- July 2009
- June 2009
- May 2009
- April 2009
- March 2009
- February 2009
- January 2009
- December 2008
- November 2008
- October 2008
- September 2008
- August 2008
- July 2008
- June 2008
- May 2008
- April 2008
- March 2008
- February 2008
- January 2008
- December 2007
- November 2007
- October 2007
- September 2007
- August 2007
- July 2007
- June 2007
- May 2007
- April 2007
- March 2007
- January 2007
Categories
- About Me
- All That Scraps
- blogger challenge
- camera/photo play
- Cards
- Contests
- family stuff
- FOR SALE
- Home decor/3-D items
- How to FAKE it!
- Introduction
- JUGS Challenge
- JustRite Stampers
- Lizzie Anne Designs
- My family stuff
- My Stamping Space
- My Time Made Easy
- My Time To Color Challenge
- My Time to Create Challenge
- My Timeless Template Challenge
- My Timeless Templates
- Mytime Mail
- MYTIME MOVIE/VIDEOs
- Papertrey Newsletter
- Pink Cat Studio
- Pretty Palette Challenge
- Pretty Patterns Sketch
- Product Opinions and Must haves
- Recipe's
- Saturday Sketch
- Smilebox Creations
- Stampavie
- Tutorials
- Uncategorized
- videos
Most Popular
- Create your own Onesie Card Tutorial-and important NOTE! PLEASE READ (2529)
- Saturday Sketch-Boxed bag holder (2333)
- Going GREEN! Fancy Flower Flourish-Closure Video (1478)
- Fabulous Favorite - Giveaway! (1336)
- a Prayer Request (1231)
- QUICK-Easter Baskets from Nestabilities-PTI style-and blog challenge (1063)
- Teaser Sketch (999)
- February Release Giveway! (and a little peek) (996)
- Group Post and Rambling Rose Video Tutorial (985)
- GIVEAWAY! Who wants it all?! (895)
Recent Comments (RSS)
- 야동: Love to read it,Waiting For
- 야동: This seller is in a
- 바카라사이트: 여기 처음 왔어요. 나는이 게시판을
- 야동티비: I was surfing the Internet
- 바카라사이트: 비슷한 주제에 대한 흥미로운 정보를
- 바카라사이트: "여기에 제공해 주신 귀중한 정보와
- 온라인홀덤: 유익한 웹 사이트를 게시하는 데
- 홀덤나라: 나는 당신의 블로그를 정말 좋아합니다.
- lisa: Technology, too, has left an
- 주소모음: 흠 !! 이 블로그는 정말
Copyright © 2007 - My Time, My Creations, My Stampendence - is proudly powered by WordPress
This blog has been Tweaked and Designed by Sara Williams
31 Responses for "My Time for a template peek!"
Super cute!!
oh Lauren, I LOVE this one! I can think of so many things to do with this. I’m picturing those little pots that you grow herbs in for starters. Or a muffin mix and a little bread pan, or cookie mix and cookie cutter and icing tubes! Adorable!
oh, coloring books and crayons and stickers for a sick child!
Now I can’t sleep, my mind is racing with ideas.
Wow, I love this template! Can’t wait for it!
That Target $1 spot is just wonderful for filling your templates. What about putting a bunch of chocolate or cookies in one of these?
I think these are fabulous! Maybe I should ask my husband for a BIG gift certificate for Christmas. 🙂
Lauren Love the New pattern. I can think of many uses for it and ways to utilize it.
I hate that someone keeps putting these comments of yours, back on your blog. Do they not have anything else to do?
Oh I can’t wait for this one!!! It’s going to be so helpful for a project I’m working on this weekend!!! Needed something to hold the gift. Cool…next week after Chloe’s Christmas concert is done, I can get to work on it! yippee!
Love the colours you used, especially that poppy!
amazing Lauren. I just love it. perfect in so many ways
Lauren, this is amazing!! I just love this template. What a perfect little gift ensemble!!
Super template Lauren! I often make pops to sell at church and this little holder would add just that little POP to make it a really fun gift item! and I like the versatility of using it as a box to hold other things too!
great job on this (as usual!!)
Wow! Looks like a fabulous template. I love your samples.
O.K. This one is DEFINITELY A MUST HAVE!! Congrats, again, Lauren!!
This one is amazing and inspiring. There are so many things you could use this one for. YOU are so talented.
Wicked cute! I love that pedicure kit! How awesome!!!! I bet this would make a great package for chocolate dipped spoons or coffee stirrers, too!
hi I love this one but I have a question on the stocking one do you print to box base or is the front open I was wanting to make these today and I don’t know what to do for the base
I LOVE this one.
Super Cute!!
You can use this so many ways..
very versatile 🙂
Awesome gifts!
fantastic ideas baby! Have a great day!!!!!
AWESOME…love this one Lauren!!! Glad Alexa’a appt. went well!!!
What a joy to open this email and go to your new post. Just …hmmmm…I’m still speechless..amazing. you continue to out do yourself.
[email protected]
SUPER super cute! Another winner!!
Love it, Love it, Love it. And I do not have kids, but hey, we are alll kids at heart. I will be picking up this template that is forsure. I now need to plan a trip from Victoria BC to somewhere in the US and get me to a Target store. I feel like I’m missing out big time. Thanks again Laureen for a wonderful template.
Lauren, I have soo much fun with these templates, that I hardly look at the stamps!!! Stupid question, is acetate just like an overhead projector clear sheet thingie? Thx.
You rock Lauren! I’m sure you already knew that though. ;o)
I love this! Do you get your acetate from PTI or somewhere else?
Yep, super cute! Love it!
Good Content.
Today while I was surfing the Internet, I came across several interesting articles talking about UV nail lamps and how to use them with gel nail application. I also happened to visit this site Gel-Nails and found amazing variety of UV lamps in American and European style. Some of these lamps also have a timer and a digital display which I think is really cool. And what’s best above all is the super discount that you can get which is 50% and more also for most of the products.
I guess this is a great offer to grab as there is free global shipping also over a minimum purchase order. So if you are looking out to save money after having spent on gel nails, then check out the great offers here. Maybe you may find much more than what you are looking for as I did.
Varios comentaristas dijeron que las imágenes absurdas de un grupo de trabajadores intentando arreglar los cables averiados en el tejado del camisetasofutbol campo del Rayo mientras varios grupos de oficiales esperaban en la semioscuridad el domingo hacían que la Liga http://www.camisetasofutbol.com/ pareciera una “república bananera”.
Con la imagen de la Liga ya dañada por los problemas financieros de muchos de sus clubes, los estadios medio vacíos y el descontento por los precios de las entradas y las horas de los partidos http://www.camisetasofutbol.com/camiseta-real-madrid-Baratas-1_2/ , el incidente difícilmente podría haber pasado en un momento peor.
is a liquid product produced from algae grown in 100% distilled water.
It is in line with Xooma’s vision of bringing about
a positive change to its users through its products and services.
The X20 also helps to incorporate vitamins and minerals from the food we eat, meaning
the body gets access to these vital ingredients.
Leave a reply