Archive for December 9th, 2008
Well its the 10th! That means its day 1 of the preview samples for Papertrey Ink!
Tomorrow begins my peeks at my 2 newest templates too!! I have so many amazing things planned for those, so I hope you will check in again ![]()
Today’s post I am sharing a NEW! stamp set by Candice called Forest Friends. It is SOOO cute, and is releasing on the 15th. Let me tell you its really just so ADORABLE! I had a hard time trying to decide just what to share from it for my countdown post with you! I had too much fun with it. I will say it was very hard to make the switch from Christmas to Valentines Day for me this month, as I am working feverishly to complete gift sets for everyone. Crazy times.
OK enough blabbering.
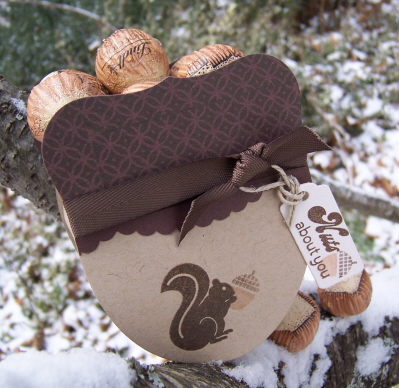
I figured I would share yet ANOTHER treat holder made using the Nestabilities and this fun set.
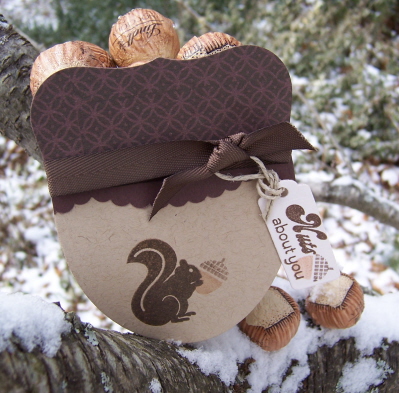
Nuts for you Acorn Holder
Is this not the CUTEST thing ever?!
I was inspired by these little “nut” wrapped Lindt chocolates that Noah got with his birthday gifts (I quickly claimed them as my own! LOL! But promised to give them back after my creative venture was over. Thankfully Noah gets it, and didn’t mind letting me borrow some). They are just so cute and perfect to present to anyone.
So seeing these, and this little squirrel I had to try a way to make my own acorn holder. Then this idea was born. I love it. Its great for the guy’s too.
This project took like 20 minutes to make. It could go faster, but I had no idea WHAT or HOW I was going to do what was in my head.
Now when you begin just align the Labels die with the oval die to ensure a compatible topper. You don’t one one that is too big or small. I believe I used the 2nd from the largest of the large set for both die sets on this project.
We are decorating BOTH sides of this box. A completed look on both sides makes it not only more professional looking, but appealing as well.
Lets begin.
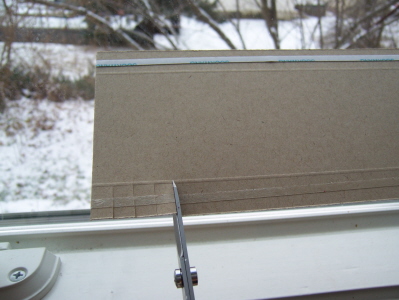
Using Kraft cardstock die cut 2 large ovals.
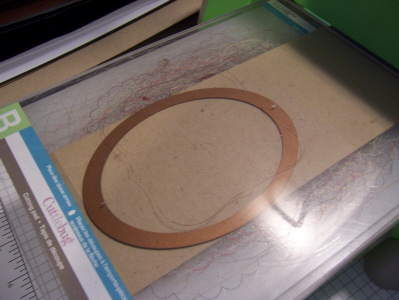
These become the acorn bottom. You will cut down the top, so that your oval measures 3 inches. See photo below.
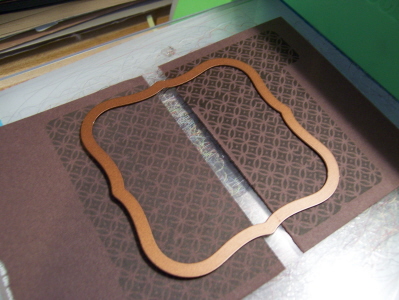
Now for our acorn toppers!
I stamped my circular pattern from Limitless Labels in dark chocolate ink, on dark chocolate cardstock to mimic the texture of an acorn top. I then used the labels one nestability to cut 2 acorn toppers.
This is what you are going to have for pieces.
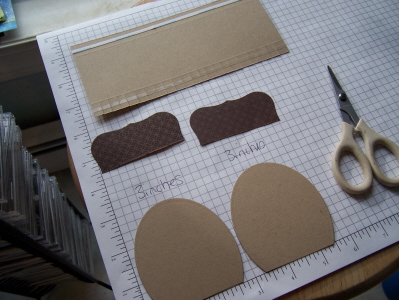
See acorn toppers cut down.
Then you want to cut a box bottom/connector piece size 3 X 7.
Score that piece at 1/2, then 2 1/2.
Apply score tape and remove backing, before you cut! Otherwise you are removing tiny snippets of paper backing from the project, wasting precious time. Can you tell I HAVE done that before?
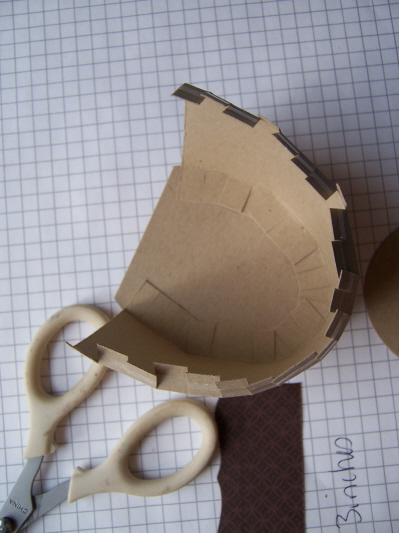
Snip edges to score line all the way across on both sides.
This will allow you to easily bend, and apply the box piece to the curved oval acorn.

You slowly adhere it, and curve it as you go, to your acorn back. The box edge go to edge of front and back panel.
Soon it will be adhered all the way around.
Now before you put your front panel on you need to stamp it!!
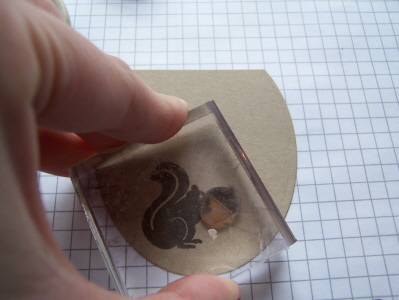
I LOVE acrylic stamps for this purpose alone! Easy peasy.
I stamped my squirrel image with dark chocolate ink. I then colored my acorn image (also from limitless labels) with markers, and stamped it into the squirrels hands.
Now adhere the front panel.
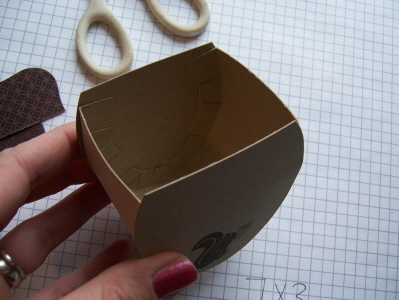
This is the box with the front panel on.
Last but not least we add the topper!

I just used a scalloped border punch from Martha Stewart, to first to make a nice finished edge. Layered it on, then trimmed the excess. You can omit the scallop border portion and its still super cute. This was a last minute detail I wanted.
For my final acorn topper, I tied on some dark chocolate twill, with my tag ready to go!
(You would adhere this as is if omitting the scallop layer)
I just die cut my tag, and added the same acorn as in the squirrels hands. Then attached it through my ribbon.

Put it on the acorn box, and VOILA!!
DONE!
Thats all there is to it 😀 And yes I did crawl out my window again!
There was an actual squirrel by this tree collecting the nuts the kids piled up for him at the bottom. I spent an HOUR trying to get him in my photo!! Wouldn’t that have totally rocked!! It was a no go though :C Apparently Im not furry and friendly enough to be trusted my a squirrel, as I invade his personal space to get get my photo op. I did have some crazy stray orange cat though, that would NOT go away! He kept climbing up the tree next to my box, and making it fall over. How annoying that was. The stories I could tell from my stamp room, I swear. I think my neighbors in the back must think I’m totally mad!
Well thats it, for here anyway.
Be sure you check out Nichole and Lisa’s blog as well for more peeks!
I can’t even wait for tomorrow 😀 Lots of eye candy to come. You are going to love this months templates ( I HOPE!)
Today Alexa has a post chemo check up, so wish us well! AND Amber has a Christmas recital at the nursing home this afternoon. Busy day.
Thanks for checking in and reading 😀
Till tomorrow
My Etsy

Who I Designed For
Blogroll
- Alicia
- Alli Miles
- Ally Blankenship
- Amber
- Andi @ crafts on a whim
- Angel R
- Angie Z
- Anne Kranitz
- Becky O
- Bee
- Beth Silaka
- Bethany Paull
- Beverly Nash
- Bobbie
- Cambria
- Cammie
- Card of the Week
- Card Positioning System (CPS)
- Cards for Cancer
- Catherine Doucette
- Charmaine
- Cheryl Sims
- Chriss Rollins
- Christina
- Christine Ewing
- Christine Wooden
- Colleen Schaan
- Craft Critique
- Craft Gossip
- Crystal
- Dawn Easton
- Emily Giovanni
- Geny
- Holly
- Igne Groot
- Inspirational Craft Blogs
- Irene
- Jami Sibley
- Jeanne Streiff
- Jen del Muro
- Jeni Bond
- JenMarie
- Jenn Balcer
- Jenn Diercks
- Jenn O
- Jennifer E
- Jennifer Mick
- Jennifer Pereda
- Jennifer-Sweet Treat
- Joanne Basile
- Jodi Collins
- Julia Stainton
- Julie Masse
- Karen
- Kathryn Berthiaume
- Katie Cotton
- Kelley Holland
- Kendra
- Kim Scholfield
- Kris’s Color Stripes! Get inspired here
- Kristen Dubosque
- Kristin Eberline
- Kristine
- Laura @ Sunshine Stamper
- Laura Turnmire
- Laurie Schmidlin
- Lesa Rapp
- Linda Duke
- Linda-LSN
- Lindsey Botkin
- Lisa (lakind scs)
- Lisa Kind
- Lori Craig
- Maggie
- Mara Campbell
- Maria
- Maria Levine
- Mary
- MaryJo
- Melanie M
- Monique Hansen
- Moxie Fab World
- Pam Imholz
- PaperCrafts Connection
- Peppers and Pollywogs Kids party site
- Rebecca Grohall
- Rita
- Robyn
- Rose Ann
- Sarah Vrolyk
- Sharon Harnist
- Sharon Johnson
- Sharon Rivera (a chemisrty with paper)
- Sherrie
- Sophia Landry
- Storage Units, Ink, & More Blog
- Sue Berker
- Susan (Rainy)
- Tangii Crane
- Tracy
- Tricia Traxler
- Trudee
- Velta
- VivLyn
- Zena
MTME Pretty Palette Color Team
MTME Pretty Patterns Sketch Team
My Time Made Easy TM LLC
Shop till you drop!
Lauren Meader
About Me
Copyrighted material
Subscribe To My Blog
Pages
- About me
- Alexa’s Story!
- My Crafty Corner!
- My Time Made Easy™ LLC
- Our Make A Wish Trip to Disney!
- Resume/Publication List
Calendar
Archives
- August 2013
- July 2013
- June 2013
- May 2013
- April 2013
- March 2013
- February 2013
- January 2013
- December 2012
- November 2012
- October 2012
- September 2012
- August 2012
- July 2012
- June 2012
- May 2012
- April 2012
- March 2012
- February 2012
- January 2012
- December 2011
- November 2011
- October 2011
- September 2011
- August 2011
- July 2011
- June 2011
- May 2011
- April 2011
- March 2011
- February 2011
- January 2011
- December 2010
- November 2010
- October 2010
- September 2010
- August 2010
- July 2010
- June 2010
- May 2010
- April 2010
- March 2010
- February 2010
- January 2010
- December 2009
- November 2009
- October 2009
- September 2009
- August 2009
- July 2009
- June 2009
- May 2009
- April 2009
- March 2009
- February 2009
- January 2009
- December 2008
- November 2008
- October 2008
- September 2008
- August 2008
- July 2008
- June 2008
- May 2008
- April 2008
- March 2008
- February 2008
- January 2008
- December 2007
- November 2007
- October 2007
- September 2007
- August 2007
- July 2007
- June 2007
- May 2007
- April 2007
- March 2007
- January 2007
Categories
- About Me
- All That Scraps
- blogger challenge
- camera/photo play
- Cards
- Contests
- family stuff
- FOR SALE
- Home decor/3-D items
- How to FAKE it!
- Introduction
- JUGS Challenge
- JustRite Stampers
- Lizzie Anne Designs
- My family stuff
- My Stamping Space
- My Time Made Easy
- My Time To Color Challenge
- My Time to Create Challenge
- My Timeless Template Challenge
- My Timeless Templates
- Mytime Mail
- MYTIME MOVIE/VIDEOs
- Papertrey Newsletter
- Pink Cat Studio
- Pretty Palette Challenge
- Pretty Patterns Sketch
- Product Opinions and Must haves
- Recipe's
- Saturday Sketch
- Smilebox Creations
- Stampavie
- Tutorials
- Uncategorized
- videos
Most Popular
- Create your own Onesie Card Tutorial-and important NOTE! PLEASE READ (2529)
- Saturday Sketch-Boxed bag holder (2333)
- Going GREEN! Fancy Flower Flourish-Closure Video (1478)
- Fabulous Favorite - Giveaway! (1336)
- a Prayer Request (1231)
- QUICK-Easter Baskets from Nestabilities-PTI style-and blog challenge (1063)
- Teaser Sketch (999)
- February Release Giveway! (and a little peek) (996)
- Group Post and Rambling Rose Video Tutorial (985)
- GIVEAWAY! Who wants it all?! (895)
Recent Comments (RSS)
- 바카라사이트: 비슷한 주제에 대한 흥미로운 정보를
- 바카라사이트: "여기에 제공해 주신 귀중한 정보와
- 온라인홀덤: 유익한 웹 사이트를 게시하는 데
- 홀덤나라: 나는 당신의 블로그를 정말 좋아합니다.
- lisa: Technology, too, has left an
- 주소모음: 흠 !! 이 블로그는 정말
- FutureGen Apps: Thank You For Sharing fantastic
- 웹툰사이트: 터키에서 온라인 스포츠 베팅을 할
- 툰코: It is a really very
- 온라인홀덤: I’ll be sure to come
Copyright © 2007 - My Time, My Creations, My Stampendence - is proudly powered by WordPress
This blog has been Tweaked and Designed by Sara Williams