Papertrey: Etched Glass Canister
Sep 11, 2008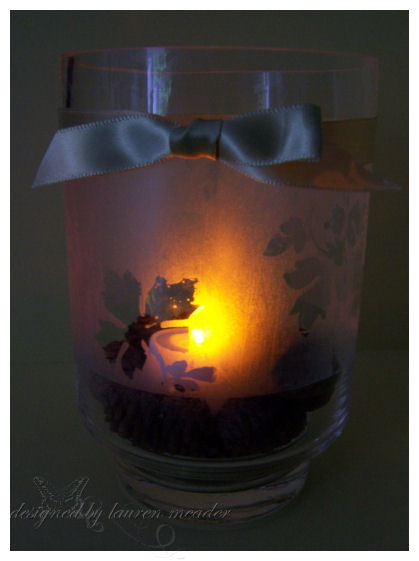
This is a gorgeous technique, that is SUPER easy to do : Etched Glass -using stamps!
Over the months I have received many emails asking for a how to, on this technique. Today I will show you just how simple it really is, with step by step instruction/ photos.
To start, this was a simple, round candle canister. I bought this for $4.99, and turned it into a pretty candle holder that would look fabulous anywhere in the house! If you purchased an etched glass canister it would cost triple that! Now you can make your own. With the holidays coming up, these would make fabulous inexpensive gifts for family, friends and teachers.
The possibilities for the items you can alter with this technique is limitless. So I hope you enjoy learning.
Supplies:
Stamp of choice-First Fruits, Glass container of choice (or mirror!), versmark ink, clear embossing powder, embossing buddy, heat tool, Armour Etch cream, sponge brush, Eclipse Tape (optional)
EDITED TO ADD: Etching cream can be found at Michaels in the section near the soap/candle isle. It took me an hour to find it because I did not think it was in that isle 😀

Before we get started there some things you should consider:
If you are heating glass, make sure is it a heat safe glass. Many times glass will crack or even explode when exposed to extreme heat!
Do not hold glass while heating. It gets very hot, and you could burn yourself.
Use a heat safe surface when heating your item. You don’t want to burn your work area.
IMAGES:
Carefully examine the images you want to use. You don’t want to choose too finely detailed of an image because it can be hard to define what the image was. You need a nice balance of bold, and detailed. Consider the overall look of the completed project.
Step 1)
Clean glass with windex, and dry well! You don’t want ANY finger prints anywhere. They will show up!
Step 2) OPTIONAL
If necessary you may want to mask the glass. I use Eclipse Tape. It is sticky enough, and leaves no residue when removed.

Step 3)
Rub embossing buddy all over glass. This prevents embossing powder from sticking to unwanted areas, and ruining your etching. It will also show you if you do have finger prints on your glass, and need to re-clean it.

Step 4)
Carefully stamp the image in versamark ink. Because Papertrey Ink uses clear acrylic images you can see the image pressing into the glass! Since they are acrylic, they are also easier to stamp onto round surfaces.
Sometimes this take PRACTICE! Glass is slippery. So take your TIME stamping the image.
(NO photo for this step since it is hard enough stamping, let along photographing too! LOL!)
Step 5)
Apply a generous amount of embossing powder.
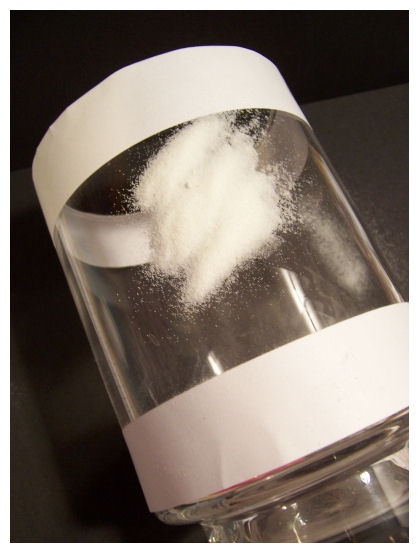
Tap of excess.
Step 6)
Heat set the image.

You will need to heat it until the powder turns SMOOTH-just like the glass.

CAUTION: Glass will get very hot! Don’t handle while heat setting, it is best to heat it on a heat safe surface.
NOTE: Also when doing more than one image on a surface, it is easier to heat set each one as you go. Keep in mind that the glass stays hot, and the melted powder remains warm, so you want to avoid smudging it, and avoid squishing it onto the table or getting more embossing powder on it, until the glass is cooled. Just be careful.
Step 7)
Once glass is COOLED-then apply a nice thick layer of etching cream.

Make sure you coat it thick and evenly!
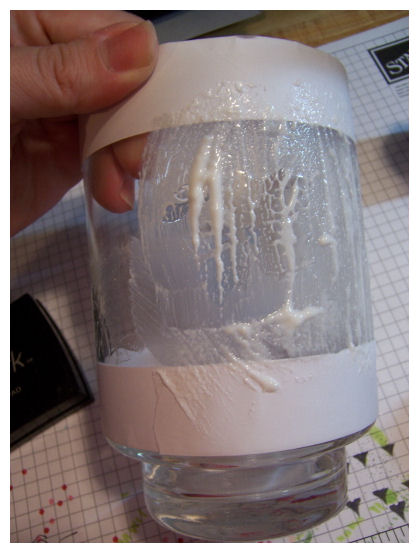
The directions say leave on for 5 minutes. DON’T LISTEN TO THAT! LOL!
It really takes at LEAST 20 minutes to get a nice etched coating. If you don’t let it sit long enough it will hardly looked etched.
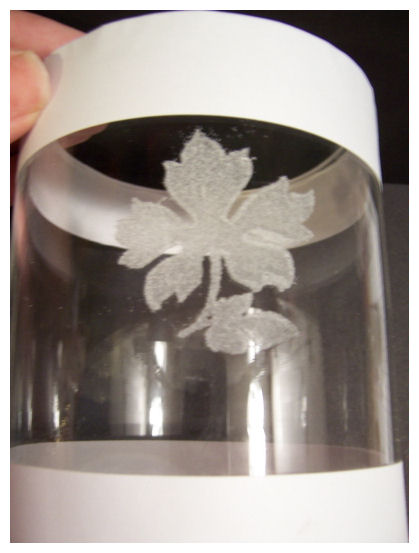
Step 8)
After you let it sit, go rinse the cream off under cold water. Take your fingernail, and scrap off the clear embossing powder. It will peel off.
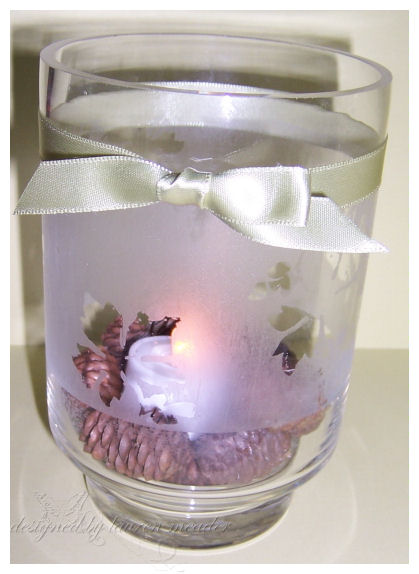 Here is the finished glass.
Sorry for the photo. I wanted you to see the detail, and it is very difficult to get a nice picture of something like this so you see the detail.
I tied a Spring Moss satin ribbon around the top, then filled the bottom with pine cones and bought a battery tea light to put inside. No flame to worry about.
Now here it is lit up from the top view
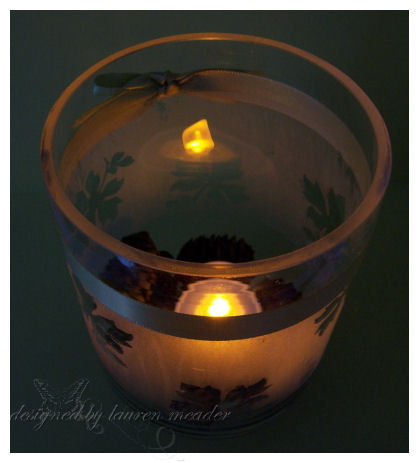
Isn’t that so pretty?
Now it is your turn! Send me a link here if you decide to try it.
I hope you enjoyed learning all about etching cream here. I’d love to hear your thoughts.
As always, thank you for reading, and I hope you are inspired in some way to get an early start on those holiday gifts.

My Etsy

Who I Designed For
Blogroll
- Alicia
- Alli Miles
- Ally Blankenship
- Amber
- Andi @ crafts on a whim
- Angel R
- Angie Z
- Anne Kranitz
- Becky O
- Bee
- Beth Silaka
- Bethany Paull
- Beverly Nash
- Bobbie
- Cambria
- Cammie
- Card of the Week
- Card Positioning System (CPS)
- Cards for Cancer
- Catherine Doucette
- Charmaine
- Cheryl Sims
- Chriss Rollins
- Christina
- Christine Ewing
- Christine Wooden
- Colleen Schaan
- Craft Critique
- Craft Gossip
- Crystal
- Dawn Easton
- Emily Giovanni
- Geny
- Holly
- Igne Groot
- Inspirational Craft Blogs
- Irene
- Jami Sibley
- Jeanne Streiff
- Jen del Muro
- Jeni Bond
- JenMarie
- Jenn Balcer
- Jenn Diercks
- Jenn O
- Jennifer E
- Jennifer Mick
- Jennifer Pereda
- Jennifer-Sweet Treat
- Joanne Basile
- Jodi Collins
- Julia Stainton
- Julie Masse
- Karen
- Kathryn Berthiaume
- Katie Cotton
- Kelley Holland
- Kendra
- Kim Scholfield
- Kris’s Color Stripes! Get inspired here
- Kristen Dubosque
- Kristin Eberline
- Kristine
- Laura @ Sunshine Stamper
- Laura Turnmire
- Laurie Schmidlin
- Lesa Rapp
- Linda Duke
- Linda-LSN
- Lindsey Botkin
- Lisa (lakind scs)
- Lisa Kind
- Lori Craig
- Maggie
- Mara Campbell
- Maria
- Maria Levine
- Mary
- MaryJo
- Melanie M
- Monique Hansen
- Moxie Fab World
- Pam Imholz
- PaperCrafts Connection
- Peppers and Pollywogs Kids party site
- Rebecca Grohall
- Rita
- Robyn
- Rose Ann
- Sarah Vrolyk
- Sharon Harnist
- Sharon Johnson
- Sharon Rivera (a chemisrty with paper)
- Sherrie
- Sophia Landry
- Storage Units, Ink, & More Blog
- Sue Berker
- Susan (Rainy)
- Tangii Crane
- Tracy
- Tricia Traxler
- Trudee
- Velta
- VivLyn
- Zena
MTME Pretty Palette Color Team
MTME Pretty Patterns Sketch Team
My Time Made Easy TM LLC
Shop till you drop!
Lauren Meader
About Me
Copyrighted material
Subscribe To My Blog
Pages
- About me
- Alexa’s Story!
- My Crafty Corner!
- My Time Made Easy™ LLC
- Our Make A Wish Trip to Disney!
- Resume/Publication List
Calendar
Archives
- August 2013
- July 2013
- June 2013
- May 2013
- April 2013
- March 2013
- February 2013
- January 2013
- December 2012
- November 2012
- October 2012
- September 2012
- August 2012
- July 2012
- June 2012
- May 2012
- April 2012
- March 2012
- February 2012
- January 2012
- December 2011
- November 2011
- October 2011
- September 2011
- August 2011
- July 2011
- June 2011
- May 2011
- April 2011
- March 2011
- February 2011
- January 2011
- December 2010
- November 2010
- October 2010
- September 2010
- August 2010
- July 2010
- June 2010
- May 2010
- April 2010
- March 2010
- February 2010
- January 2010
- December 2009
- November 2009
- October 2009
- September 2009
- August 2009
- July 2009
- June 2009
- May 2009
- April 2009
- March 2009
- February 2009
- January 2009
- December 2008
- November 2008
- October 2008
- September 2008
- August 2008
- July 2008
- June 2008
- May 2008
- April 2008
- March 2008
- February 2008
- January 2008
- December 2007
- November 2007
- October 2007
- September 2007
- August 2007
- July 2007
- June 2007
- May 2007
- April 2007
- March 2007
- January 2007
Categories
- About Me
- All That Scraps
- blogger challenge
- camera/photo play
- Cards
- Contests
- family stuff
- FOR SALE
- Home decor/3-D items
- How to FAKE it!
- Introduction
- JUGS Challenge
- JustRite Stampers
- Lizzie Anne Designs
- My family stuff
- My Stamping Space
- My Time Made Easy
- My Time To Color Challenge
- My Time to Create Challenge
- My Timeless Template Challenge
- My Timeless Templates
- Mytime Mail
- MYTIME MOVIE/VIDEOs
- Papertrey Newsletter
- Pink Cat Studio
- Pretty Palette Challenge
- Pretty Patterns Sketch
- Product Opinions and Must haves
- Recipe's
- Saturday Sketch
- Smilebox Creations
- Stampavie
- Tutorials
- Uncategorized
- videos
Most Popular
- Create your own Onesie Card Tutorial-and important NOTE! PLEASE READ (2529)
- Saturday Sketch-Boxed bag holder (2333)
- Going GREEN! Fancy Flower Flourish-Closure Video (1478)
- Fabulous Favorite - Giveaway! (1336)
- a Prayer Request (1231)
- QUICK-Easter Baskets from Nestabilities-PTI style-and blog challenge (1063)
- Teaser Sketch (999)
- February Release Giveway! (and a little peek) (996)
- Group Post and Rambling Rose Video Tutorial (985)
- GIVEAWAY! Who wants it all?! (895)
Recent Comments (RSS)
- 야동: Love to read it,Waiting For
- 야동: This seller is in a
- 바카라사이트: 여기 처음 왔어요. 나는이 게시판을
- 야동티비: I was surfing the Internet
- 바카라사이트: 비슷한 주제에 대한 흥미로운 정보를
- 바카라사이트: "여기에 제공해 주신 귀중한 정보와
- 온라인홀덤: 유익한 웹 사이트를 게시하는 데
- 홀덤나라: 나는 당신의 블로그를 정말 좋아합니다.
- lisa: Technology, too, has left an
- 주소모음: 흠 !! 이 블로그는 정말
Copyright © 2007 - My Time, My Creations, My Stampendence - is proudly powered by WordPress
This blog has been Tweaked and Designed by Sara Williams
55 Responses for "Papertrey: Etched Glass Canister"
Really beautiful project – sounds so easy I may just have to try!
OMG!!!! This is sensational!!! Where do you find etching creme? I’m going to try making these for teacher Christmas gifts this year!
Great tutorial, Lauren!
Thanks for sharing. I love your votive.
WOW!!!!
This is an AMAZING project, and the tutorial is so great! Thanks for sharing this technique, I will be doing this for some Christmas gifts for sure.
Tamara 🙂
What a STUNNING project! Oh my word!
You are right, a great teacher gift. I might do this for my son’s sunday school teachers since neither are in school otherwise. TFS!!!
Thank you Lauren for another great tutorial. I have tracked down the etching cream I can get it from Joanns online. (We live in a small place with no craft stores and none within a 2 hour drive). What a great idea for handcrafted gift giving. I love your blog and you are so generous to share with us. Ann Lind
This is awesome. I’ll have to give this a try.
Something I’ve never tried, but it’s really pretty.
Lauren that is stunning!!!!! That might be something to try on a votive size first. Did you get the creme at Michael’s/joannes?
Gorgeous! Thank you so much for the step-by-step tutorial. I think I may just give this a try now.
It turned out beautifully! 🙂
hugs!!!
WOW! What a fantastic idea!
What a great idea. Thanks so much for the excellent tutorial. Now I need to find some of that etching cream.
Great Christmas gift idea.
Joan
OMG! What a great project! Thanks so much for the tutorial!
Very cool! Thanks for the tutorial.
The Queen has done it again..thanks for sharing..
How awesome! How do you know the glass is heat safe?
Once again Lauren….you amaze me :~) Thanks for your tutorials, they really inspire me to do more…
In fact….I feel SEVERAL candles being made for Christmas this year!!
That is so gorgeous and you make it look so easy. Thank you for posting that.
Wow! This is gorgeous! Thanks for the tutorial!
SUPER COOL! I have etched glass in the passed but never thought about embossing powder as a mask! Brilliant!
This is a great technique but I think you should mention that etching cream is very dangerous and should be handled with extreme caution. This is not a good project to do around children. Also you should really wear gloves while etching and etch in a well ventilated location.
This is beautiful!!! I am so excited to try this. Thank you for sharing this. Great tutorial.
This is gorgeous!!! I’ve wondered how to do this!!! Thanks for taking the time to give us the tutorial!!! As always – YOU ROCK!!!!
This is one of my favorite things to do…I actually have something I made a while ago, but needed to wait to post it.
Beautiful job Lauren – I resisted this set last month, but I dunno how much longer I can hold out 😉 I LOVE those leaves…
Lauren,
This is so elegant and classy. What an amazing idea for Christmas gifts. As always you’ve blown me away with your amazing ideas.
Amazing project. Thanks for the detailed information and safety tips.
THis is wonderful,I have been wondering how this is done,great tutorial!.Thanks a bunch!
Gorgeous! 🙂
You are the queen…nuff said. I am heading to M’s and the dollar store today. I will link you up with full credit if I complete it without a) breaking it or b) killing myself!
This is awesome I love the way the candle turned out. Thanks for sharing how to do it.
Lauren thank you for the wonderful and easy to follow tutorial. What an elegant giftable item. TFS.
Debbie/Phx AZ
What a wonderful thing to do and a great tutorial to follow. May have to give this a go some time. Thanks for sharing!
Great tutorial. I love it! I think I might try this for some christmas gifts.
What a beautiful creation! Thanks for the tips on the etching! I have some of this, but have not yet attempted using it yet!! 🙂
This is such an awesome idea– & it looks pretty simple, too! Thank you for the tutorial and I will have to try this sometime! 🙂
What a great project! Thanks for sharing, and giving us an idea for such wonderful gifts!
What a great ‘new’ use for our stamps! 🙂
What a wonderful tutorial you have, Lauren! I bought Armour Etch last year to decorate ornaments, and never got around to it! I whipped that baby out when I saw your tutorial and got to work! Now, mine isn’t NEARLY has good as yours, but, it works, for my first one!!!!
Check it out on my blog and tell me what you think! And be honest!!!!
http://erinscrafts.blogspot.com
Thanks for such inspiring ideas!!!!
Erin
Thanks for the tutorial. This looks like a really fun project to do.
Oh I love the results, thanks for the step by step!
Wow! I think even I can do this, and I see several Christmas gifts in the making!! lol Thanks, Lauren, for sharing this with us. I certainly appreciate it.
Gail S.
Lauren,
Thanks for the awesome comment! I know I need more work on this! I have learned (albeit the hard way!) that you really have to sponge the Armour Etch up and down in nice even strokes or it looks splotchy when you’re done. I have also learned to scrape off the embossing while you’re cleaning off the remains of the Armour Etch. (That was a duh moment!) And last, I learned that adding reinker doesn’t change the effect of the etching! Darn!
Here’s a plate and cup I made. It’s better than the first cup!
http://erinscrafts.blogspot.com/2008/09/more-etching-i-cant-stop.html
Thanks again for the awesome tutorial!
Erin
Last year DS and I did an etched glass project using clear BALL canning jars and star stickers. I didn’t want to invest in the price of the ARMOUR ETCH stencils. The cream is super easy to use and our project came out beautifully but we were limited to doing only stars. Thank you for this tutorial!! I have tons of snowflake stamps and we are going to do snowflake jars this year!! DS makes his own chocolate dipped pretzel stix and packaging them in fancy jars adds to his success at crafting.
Thanks so much ,Im so excited to learn this ..Also can you tell me on another subject ,coloring your Acestete ( I know I cant spell) How and what do you use to color your image when your making 3-D
thanks
Diana
I love your votive jar!!! I saw a tut on the CHF forums a few weeks ago and have been playing with it ALOT – as Erin says – I can’t stop….stop by if ya want to see my attempts – I have done about 5 or 6 so far – I have 6 jars left from thrift store hoppin left to do….
WOW! You sure do make this look easy! I hope it really is, because I want to try this with Pine’s snowflakes!
You were the Tutorial of the Week at Card of the Week.com. You can see the original post here: http://www.cardoftheweek.com/2008/09/crafting-101–2.html.
I did use a picture from your post, with links back to the site and the original post. I hope that is OK. Please feel free to email me if you need me to change anything.
I also have an “I was featured” on badge for you if you want it 😀
Absolutely gorgeous… great idea, thanks so much for sharing! 🙂 Rose
I love the look of etched glass and have made many things with stencils and old glass I find at the Goodwill and such…but I never thought of using my rubber stamps. Oh my garsh girl, I can see the possibilities now. Christmas gifts, here I come!!!!
Thanks for sharing the wonderful instructions,
Debi – Rittman, OH
I finally got the courage to try one of your wonderful creations! I love your inspiration!
http://cruisincrops.blogspot.com
Nikki
Thank you so much for this!! I bought etching cream a LONG time ago when I worked at Michaels and have never used it. Now I am inspired to pull it out and do something!! This will make great Sunday School class gifts for the older ladies. I can use the PTI cross stamp! thanks again!
My very bad attempt at this…http://saracreativemind.blogspot.com/2008/09/happy-anniversary.html
I did it and WOW it turned out better than I expected! Thanks!!
Here’s the link to my post:
http://mytreasuredcreations.blogspot.com/2008/10/lauren-rocks.html
I saw this blog and read sensuously and appreciate the owner’s thoughts as a viewer share some points which is related.
Thank you for this wonderful blog..
Vraiment sympa ce blog, où peut on trouver plus d information sur ce sujet ? J’attend avec impatience la suite. Bravo !
Leave a reply