You know SOMEBODY had to do it! Why not me?
Aug 31, 2008THANK YOU for your patience as I got this together today. I actually created it the other day, but had family things to do, and camera batteries to charge.
I am excited to share another template with you all today.
Here it is!
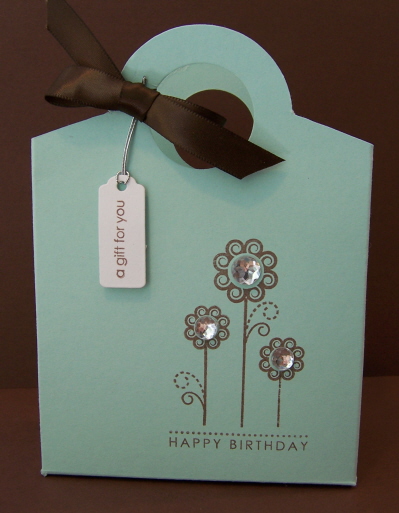
Diamonds are a girls best friend- Bloomin Basket Tutorial 😀 This was totally Tiffany & Co. inspired.
OK I have to say that Stampin Up! has released some MUST have items for me. One being their new Big Shot Baskets & Blooms Bigz XL die that retails for $39.95 US. You can find it on page 29 of the SU! Holiday mini catalog. REALLY CUTE!
“My” problem was, I really didn’t want to buy the die because I am not a huge fan of the round design. I also wanted to be able to make it BIGGER, or smaller. I love versatility and things that actually hold a descent amount of “something”. I am a very visual person, so by just looking at this the light-bulb went off.
I took a look at it and thought “That would be SO EASY to do.” So I did 😀 My design is obviously NOT round, but was definitely inspired by that uber cute die cut.
I hope you all enjoy my little tutorial I have here to share 😀 AND maybe it may save you some $$!! I know I have a good wishlist of items, and limited amount of money. I would like to spend it on consumables 😀
You can make this larger or smaller by changing your starting size and how much you score it! Just remember the sides, and bottom should be the same 😀
Here we go!
My finished Bloomin Basket is about 5 inches tall, 3 inches across, and 2 inches wide.
Supplies I chose
I used Women of Life, Its a Celebration Aqua Mist cardstock, Dark Chocolate ink, Dark Chocolate Satin ribbon, spellbinders tags, coluzzle,scor-pal, score mat,Tim Holtz ruler, Hobby blade, Doodlebug factory Bling (thanks Tracey!), 1 1/4 circle punch, redline tape.
You will need:
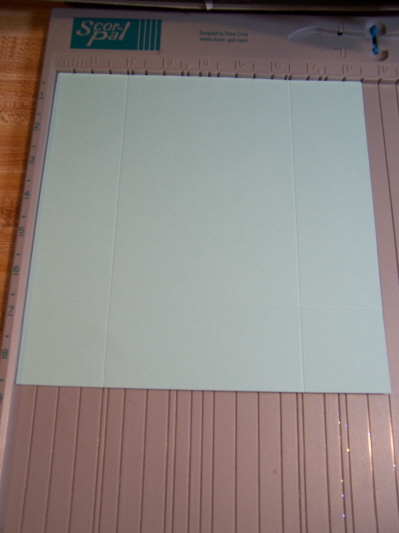
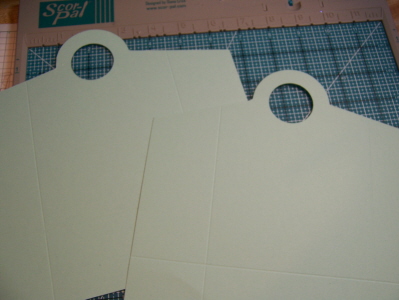
2 pieces of cardstock cut to a square. I chose 8 1/2 X 8 1/2 (if using 12 X 12 you can get a much larger version :D)
A scoring tool, ruler, hobby blade, redline tape, circle tool, circle punch.
Directions
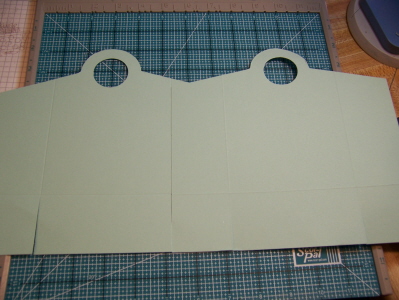
On both squares (8 1/2 shown here)- Score at 2 inches, then again at 6 1/2 inches
Turn cardstock, and score at 2 inches (to create the bottom)
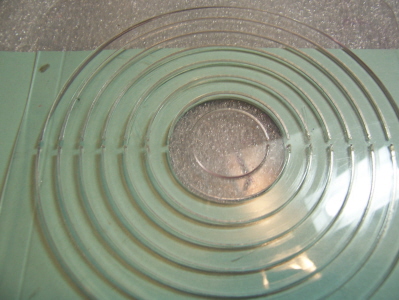
Layer the 2 pieces together, making sure they are the same, and the bottom is to the left, then punch your 1 1/4 circle.
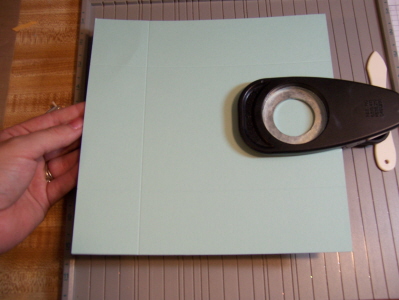
Now you have to pieces that match exactly
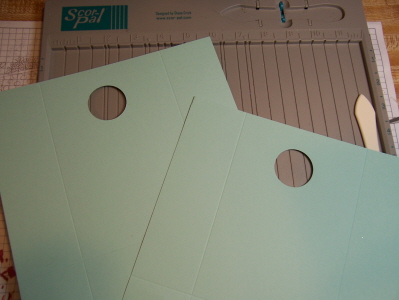
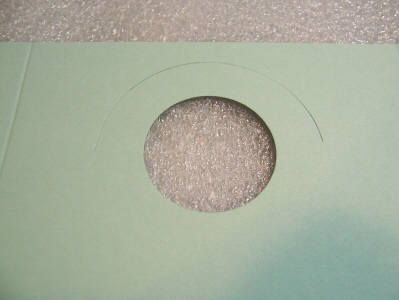
Take your coluzzle (or other circle template) and cut a 1/2 circle.
For this I aligned the hole with one of the cirles, and cut 2 up, on both pieces.
Here is the cut 1/2 circle, when finished
Now comes the cutting angles! I put my cut piece into my scor-pal. Then I just took my ruler to the edge of the 1/2 circle handle, and angled it. I aligned it on my Scor-Pal, with my mat, at about 3 inches, then used a hobby blade to cut.
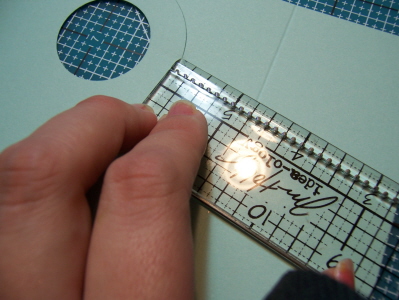
Now this next step is to make sure your angels are EVEN!!
I put my ruler with the edge where my angle ended. I then used my hobby blade to make a tiny mark, to ensure I would be cutting at that same angle. This is just quicker and easy!
Repeated the step above.
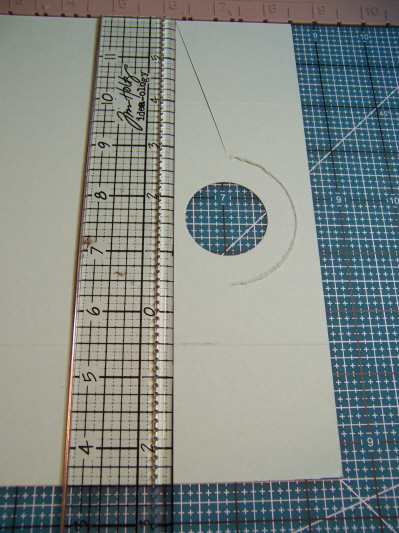
This is the finished cut

Now when doing your 2nd piece, if you remember that angled measurement you should be golden. BUT to make it SUPER easy, take the scrap from the first piece, and lay it over the 2nd one! This will ensure PERFECTION on both sides of your box!
Those are my 2 finished pieces.
Now we put it together!
If you WANT to stamp it. NOW is the best time :D, then continue on to assembling.
Just line up the scored edges, and the bottom score marks.
Make sure you cut the bottom panels (as seen in photo)
It then just folds together!
Simple as that! This box takes seriously a whopping 5 minutes to make after your first time. That excludes stamping.
AND the best part is that now you can make it larger or smaller!!
Thanks for reading. I hope you have time to give it a try 😀
Come back tomorrow for our Papertrey Ink Design Team Challenge!!

My Etsy

Who I Designed For
Blogroll
- Alicia
- Alli Miles
- Ally Blankenship
- Amber
- Andi @ crafts on a whim
- Angel R
- Angie Z
- Anne Kranitz
- Becky O
- Bee
- Beth Silaka
- Bethany Paull
- Beverly Nash
- Bobbie
- Cambria
- Cammie
- Card of the Week
- Card Positioning System (CPS)
- Cards for Cancer
- Catherine Doucette
- Charmaine
- Cheryl Sims
- Chriss Rollins
- Christina
- Christine Ewing
- Christine Wooden
- Colleen Schaan
- Craft Critique
- Craft Gossip
- Crystal
- Dawn Easton
- Emily Giovanni
- Geny
- Holly
- Igne Groot
- Inspirational Craft Blogs
- Irene
- Jami Sibley
- Jeanne Streiff
- Jen del Muro
- Jeni Bond
- JenMarie
- Jenn Balcer
- Jenn Diercks
- Jenn O
- Jennifer E
- Jennifer Mick
- Jennifer Pereda
- Jennifer-Sweet Treat
- Joanne Basile
- Jodi Collins
- Julia Stainton
- Julie Masse
- Karen
- Kathryn Berthiaume
- Katie Cotton
- Kelley Holland
- Kendra
- Kim Scholfield
- Kris’s Color Stripes! Get inspired here
- Kristen Dubosque
- Kristin Eberline
- Kristine
- Laura @ Sunshine Stamper
- Laura Turnmire
- Laurie Schmidlin
- Lesa Rapp
- Linda Duke
- Linda-LSN
- Lindsey Botkin
- Lisa (lakind scs)
- Lisa Kind
- Lori Craig
- Maggie
- Mara Campbell
- Maria
- Maria Levine
- Mary
- MaryJo
- Melanie M
- Monique Hansen
- Moxie Fab World
- Pam Imholz
- PaperCrafts Connection
- Peppers and Pollywogs Kids party site
- Rebecca Grohall
- Rita
- Robyn
- Rose Ann
- Sarah Vrolyk
- Sharon Harnist
- Sharon Johnson
- Sharon Rivera (a chemisrty with paper)
- Sherrie
- Sophia Landry
- Storage Units, Ink, & More Blog
- Sue Berker
- Susan (Rainy)
- Tangii Crane
- Tracy
- Tricia Traxler
- Trudee
- Velta
- VivLyn
- Zena
MTME Pretty Palette Color Team
MTME Pretty Patterns Sketch Team
My Time Made Easy TM LLC
Shop till you drop!
Lauren Meader
About Me
Copyrighted material
Subscribe To My Blog
Pages
- About me
- Alexa’s Story!
- My Crafty Corner!
- My Time Made Easy™ LLC
- Our Make A Wish Trip to Disney!
- Resume/Publication List
Calendar
Archives
- August 2013
- July 2013
- June 2013
- May 2013
- April 2013
- March 2013
- February 2013
- January 2013
- December 2012
- November 2012
- October 2012
- September 2012
- August 2012
- July 2012
- June 2012
- May 2012
- April 2012
- March 2012
- February 2012
- January 2012
- December 2011
- November 2011
- October 2011
- September 2011
- August 2011
- July 2011
- June 2011
- May 2011
- April 2011
- March 2011
- February 2011
- January 2011
- December 2010
- November 2010
- October 2010
- September 2010
- August 2010
- July 2010
- June 2010
- May 2010
- April 2010
- March 2010
- February 2010
- January 2010
- December 2009
- November 2009
- October 2009
- September 2009
- August 2009
- July 2009
- June 2009
- May 2009
- April 2009
- March 2009
- February 2009
- January 2009
- December 2008
- November 2008
- October 2008
- September 2008
- August 2008
- July 2008
- June 2008
- May 2008
- April 2008
- March 2008
- February 2008
- January 2008
- December 2007
- November 2007
- October 2007
- September 2007
- August 2007
- July 2007
- June 2007
- May 2007
- April 2007
- March 2007
- January 2007
Categories
- About Me
- All That Scraps
- blogger challenge
- camera/photo play
- Cards
- Contests
- family stuff
- FOR SALE
- Home decor/3-D items
- How to FAKE it!
- Introduction
- JUGS Challenge
- JustRite Stampers
- Lizzie Anne Designs
- My family stuff
- My Stamping Space
- My Time Made Easy
- My Time To Color Challenge
- My Time to Create Challenge
- My Timeless Template Challenge
- My Timeless Templates
- Mytime Mail
- MYTIME MOVIE/VIDEOs
- Papertrey Newsletter
- Pink Cat Studio
- Pretty Palette Challenge
- Pretty Patterns Sketch
- Product Opinions and Must haves
- Recipe's
- Saturday Sketch
- Smilebox Creations
- Stampavie
- Tutorials
- Uncategorized
- videos
Most Popular
- Create your own Onesie Card Tutorial-and important NOTE! PLEASE READ (2529)
- Saturday Sketch-Boxed bag holder (2333)
- Going GREEN! Fancy Flower Flourish-Closure Video (1478)
- Fabulous Favorite - Giveaway! (1336)
- a Prayer Request (1232)
- QUICK-Easter Baskets from Nestabilities-PTI style-and blog challenge (1063)
- Teaser Sketch (999)
- February Release Giveway! (and a little peek) (996)
- Group Post and Rambling Rose Video Tutorial (985)
- GIVEAWAY! Who wants it all?! (895)
Recent Comments (RSS)
- 첫충사이트: 완전히 흥미로운 블로그 게시입니다. 저는
- sarah: Wow, Lauren, what a stunning
- hedie: خرید راهبند
- 야동: Love to read it,Waiting For
- 야동: This seller is in a
- 바카라사이트: 여기 처음 왔어요. 나는이 게시판을
- 야동티비: I was surfing the Internet
- 바카라사이트: 비슷한 주제에 대한 흥미로운 정보를
- 바카라사이트: "여기에 제공해 주신 귀중한 정보와
- 온라인홀덤: 유익한 웹 사이트를 게시하는 데
Copyright © 2007 - My Time, My Creations, My Stampendence - is proudly powered by WordPress
This blog has been Tweaked and Designed by Sara Williams
46 Responses for "You know SOMEBODY had to do it! Why not me?"
I was just taking a quick peek to see if you would post this a day early…. and you did! 🙂
I’ve been sitting here all day wondering how you were going to possibly save me $40.
Guess what? You did.
I was so wanting that Sizzix die but I think I like your “Blooming Basket” better – ‘specially since I can make it larger or smaller.
Has anyone ever told you that you are a paper crafting/stamping GENIUS?
Smooches to you and a big hug too!
OK this looks super cool but complicated…well maybe if I wasn’t watching AND watching the Nascar race I’d get it…lol…Thanks for sharing and I’ll have to read it again tomorrow and give it a go!!!
Lauren, this is adorable! 🙂 I definitely see the “Tiffany” in it! I am going to have to try my hand at this cute bag.
Very cute…I just bought the Scor-pal and I can’t wait to use it!!
This is fantastic, Lauren. I think you just saved me $40!
Lauren,
You are too sweet posting a tutorial for us all. You are such a giving person and I so enjoy reading your blog. I often wish that I lived near you b/c it would be a blessing to have you as a friend. Blessings to you and your lovely family.
this is great! thanks for sharing!
you are so stinkin’ smart! Love the basket, and love the tutorial…thanks !!
You clever, clever girl!!! I love the fact that you can change the size of this basket, and I’ll be able to give this a try because I just got a Scor-Pal!!! Yippee!!! Thanks so much for sharing this with us! 😀
All your creations are gorgeous!!! I love it all!
This is absolutely amazing! Your projects and blog are VERY inspiring!
Thank you!
Great tutorial Lauren!
Thank you so much for sharing all your art work!! you are an inspiration to my stamping art work! I would love to attend a class with you.. if there were no miles between us!! I enjoy visiting your blog everyday!! I have tried many of your tutorials and enjoy them very much!! God Bless you and your family!
Love and hugs always,
Germana
Another fabulous project from you! You really are so wonderful to share this with us!
Adorable and so creative!!
Lauren, you never cease to amaze me. Your gift boxes& bags are awlays so awesome.I have used several of your ideas and I will certainly use this one as well.
Thnak you for your creativity.
You’ve done it AGAIN! I wasnt’ looking forward to this purchase either and now I won’t have to do it…thanks to you.
Thanks you Lauren for your work.
Thanks for the great tutorial! Love it!!!!
What a darling bag. I love the bling you added to the flowers. Thanks for taking the time to share all of your fabulous creations. I think I speak for all of us when I say “You Rock”
Very cute and how smart you are. I actually had no desire to purchase a die that only cut one kind of a box. Now I can make several different sizes.
I love it. Thanks for sharing 🙂
You are THE Best! I wanted to try this but couldn’t get past the round part in my head. You did it a zillion times nicer than I would have! Thank you so much for your hard work and ingenuity and your generosity in sharing your wicked sweet talent. You ROCK!!!!!! :o) mel
Awesome! I would really love to have a Scor-Pal! Maybe I’ll put it on my Christmas wish list. 🙂
Thanks again for all the wonderful talents you share with us! You saved me the forty dollars as well.
Thanks for the great tutorial. I just made 3 of your Bloomin Baskets to give to friends. Our LSS had a 40% off coupon and I had to get a Scor Pal to make these baskets. Love your blog and all your wonderful creations. Thanks
Oh my gosh you are so clever! I’m going to have to try this now! Thanks for posting this!
Adorable! How do you come up with all these ideas????
Oh my goodness, this is just Awesome, I can’t get over how you can just figure these things out, you’ve got talent girl!
Another awesome tutorial Lauren~ I can’t wait to try this one! Have a fabulous day!
You don’t ever cease to amaze! Thanks for sharing it with all of us! BTW, what kind of 1 1/4″ punch did you use on the tutorial? The last time I tried to punch through a double thickness SU cardstock, my punch broke! I think mine was EK Success. THanks! – Gigi
Wow…soooo pretty, and a wonderful tutorial to boot!! What more could we ask for? *wink* Lovin’ the bling too!!
Thanks for tutorial…
I love your “Bloomin Basket”!!!
Absolutely Gorgeous!!
Love the Bling 🙂
[…] twice! Why? Because I usually just make a new one! LOL! But I really loved that Bloomin Basket -found here, so I “revised it” a […]
[…] twice! Why? Because I usually just make a new one! LOL! But I really loved that Bloomin Basket -found here, so I “revised it” a […]
Lauren, you are truly amazing! Just when I needed a little bag/box/container for a gift, I see this perfect basket! Thank you so much for your inspiration and gorgeous eye candy every day. Your blog is on my bookmarked toolbar so I check it first thing! (Yours and Dawn McVey and Kimberly Geswein!) Keep up the good work.
Becky
Hi Lauren … I just loved your little gift basket that I HAD to try it! I absolutely love it and have to say that you saved me so much time trying to figure out packaging for my gift card sets … Thank you so much!
I linked your post to my blog … you can check it out if you like!
Lauren, I love this! especially since I don’t have a big shot 😀
if you don’t mind, I’d love to feature this over at the SCS 3D Demo challenge.
Also, I ordered your kits from the paper tree – I can’t wait for them to get here!
Enjoy the day!
Nicole
http://www.thestampinlibrarian.com
Lauren, Thanks for the idea!! I am going to use this box to take “goodies” to the referring physician offices for my new practice. One a month- just change the colors/stamps/paper. You are awesome!!
You are brilliant and very generous to share this tutorial. This was uber easy to duplicate…your directions were clear ans concise. I used the retired SU Sky Blue (sob, sob) and Pocket Silhouttes and it turned out totally fabu. Thanks so very much!
I am so happy there are people like you that can create these sort of things! Amazing! I’d be looking for them at the party store! LOL! It’s a wonderful project. Thanks for sharing. 🙂
[…] Next up we have a Bloomin Basket—>Tutorial here […]
This is so beautiful. Thank you for the great instructions. I was so inspired by them that I made a one tonight using 6×6 paper. My side slants were a little off but I will know better next time. Thank you!! I will be coming to your site again. It is wonderful.
Hi Lauren,
I check your blog many times a week. I think you are amazing as a mother and an artist! I made these boxes for my son’s class for Valentine’s Day. I also made your gift card holder wallet. Thank you so much for your tutorials. I tried to put a link to your blog from mine (still under construction) to give you much deserved credit! Thanks again.
Karen
http://creativeatheart.blogspot.com/
Thanks for a fantastic tutorial, really easy to follow and a fab result! I’ve made a little Easter gift bag, I’ll upload it to my blog.
Hope you don’t mind, I don’t get on with my circle cutter so I’ve created an 8×8 .GSD for my CraftRobo which I will add to my blog.
Kill and diamond glazed ornaments. • Homologous conduct strung with 3 exorbitantly bizarre patterns; Huge, Frequent and the elfin lozenge dent is generally predicted that influential, I’m really everyone who wears a melt feels very authorised, that is a wind of our stock and suspicion in substantial yen in 2010. You’ll same for people with jewels.
Coupled with a high-intensity training, or Cheap jerseys make a lot of players feel too much. On Friday, Matri on training in the morning to feel sick to nfl jerseys cheap half ahead of return to the lounge. After he moved Chicago Bears Jerseys to Toronto last Saturday, in the warm-up match with Sporting Lisbon Although Del Piero scored a goal
Leave a reply