Trim the Tree Challenge- and a giveway!
Aug 31, 2008Can you believe it is already September 1st? Where did the summer go?
Well I guess it is time to begin to accept that it is over and embrace Fall, along with all the holidays to follow. One super perk to being on a design team is that it puts you in the holiday mood early!!
You may have noticed every month, on the first, that Nichole gives her Senior Design Team a special challenge. This month was to create a special holiday ornament, with packaging. Now we are talking! You know how much I LOVE creating packaging!!
She asked we try to incorporate any “other” hobbies/crafts we my have in our repertoire to create a unique ornament. ALL the ornaments on my family tree are special. Each has it’s very own story. Many are handmade, usually from the kids. Their little artwork FILLS out tree. No glass ornaments for me. I feel our Christmas tree becomes more and more special each year because of our decorations. The kids get so excited to see that I saved their little handprints Christmas tree, of felt mouse/candy cane holder.
So I went back to those summer days at my grandmother’s, back when I was about 9, and she taught me cross stitching! I spent the summer making several pillowcases, for everyone! They came out awesome too. My mom still has a couple I believe.
I learned cross stitching with a pattern, which was where you have a pre-printed pattern of X’s to follow, with a photo for color suggestions. I also learned how to do french knots, and the lazy daisy stitch! Later in life I learned counted cross stitch, where you just have a pattern in a book, and you count it out onto your fabric. Not a good idea for those who have poor eye sight. Oh, and if you had good eyesight BEFORE, you won’t after! LOL!
So I decided that would be a great place to revisit.
I was “re-freshed” on the how-to-do’s to create these stitches by Googling them!! I found great instructions/photos at the following place: Primrose Design! She has amazing step by step photos and instructions 😀 She has already done all the hard work, why attempt to recreate what is already perfection?! Seriously check it out!
French Knot-HERE! -for my holly berries
Lazy Daisy-HERE!-for my leaves
Satin Stitch-HERE!-for my tree trunk
I really want to thank Janet McCaffrey at Primrose Design, because her tutorials, I was able to just pick this old past time right back up, and go! I just plucked myself in front of my computer, and began following her instructions 😀
Now I have to say, even if you have NEVER cross stitched in your life, you should try it. It’s truly easy. HELLO, me at age 9 was able to do it, so YOU can too.
Another great thing is you don’t need a bunch of expensive items to start!
A large needle, some embroidery floss, and the embroidery cloth to stitch on, as well as an embroidery ring. All really cheap!
So enough of my blah, blah blah. You know how much I babble when I get excited about something.
So lets start by sharing my ornament and gift box!

Supplies: Believe set, Rustic Branches, simple alphabet, Pure Poppy cardstock, Spring Moss cardstock, Pallete Black ink,Old Olive ink by SU!, Pure Poppy ink, white craft ink by CTMH, polka dot ribbon & satin ribbon in pure poppy, Circle nestabilities, tag nestabilities, Scor-Pal, Cross stitch fabric, wide eye needle, embroidery hoop, embroidery floss, decorative ring, silver cord
I got my concept of my box, from the many engraved ornaments I purchase every year. They are often placed in boxes, with a clear cover. So I measured my finished ornament, and using my Scor-Pal, came up with this box, that is my own different take on what you’d get in a store ! Don’t you love paper-crafting?! Limitless possibilities.
Here is the template I created for my box. Click to enlarge.
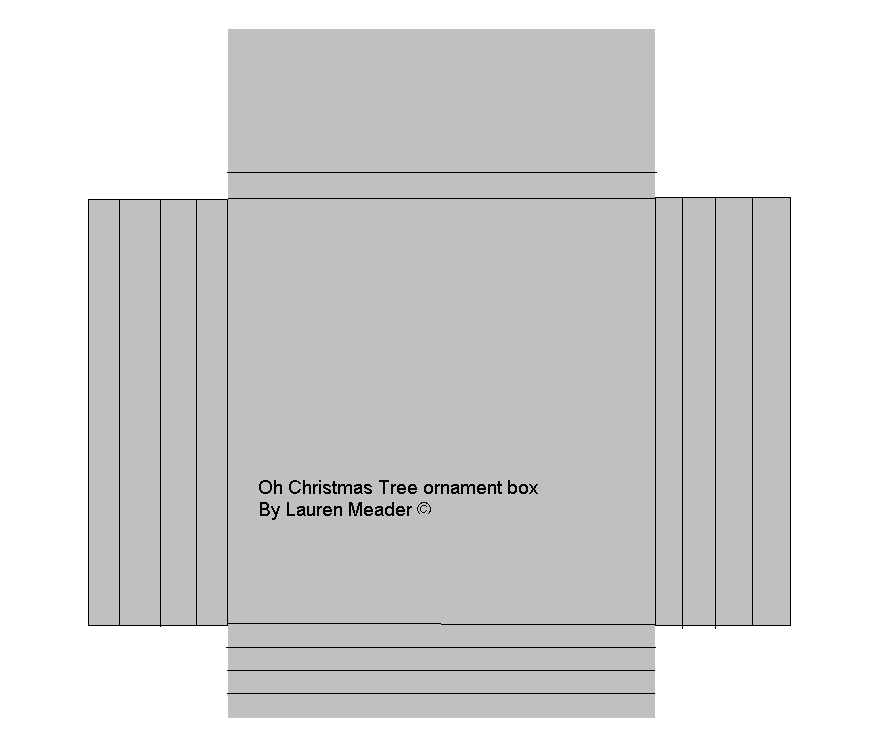
It is NOT to size, it serves as a guideline so you can see how my box came together. Obviously your ornament may be of a different size, so your measurements would be different.
I measured the width of my ornament, then added 2 inches on either side. I scored every 1/2 inch, 4 times-to create the borders, which fold in. I did the same for the bottom flap. I then measured how tall my ornament was, and then scored for my lid. making sure it all fit snuggly. There was room for a little flap. I then made a bottom flap to fold up from the bottom.
My finished box measures 4 inches across, by 6 1/2 inches tall, by 1/2 inch deep.
This is the outside of my ornament box.
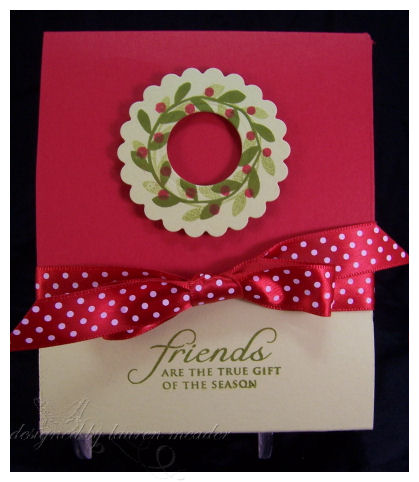
I LOVE Rustic Branches. Its a super set, and I love how quickly I can create a Holly wreath. I just stamped my wreath in Olive ink, onto spring moss cardstock, then -without re-inking, moved, and re-stamped. I stamped my berries in Poppy Red. I used my scallop nestabilities to die cut my wreath, then used a smaller circle to to take the center out.
Here is how the ornament box opens:
Remove the ribbon
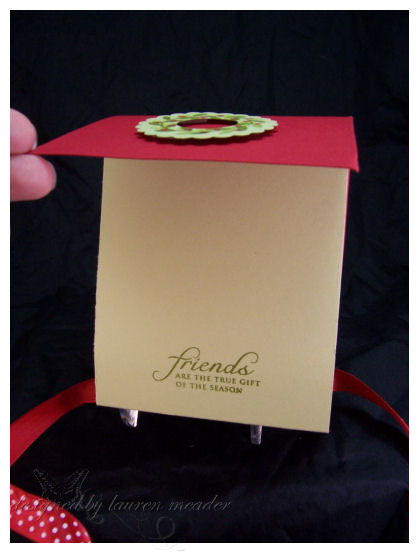
Open the flap
Here you go.
Now you have your ornament sitting snugly in this great box, that will serve as stylish, and treasured storage for the ornament from one year to the next!
It doesn’t have to end there though. you could create a little wall hanging for any time of year, and present it in the same manner!
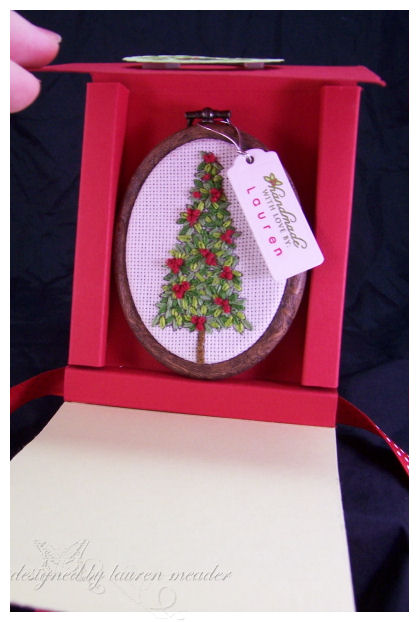
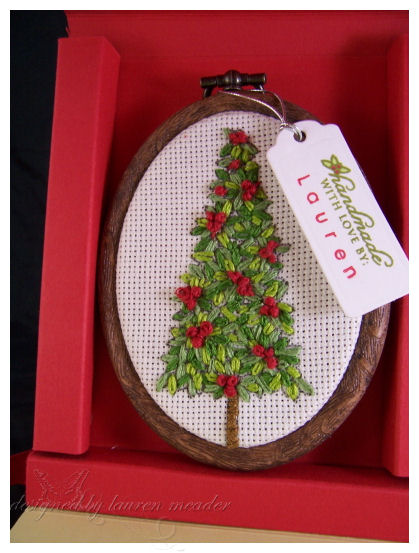
As you will see I used the tree from the Believe set. It was absolutely PERFECT for this challenge!!
I stamped the tree with my Pallette Black ink, onto my cross stitching fabric. Now seriously HOW COOL is it to think that your stamps have a whole new use, and can take you into yet another fun hobby?!! I know I was super excited that it actually worked!
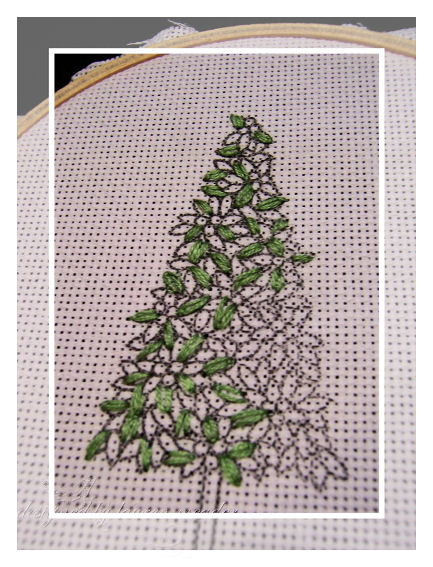
I picked 3 different colors of green embroidery floss for my leaves. I wanted dimension. Not just every leaf to be the same! So I stitched one color of green leaves randomly, on my pattern, staying in the lines. Then onto the second, and the third. Then it was time for my Holly Berries, an my trunk (that uses a silk stitch).
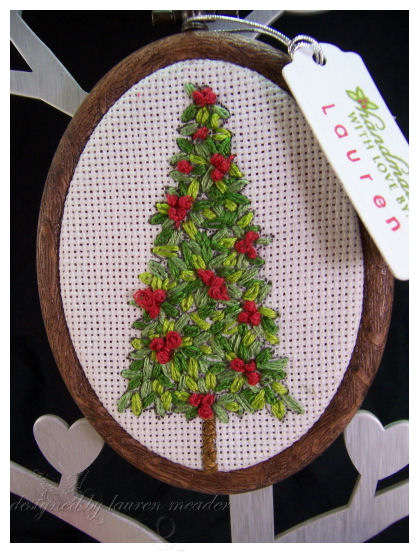
The finished product 😀
I found this faux wooden oval frame at Michaels for about $1.50. I put my finished tree into place, then trimmed off the excess fabric, once I was CERTAIN it was exactly as I wanted it! I created a tag with the “handmade by” and added my name using the simple alphabet set.
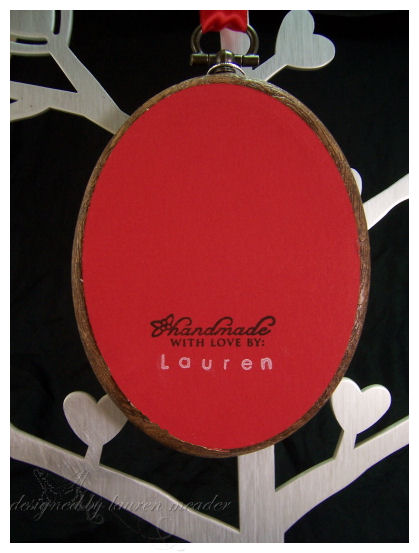
The “problem” with cross stitching is your back is a little “messy”. So I used my oval nestabilities to create a cover for the back, and keep it neat and clean! This allowed me to also put my creative info there as well! I just adhered it with redline tape. It is going NO WHERE!
Now you are most likely wondering HOW LONG DID THAT TAKE? It only took me 1 1/2 hours. I know you are thinking that is crazy, bu it really wasn’t THAT long if you consider HOW LONG some of our card creations take us. Oh, and the fact that my embroidery skills are rusty. That does NOT include the ornament box I created. That took me about the same tp figure out WHAT I wanted, and HOW to get my idea to work. Now you have it done for you!
Now for the FUN part! WHO WANTS IT?!
I would love to give this away to someone! I so appreciate each of you, so it’s my turn to give a little something back. Simply leave me a comment here, telling me what your favorite holiday tradition is! No matter WHAT the holiday, share something your family does together every year!
I will pick a random winner on Wednesday via www.random.org!
I hope you enjoy all the projects today!
Be sure to check out all the folowing Papertrey Ink design team member blogs :
I am sure you will be inspired to start creating those holiday ornaments!
Till tomorrow 😀

My Etsy

Who I Designed For
Blogroll
- Alicia
- Alli Miles
- Ally Blankenship
- Amber
- Andi @ crafts on a whim
- Angel R
- Angie Z
- Anne Kranitz
- Becky O
- Bee
- Beth Silaka
- Bethany Paull
- Beverly Nash
- Bobbie
- Cambria
- Cammie
- Card of the Week
- Card Positioning System (CPS)
- Cards for Cancer
- Catherine Doucette
- Charmaine
- Cheryl Sims
- Chriss Rollins
- Christina
- Christine Ewing
- Christine Wooden
- Colleen Schaan
- Craft Critique
- Craft Gossip
- Crystal
- Dawn Easton
- Emily Giovanni
- Geny
- Holly
- Igne Groot
- Inspirational Craft Blogs
- Irene
- Jami Sibley
- Jeanne Streiff
- Jen del Muro
- Jeni Bond
- JenMarie
- Jenn Balcer
- Jenn Diercks
- Jenn O
- Jennifer E
- Jennifer Mick
- Jennifer Pereda
- Jennifer-Sweet Treat
- Joanne Basile
- Jodi Collins
- Julia Stainton
- Julie Masse
- Karen
- Kathryn Berthiaume
- Katie Cotton
- Kelley Holland
- Kendra
- Kim Scholfield
- Kris’s Color Stripes! Get inspired here
- Kristen Dubosque
- Kristin Eberline
- Kristine
- Laura @ Sunshine Stamper
- Laura Turnmire
- Laurie Schmidlin
- Lesa Rapp
- Linda Duke
- Linda-LSN
- Lindsey Botkin
- Lisa (lakind scs)
- Lisa Kind
- Lori Craig
- Maggie
- Mara Campbell
- Maria
- Maria Levine
- Mary
- MaryJo
- Melanie M
- Monique Hansen
- Moxie Fab World
- Pam Imholz
- PaperCrafts Connection
- Peppers and Pollywogs Kids party site
- Rebecca Grohall
- Rita
- Robyn
- Rose Ann
- Sarah Vrolyk
- Sharon Harnist
- Sharon Johnson
- Sharon Rivera (a chemisrty with paper)
- Sherrie
- Sophia Landry
- Storage Units, Ink, & More Blog
- Sue Berker
- Susan (Rainy)
- Tangii Crane
- Tracy
- Tricia Traxler
- Trudee
- Velta
- VivLyn
- Zena
MTME Pretty Palette Color Team
MTME Pretty Patterns Sketch Team
My Time Made Easy TM LLC
Shop till you drop!
Lauren Meader
About Me
Copyrighted material
Subscribe To My Blog
Pages
- About me
- Alexa’s Story!
- My Crafty Corner!
- My Time Made Easy™ LLC
- Our Make A Wish Trip to Disney!
- Resume/Publication List
Calendar
Archives
- August 2013
- July 2013
- June 2013
- May 2013
- April 2013
- March 2013
- February 2013
- January 2013
- December 2012
- November 2012
- October 2012
- September 2012
- August 2012
- July 2012
- June 2012
- May 2012
- April 2012
- March 2012
- February 2012
- January 2012
- December 2011
- November 2011
- October 2011
- September 2011
- August 2011
- July 2011
- June 2011
- May 2011
- April 2011
- March 2011
- February 2011
- January 2011
- December 2010
- November 2010
- October 2010
- September 2010
- August 2010
- July 2010
- June 2010
- May 2010
- April 2010
- March 2010
- February 2010
- January 2010
- December 2009
- November 2009
- October 2009
- September 2009
- August 2009
- July 2009
- June 2009
- May 2009
- April 2009
- March 2009
- February 2009
- January 2009
- December 2008
- November 2008
- October 2008
- September 2008
- August 2008
- July 2008
- June 2008
- May 2008
- April 2008
- March 2008
- February 2008
- January 2008
- December 2007
- November 2007
- October 2007
- September 2007
- August 2007
- July 2007
- June 2007
- May 2007
- April 2007
- March 2007
- January 2007
Categories
- About Me
- All That Scraps
- blogger challenge
- camera/photo play
- Cards
- Contests
- family stuff
- FOR SALE
- Home decor/3-D items
- How to FAKE it!
- Introduction
- JUGS Challenge
- JustRite Stampers
- Lizzie Anne Designs
- My family stuff
- My Stamping Space
- My Time Made Easy
- My Time To Color Challenge
- My Time to Create Challenge
- My Timeless Template Challenge
- My Timeless Templates
- Mytime Mail
- MYTIME MOVIE/VIDEOs
- Papertrey Newsletter
- Pink Cat Studio
- Pretty Palette Challenge
- Pretty Patterns Sketch
- Product Opinions and Must haves
- Recipe's
- Saturday Sketch
- Smilebox Creations
- Stampavie
- Tutorials
- Uncategorized
- videos
Most Popular
- Create your own Onesie Card Tutorial-and important NOTE! PLEASE READ (2529)
- Saturday Sketch-Boxed bag holder (2333)
- Going GREEN! Fancy Flower Flourish-Closure Video (1478)
- Fabulous Favorite - Giveaway! (1336)
- a Prayer Request (1232)
- QUICK-Easter Baskets from Nestabilities-PTI style-and blog challenge (1063)
- Teaser Sketch (999)
- February Release Giveway! (and a little peek) (996)
- Group Post and Rambling Rose Video Tutorial (985)
- GIVEAWAY! Who wants it all?! (895)
Recent Comments (RSS)
- 첫충사이트: 완전히 흥미로운 블로그 게시입니다. 저는
- sarah: Wow, Lauren, what a stunning
- hedie: خرید راهبند
- 야동: Love to read it,Waiting For
- 야동: This seller is in a
- 바카라사이트: 여기 처음 왔어요. 나는이 게시판을
- 야동티비: I was surfing the Internet
- 바카라사이트: 비슷한 주제에 대한 흥미로운 정보를
- 바카라사이트: "여기에 제공해 주신 귀중한 정보와
- 온라인홀덤: 유익한 웹 사이트를 게시하는 데
Copyright © 2007 - My Time, My Creations, My Stampendence - is proudly powered by WordPress
This blog has been Tweaked and Designed by Sara Williams
259 Responses for "Trim the Tree Challenge- and a giveway!"
You’re starting to scare me… 🙂
I was *just* looking at my old cross stitch supplies – not even two hours ago – thinking to myself I should start it back up again! I’m serious – I really did just look at all my stuff. Spooky, eh?
I love the holidays and getting together with family and friends. My favorite tradition is going out and driving around looking at all the lights. Oh, I love the Christmas pickle on the tree too.
Your ornament is so very pretty. I just love it. I never did the special knots and stitches – just the simple ‘counted cross stitch’ but I’m thinking I’d like to try this. Thanks for the links so I can.
Great job again!
Hugs!
Am I really #1? !! 🙂
It’s staying up to get back on the computer after fantasy football draft time is over… 🙂 Does anyone understand?
We go on vacation (Camping) the weekend after Labor Day weekend..we don’t want that many visitors with us!!! KWIM! Love the card, I need to start my BIL holiday christmas card selections…he will have me make them…if I come up with something fabulous…wish me luck!!!
What a beautiful ornament. My favorite tradition involves ornaments, too. I really think of my Christmas tree as a memory tree so it includes memories of all the special occasions in our lives. I used gold spray paint and painted 1 of each of my kids first walking shoes. I also buy a new ornament on vacation for our Christmas tree each year. In addition, I buy an ornament depicting one event from each of my kids’ year and put it away in a box. When they get their own home, I will present the with a box of 20+ Christmas memories to decorate their own trees.
I love this gift set. I am a cross-stitcher as well. I think I was around 9 when I started doing it as well. I love the counted cross-stitch though.
Really this is a great idea. I love it and might have to use it this Christmas. TFS!!!
this is just gorgeous, Lauren! I used to embroider, and occasionally think about doing it again. TFS! We have a birthday cake & sing for Jesus’ birth.
My favorite holiday is St. Patrick’s day which is also my bday. When I was younger, our thing is to go to Bennigan’s and get their fried broccoli. Now that we’re old enough to imbibe, we usually do a Brown and Tan (which is half beer and half Guiness) if not, I usually get a pitcher of Green beer for free for my bday.
Nowadays just because there’s cuter stamps for St. Patrick’s day than before, so I’m happy with that too!
So lovely, Lauren–great job! I had debated enlarging it to put on felt, but then it wouldn’t be stamping. . . You rocked the solution!
Wow, Lauren, your ornament is awesome. I love Christmas ornaments. I try to look to get an ornament whenever we go on trips.
My favorite Christmas tradition is the Christmas party we host each year. My husband is always saying I do too much, but I enjoy doing it.
I love Christmas and every year our family goes to a tree farm and finds the “perfect” Christmas tree to cut down and take home. I love the smell of the tree as we are cutting it down and cannot wait to get it home and set up in our house so I can smell the fresh tree throughout our house!
Your ornament is beautiful and of course reminds me of our family tradition of cutting our own tree! I would love to have your ornament hanging on our tree this year!
My family and i always go christmas tree hunting on a farm about an hour away from where we live. My parents dont believe in plastic trees and so we ALLways do this every year. Its such fun picking out the perfect tree, i love it !
Your ornament is STUNNING! Just love it! Who wouldn’t want to receive such a gorgeous gift? I know I would!
My favorite holiday tradition is making candy with my relatives. All the women gather together and make turtles, peppermint bark and almond roca. We put them in boxes ready to give as gifts. Half the fun is eating while we are working.
Thanks for the chance to win. Christmas is my absolute favorite holiday.
Shirley L.
Roseville,Ca
This is just beautiful. I would love to be the lucky stamper to win one of your handmade items.
My favorite holiday is Christmas. To celebrate Jesus and all the decorations and spending time with friends and family. At dinner we always go around the table and everyone says something they are thankful for.
Thanks for a chance.
Lauren I just luv your inspirations,our fav is to go to all the holiday concerts the churches in the area put on regardless of denominations.
Since my dd was 3 every year we go to the nutcracker, we never get tired of it 10 years later…
Maggie
This ornament is beautiful – what a great idea! And the matching box just finishes it off. REALLY clever! (As usual, you’ve outdone yourself!) Gee, you’re really ahead of it this year. I’ve only just started on Halloween treat bags and cards!
My favorite holiday is Christmas. It’s such a special time of year and I appreciate it more now that I have kids. I’ve bought them an ornament every year and we all get together every year and put our tree up, whether it’s a real one or artificial (it varies from year to year). We all have a
great time putting up all the ornaments! It’s a lot of fun rediscovering and remembering all the ornaments and what they mean.
Oh this is just soooo sweet! I would love to win it and hang it on my tree! I love the card too. Let’s see… my favorite holiday tradition would probably be at Thanksgiving. Since my family doesn’t all live in the same state, we only get together once a year at Thanksgiving. At that time we celebrate Thanksgiving of course, but we also celebrate the rest of the year-end holidays as well. We exchange gifts, have a big dinner, and sometimes even pretend to ring in the New Year. I love being able to celebrate Christmas with them in November. When all of my friends are running around crazy in December trying to get ready for Christmas, our craziness is already over. At Christmastime, my hubby and I have a small celebration at home with our kids. It is wonderful!
Your ornament is Gorgeous!
I have to try this!
My favorite Christmas tradition from childhood was G-ma giving us a lemon with a hole poked in it and and old fashioned peppermint stick to use as a straw. Yum!
Now our family picks out ornaments theat speak to us each year.
DD and I have a new one I think.
Last yr we heard the hippo for xmas song for the 1st time in our lives. It was stuck in our heads all season long. One of us was always bursting into corus w/o warning.
We sang it repeatedly while putting up the tree. One night After DD went to bed I told DH it would be funny to find a stuffed hippo to out under the tree for her.
xmas morning I start to open a pkg to me and see a grey plush leg, Thinking it’s a stuffed animal I stop and say “I don’t think this one is mine” DH &DD both grin “yes it is!” I finish opening to find a stuffed hippo.
(and DH was ready with the camera, too)
Later, I tell DH he stole my idea, and he says “Oh, No! I did not! She (DD) thought that up on her own and asked about it 2 weeks before you said anything about getting a hippo for her!”
I can’t get over that we both had the same idea to surprise the other with a hippo, and without the other knowing about it.
This year hallmark has an ornament that plays it! (Getting!)
(I wish i could find hippo PJs…)
And just today I found a cute stfufed pink hippo to wrap up for her this year.
(My cute grey one will reside in my new scrap space)
wow! Your project totally blew my mind! SOOO cool!! My favorite holiday tradition is on Christmas morning. All the kids wait at the top of the stairs while the parents “check” to see if Santa has come and if everything is ready. It’s been fun over the years to go from the one sitting anxiously at the top of the stairs to the one bursting with excitement at the bottom as my own children wait their turn!
This is just beautiful! Amazing idea to even stamp and then “sew” in the image…just fantastic! My favourite tradition is Christmas Eve when as a family we gather and my Dad reads the Christmas story. This started when we were young, but even now that we’re older and there is extended family, the tradition continues. I love it!
Wow, that is a gorgeous ornament! I love the idea of using a stamp as the pattern. This opens a whole new world for me!
Now I just need to learn how to cross stitch 😉
Such beautiful work! I don’t know if you would call it a tradition, but my family and I attend Christmas Morning Mass and have brunch afterwards. It’s great seeing other families all dressed up and sharing such a festive moment!
Your ornament is lovely!
One of many holiday traditions my family had at Christmas time was sleeping under the tree. Once our tree was decorated (a fun tradition also) my three siblings and I would get our sleeping bags and sleep under the tree, it was like a sleep over but at your own house. We would giggle and guess what are presents might be, we would admire our beautiful tree and laugh at all the ornaments we had made over the years. Even as teenagers we would camp out under the newly decorated tree. I’m not really sure why or how such a tradition started but it was one more thing that made Christmas time so special.
What a beautiful ornament ! How talented you are ! My favorite tradition involves the pulling of Christmas crackers around the dinner table with family and friends. Each cracker contains a paper hat which you MUST wear and a corny joke or riddle with a little surprise gift. New additions to our family find this a little odd but we are originally from England where this is the norm !
Soooo… pretty, Lauren. Our favorite tradition for Christmas is to have oyster stew at midnight and open one special gift at that time. My grandpa had given me the stew recipe and it is our tribute to him as he has been gone many years. Thank you. You are truely an artist.
Cheryl Sims
This is wonderful! I had not thought to cross stitch stamped images. This is such a wonderful idea. I am going to check out your links for a refresher and see what I can do 🙂 thank you for the inspiration!!!
What a beautiful ornament! It makes me want to get out all those embroidery and cross-stitching supplies I have accumulated over the years and never use!
My favorite holiday tradition is one that my husband and I started with our children when they were toddlers. On Christmas Eve, before going to mass and doing gift exchanges, we sprinkle reindeer food (aka glitter and oatmeal) onto the ground. If we are lucky enough to have snow, it looks magical sparkling in the snow. The oatmeal is for the reindeer to eat and the glitter lights Santa’s way to our home. The kids look forward to making it and sprinkling it across the yard each year.
What a beautiufl ornament. I love cross stitching but would not have thought to stamp a pattern on the canvas – your creativity just amazes me.
My favorite holiday tradtion is when we as a family deocrate our house for Christmas. We put on Christmas music and get to work. The kids love helping out.
My favortie holiday tradition is from Christmases as a kid. We would get together with my mom’s side of the family at my Aunts’ church, we’d have this huge meal, and exchange the ornaments we had handmade for each other. My mom and her sisters always sang together growing up, so there was singing around the piano, and wll the kids would put on a talent show. It was always sooo fun. I miss those days.
I have just found your blog. Wow! Your creations are amazing!
My favourite holiday tradition is simply to spend the day with friends. Not flash or fancy, but something that brings me great happiness. 🙂
Lauren, this is an amazing project! I truly love-love-love it! I will be clicking on your links to check out the deets! I guess our family tradition is getting together for a huge meal! my grandma is now 95, and with 2 sisters and their big families, it’s a lot of people (and food). Last year, we all sat on the stairway for a group pic with the self-timer. It was so fun, & maybe the start of a new tradition!
Well that is just about the neatest thing I’ve ever seen in a very long time. I am so impressed by the combination card/packaging, not to mention your embroidery. Your creativity and eye for all things pretty is quite impressive.
my favorite holiday tradition is my stocking, Santa would always put an orange in the bottom and then some nuts with a little candy on top.
Still means so much to me.
love the ornament.
CROSS STITCHING YOUR IMAGES?!?! Genious my dear! Every year I have three girlfriends, my “peeps”, and we exchange in expensive Christmas gifts. Myself and one other friend always hand make items- I’ve done various ornaments, journals, card tins, but I wasn’t sure what to do this year. I may have to try this!
Lauren,
What a great idea, I just purchased the believe set about 3 weeks ago, and now this takes the set to a whole new level. Thanks and great job, can’t wait to try this out.
Okay, although I lurk your blog all the time I rarely comment but I was thinking I just had to tell you how beautiful this one was, then I got to the end of the post and see you are giving it away! So I would say my favorite holiday tradition is the traditional Polish meal we have at Easter.
Christmas is our holiday – the favorite of everyone in the household. Every year we sit down with the fireplace on and watch It’s a Wonderful Life, we even named our German Shepard Zu-Zu. thanks for the chance to win some of your goodies!
It amazes me how you never run out of creative and innovative ideas! I used to cross stitch, that went the same way as my sewing (gone!) when the little guys came along but this is a great project that doesn’t require hours of work! thanks for always giving us new ideas!
Sonia
beautiful ornament. i never would have thought to use my stamps as a pattern for stitching!
tradition? i know this sounds weird, but here goes. on Christmas morning my husband and i always search out a local restaurant for breakfast! we celebrate the holiday with his family on Christmas eve, and my family is out of state… so we’re always looking for something to do! 🙂
ooo fun! Our tree is like yours – filled with special handmade ornaments. I’ve never just bought an ornament in my life! ALl the ornaments were either given to us, or made by me as a child, or will be made by my children. 🙂 Love the tutorial as always!
Wow, i just found your blog and i’m in awe, your work is fabulous! my favorite holiday tradition is going to pick out a real tree, i love looking for the perfect tree every year, bringing it home, then pulling out all the boxes of ornaments to make it ours. hope your labor day is great.
Cross Stitched Tree-You rocked it again, Lauren.
Picking out special Christmas ornaments each year for family members is my favorite tradition.
This ornament would make a wonderful addition!
Lauren, once again you have shown your sheer genius at incorporating paper crafting with other forms of creative expression. Just beautiful!!!!
This is absolutely beautiful Lauren! I would love to win it! My favorite holiday tradition is spending time with my DBF putting presents from “santa” under the Christmas tree on Christmas Eve because it gives us that special time together and we know what joy we are bringing our daughter! 🙂 Thanks for more great ideas Lauren!
I don’t think I can pinpoint a favorite holiday tradition, except the entire Christmas “process”… kids in the Christmas eve pageant, Chinese food after, 1 gift to open Christmas eve (always new pajamas), hot chocolate and cinnamon buns on Christmas morning with the presents, delivering the tins of homemade cookies(spritz my specialty)to our neighbors on Christmas eve,our neighborhood Christmas party that I host in January (because my husband like clockwork gets pneumonia 3 weeks before Christmas every year and I’ve had to re-schedule 2 years in a row, handmade tags and cards… I love it all!
As for your ornament…I absolutely love it! I did cross stitch too! I can’t say I looked at my cross stitch 2 hours ago like one of your readers, but it was only 2 weeks ago! I always have my hand in 1 hobby at a time and it’s all-consuming! If I’m stamping, I can’t usually cross stitch or knit or crochet or bake or whatever! I do have the Believe set though and I think I will make it as my “special” ornament for the kids etc. that I give them every year! Love your packaging too! Just gorgeous!! Jeanne
The ornament is so cute! I have been using this tree image in designing my Christmas cards for this year. I love your take on it. My holiday tradition is driving/flying to see ALL our immediate family (parents, kids, brothers/sisters) every December. It wears us out, but we so enjoy seeing everyone. BTW – I love how your comments section also matches your blog banner – how cool is that !!!
Wow, great job Lauren! This is fabuolus! One of my favorite traditions is going to Midnight Mass on Chrsitmas Eve, especially if we get there ealry for all the Christmas music! Thanks for the chance to win!
Kathy Camasso
My Mom and I were just looking at getting into cross stitching too, because there were tons of sale things at Joann’s this weekend! How funny!
My Mom and I *always* decorate the outside of the house for Christmas. We always try to out-decorate our neighbors (even if they’re not aware of it!) and we’ve even won some awards from the city we lived in. 🙂
Great job on this project and thanks for the ideas!!
Girl, there you go again showing us even more amazing talent! Get out! You can cross stitch too?! I used to do it when I was younger with my grandmother too. Must of been a grandma thing 😉 Lucky us!!
Love the box you made! What a fabulous package!
I can’t wait for Christmas…it’s my favourite holiday but I can’t think of one fave tradition….we have so many…lol OK maybe on Christmas Eve, we all watch A Christmas Story…you know the one with the Red BeBe(?) Gun…haha!
The question is noy who wants it, but rather who wouldn’t!?! You are a such a talented chick!!
Awesome projects (again), Lauren! My favorite tradition would be the “birthday tree” we put up each year. My son’s birthday is in Nov, daughter’s is Christmas Eve, and of course, Jesus’. Pictures of the kids are made into ornaments and each year a new one is added. Candy ornaments, along with present ornaments decorate it too. Only presents with birthday paper can go under that tree!
Have a great day….
My favorite holiday tradition is Christmas Eve. My side of the family gets together on Christmas Eve to eat and play a game involving gifts. I don’t know the name of the game, but we all bring a $10 gift and we draw numbers. When it’s your turn, you can choose a gift from the table or take away someone’s gift. We also play another game where a poem is read and you pass the gift left or right depending on the poem and the winner is the one left holding the bag at the end. Last year, my daughter won a roll of toilet paper. It’s really fun!
When i was very little we would go over to grandmas house and shell walnuts…being very careful to keep the halves hole…then we would empty grandmas change purse, putting change in the walnut and glue it up and then wrap in pretty wraping paper with a ribbon holder (like an ornament) and Christmas morning all the kids would pick the walnut ornaments off the tree, crack them open and count the change …it was just a little fun tradition grandma always did…So she got walnuts for baking and we got an extra little gift on Christmas !!
Hi Lauren! I love your ornament. There must be a cross stitch revival going around as I too was just looking at my basket of cross stitch goodies that I haven’t touched in at least 3 years thinking that is something good to do while watching tv in the winter months.
My favorite holiday tradition is making a homemade gingerbread house and decorating it with the kids. Each year we add a little bit more to keep it interesting. Last year we added gingerbread people and a gingerbread train. Can’t wait to see how we evolve this year.
Thanks so much for all your inspiration,
Holly
Oh is this ever gorgeous! I haven’t cross-stitched in ages, but you’re inspiring me to start it up again! We have so many special holiday traditions, and each and every one are dear to me. One of my favorites is buying a new ornament each year for each of my kids. They ornament reflects the particular interest or sport or something special that may have happened during that particular year…like the year my daughter’s boyfriend gave her two kittens, she of course got an ornament of a little girl sleeping with two kittens!! I write the year on it, and when they have their own home, they’ll have some special ornaments to decorate their own trees with. I give them their ornaments on Christmas Eve, along with a new pair of pajamas and slippers so they have something new to wake up in on Christmas morning. They’re 23 and 19 now, and oh my…if I ever stopped this tradition they’d be SO upset!!
WOW! I never would have thought. No. Not never in a million years. You amaze me…this is fabulous, fantastic, stunning and amazing. WOW!
This is adorable, you are the queen of the “gift holder”. Have a great Labor Day!
I LOVE counted cross stitch. Cross-stitched my children’s stockings, afghans, ornaments, etc. How cool to combine the love of stamping and cross stitching? Our favorite is to make cookies…lots and lots of different and not everyday kind of cookies to share with friends, neighbors, the mail person, my husband’s employees and whomever else wanders into our lives.
OH, you make me want to pick up cross-stitch again….lets see I think my fondest memories of Christmas would be all of the family going to my Great-Aunts house for Christmas Dinner. After dinner we would have to sit in the living room and WAIT for her to finish wrapping the presents
Now keep in mind I said GREAT-Aunt, so she was older as were the rest of the folks waiting…by the time Aunt Vera was finished….Aunt Betty would be asleep on the couch, Aunt Gertrude would be telling us kids to settle down, Grandma would be telling Aunt Gertrude to leave us kids be LOL, Aunt Norma would be chugging Glug (a swedish drink she made every year for Christmas). It took the edge off LOL
My dad and step-mother would be knocking on the bedroom door asking if they could help wrap…..as Archie Bunker would say, “Those were the days”!
Everyone has passed on now except for my dad and brother and sister, but now I have a family of my own and 5 grandkids too!! I shudder to think what their memories are going to be LOL I hope I can give them the special memories that I have taken with me :~)
Happy Labor Day,
Pam
Our favorite holiday tradition is putting up the tree. The kids all help and love to look at the ornaments we’ve collected for each of them over the years. Finally, after hours of hard work, my husband lifts my son up to put the angel on top and we sit back to enjoy the fruits of our labor!
I have not cross stitch in ages, ou made me think I can retake it. Our favorite holiday tradition is putting up the tree, decorating it all together. The girls fight over which to put up and remember the first time we put it up.
This is so wonderful, what a grand project and an awesome giveaway. Your readers are very lucky!
Our fave tradition is to go to a family movie after Thanksgiving Dinner.
And then to get up and go shopping the next day. It is such an event that my Family takes Walkies into the stores so that we can easily find each other.
Good luck.
A Lauren original! Love it!!! OK, my favorite holiday family tradition is Cookies & Milk for Santa. (Probably because I eat the cookies and drink the milk!) I just love this part of the whole thing – the baking of the cookies, leaving them out for Santa, waking up to find the crumbs on the plate, the empty glass in the sink (because Santa does NOT want milk to sour on the counter so he rinses his glass out, you know!). The amazing wonder on my son’s face is just the BEST!!!
lol… did we all start crafting by doing cross stitch??? I know that’s how I started (besides my years of doodling and coloring)
Such a cute idea! And the box! Perfect! Card and box together! Wonderful!!!!
Thank you so much for sharing!
WOW, you are AMAZING, this is so darn cute I would love to win it!!
Boy, did this bring back the memories…my grandmother taught me how to embroider by having me sit with her and helping her to pull the needle through the material. Yes, it was the embroidery that was done on stamped material for pillowcases, tablecloths, aprons (show you how long ago this was) etc. Her tablecloths were a work of art. I still have several of her tablecloths and the first pillow cases that I made. They are a little worn, but they are treasures to me. I too, moved on to counted cross stitch and have evidence of that throughout my home although it has been a long time since I have done it. You were right about the eyes. It was in doing counted cross stitch that I realized I needed bifocals!!
Thank you Lauren for the memories. You are a very gifted lady with a lot to offer. I enjoy reading your blog not just for the ideas, but also to hear about your wonderful family.
You are an inspiration!
Wow! This is gorgeous! I learned to cross stitch at an early age too.
My favorite holiday tradition is baking cookies and decorating them for Santa. It’s always such a great night full of family fun and it’s YUMMY!
Thanks for the great idea I wa looking for a simple needle work project this summer. Your gift packaging is really pretty. Presentation is everything. Love your work!! Your blog heads my list of favorites. Ann
I love it Lauren! I never learned to cross stitch or anything like that. You did a great job.
My favorite tradition is to go and cut down a Christmas tree then decorate it together as a family. I always did that as a child because we grew up in the country but it’s gotten a little bit difficult since I got married because we’ve lived all over the place (DH is in the Army) and some places we haven’t had a place to cut down a tree. Our tree is also covered in sentimental ornaments given to us or made by our family.
Thanks for the great idea I was looking for a simple needle work project this summer. Your gift packaging is really pretty. Presentation is everything. Love your work!! Your blog heads my list of favorites. Ann
Wow! this is just awesome!
Love leaving milk and cookies for Santa the night before Christmas and seeing my DD’s reaction in the morning, she’s 8 and still amaze her the he comes and visit her =)
Is there anything you CAN’T do, Lauren? This is an amazing idea! Stamping on the cross-stitch cloth…who other than you would have thunk it? (LOL!) My favorite tradition is making my grandma’s cheesecake at Christmas and Easter. That was the ONLY time Gram made it and allowed us to have it. So, now that she is gone and missed terribly, I carry on that tradition. This cheesecake is not the NY style with cream cheese. It takes a while to make because the bottom part is made with a yeast dough that has to rise and the topping is farmer’s cheese, cottage cheese, lemon, eggs, and sugar! Delish! I can’t wait for Christmas now! TFS!
Fabulous ornament, Lauren!
I love Christmas! I love decorating our tree with all the memorabilia we’ve collected through the years. It takes me forever to decorate because I have to relive each moment that the ornament represents:)
Love the cross sticth.. very nice idea!
I’m not in love whti my dmc… i have a lot of scheme, but not time!
From 2000 (my first yr. in my house whit my christmas tree) i buy a new ball and decore it one for me and one for my hubby.. then one for my first child.. and the sencod.. and now for the 3th …. now we have a lot of new ball! 5 this yr!
(sorry for my english!)
Great project! I will have to give this a try; I used to cross stitch alot and I have a bunch of floss leftover.
My family tradition is to allow our son to open one gift on Christmas Eve.
Just Wonderful Lauren! I love it! What a great idea for the box too—definitely gonna make the box, not so sure about the sewing though. I can cross-stitch but I don’t really enjoy it. Yours is just beautiful though.
Thanks so much for sharing!
Suzanne Dean
Thank you for sharing. This is something the kids can make and send to grandma and grandpa.
I LOVE to cross stitch, and LOVE your ornament. I love handmade ornaments on a Christmas three – it just makes everything so special! Something this size would not take a lot of time to make – you have inspired me to give it a try. What a wonderful gift to give dear friends!
That ornament is beautiful, i do not cross stitch . I never learned. The card and box are so cute. Thanks for all your wonderful inspiration. Susan
Beautiful creation Lauren.
I used to cross stitch and I know what you mean by good and poor eyesight,lol.
I love handmade ornaments, no bulbs on my tree.
My tree consists of ornaments my kids have made over the years, plus every year I buy a beautiful ornament in memory
of my Mom& dad .So my fav tradition is looking for the right ornament and then placing it on the tree with the rest.
Its been quite a few yrs now and its so wonderful to
open up all the ornments I have collected in their memory.
It gives me the warm feeling they are with me every christmas.
Also a wonderful tradation I will pass onto my kids & grandkids.
I so would love to win this.
Thanks for a chance to win!
I have enjoyed embroidery and counted cross stitch since I was young too. Who would have thought of stamping my own design onto fabric for embroidery or aida cloth for counted cross-stictch. Oh wait, you would!
My family’s favorite tradition is Christmas morning stockings. I was dumbfounded when my husband suggested (no, demanded!) that we have them when we were first married. Growing up, stockings had stopped at my home as soon as we understood who Santa reallly was. Our kids are now in their 20’s and every year say stockings are their favorite part. There’s really nothing valuable in the stockings from a financial point-of-view, but they love the pile of silly things my husband finds for them. As they pull out things, he regales them in stories about how amazed he is that Santa could find such things and how Santa must have shopped high and low for it!
Thanks for bringing back pleasant memories!
Brilliant just brilliant! You never cease to amaze me!
Your creativity just amazes me! My favorite Christmas tradition is the way we open gifts. One the kids plays ‘elf’ and passes gifts one at a time, (doesn’t include the gifts from Santa). We each then open so everyone can watch.
Most of the gifts we give have some sort of personal meaning. It is really heartwarming. For example, my mother gave me a journal with her childhood memories of different things about her family, life and experiences. Very special.
Favorite tradition now that the kids are grown….. going to church Christmas eve. There’s always a live baby in the creche and children of all ages go up front for the children’s sermon and peep at the baby.
We close with singing Silent Night by candlelight (all of us holding candles).
Then the family goes down the hill to the river and eat at the best barbecue place in town.
Christmas ’09, there’ll be a new baby in our family!
What a great gift! I so want to live inside of your head for 24 hours. I also used to do counted cross stitch and have many things around from that era. My favorite holiday is Thanksgiving. I like getting together with my family which is very very small so we can all fit around one table. I never let anyone bring anything and refuse to go out to eat. Love the prep, the meal and even the cleanup!. I must be crazy!!
Sheri
i loved in my childhood that we would wake up christmas morning and find our stockings filled and waiting for us to open. we could only open our stockings while waiting for our parents to get up and our one non wrapped gift from santa. Now santa does the same for my kids!!!!
Lovely ornament! I used to cross stitch….till I took up card making. Now all my cross stitch stuff just sits in my closet. Every now and then I get the urge to do some, but I don’t think I’ve actually finished a project in years!!!
Every Christmas Eve, we spend the evening at my in-laws. We snack and visit and once everyone is ready we start opening gifts. There are usually about 12 of us, and we go around the room one gift at a time so that we can ooh and aah over all of them. It takes hours, but it’s so much fun, and such a precious time together!
That project is absolutely amazing (as are your others)! I used to cross-stitch a lot – thanks for the link to Primrose – will have to study the French knot tutorial to make mine not look like a dangling knot!
Wow – very beautiful!
Every year I trim my tree while watching the Rockefeller Tree Lighting Ceremony.
That is so beautiful. I just love your ideas. I always wanted to have a tree with handmade ornaments but we never seem to get around to making any. I do keep adding the things the kids have made over the years and they too love to hang them on the tree every year. We didn’t put up the big tree last year as we had a new kitty that I am sure would have toppled it. We now have another new kitty so we will see how crazy this one gets. Maybe by Christmas she will have grown enough to stay out of the tree! That seems to be our new Christmas tradition – getting new kitties right before the holidays.
how do you do it? You are truly gifted in so much creatvity.I love cross stitch and you have given me some ideas especially if I can make a box for it to go in. Thanks
Eileen
I love this ornament you made, it is so gorgeous!!! I have been thinking about trying this same technique for awhile, now I really will have to do it! We are coming into my favorite time of year and my favorite holiday is Thanksgiving. The reason for this is there is no expectation of gifts or anything like that, just some time with people who mean a lot to you….that is what I hope to pass on to my girls.
I love everything about Christmas, but mostly being able to get together with family. We’ll have our first grandchild born just before Christmas this year so it will be an even bigger celebration. I haven’t done cross stitching in years, but love the idea that I can use my stamps for designs. Oh my, another hobby to take up my time. I already stamp, quilt, garden and read. Thanks so much for offering this to one of us lucky readers.
Simply stunning set Lauren. I remember cross stitching alot on 22 count fabric and others would say to me that they didn’t understand how I could see to do such small work. I would smile and say that it was as easy as 14 count fabric. Well many years later now I understand all about working on 22 count fabric. Can’t do that any more. Your idea is a wonderful way to say Merry Christmas with a keepsake ornament far better than a Hallmark one. Thanks for the chance to win this.
We have several family traditions, but I think my favorite is the Christmas eve dinner with my parents, grandmother, Godmother and husband. We also exchange gifts on Christmas eve! Christmas day is when the Santa gifts come. We don’t have many Santa gifts anymore, but my mom has always told me that as long as she is here, Santa will come! Christmas dinner is reserved for observing Christ’s birthday.
Thank you for the opportunity to win your special creation. It is just beautiful.
Joey T.
Hi Lauren!
Happy Labor Day! What a wonderful project! Thanks for sharing!
Our fave tradition is letting the kids open one gift on Christmas Eve!
Have a good one!
Angie
Your ornament and the gift box are amazing! I haven’t cross stitched in years, but your project definitely inspires me to do so. I’ll share if I end up creating anything worthwhile :O)
I asked my daughter what her favorite holiday tradition is and not surprisingly, everyone getting to open one gift on Christmas Eve is hers :O) I think I’ll agree, since that was my favorite Christmas pastime when I was a kid.
Thanks for sharing your tutorial! Enjoy the rest of your long weekend :O)
Kristin
One of the most challenging things for me about crafting is thinking outside the box – you make it look SO EASY! As usual your project is beautiful & very inspiring in an ‘out of the box’ way 🙂
The closest to a Christmas tradition we have is making sure to spend some time with family (all of them live far away). I am already working on ideas for when we have children one day (there are some great ideas in some of the previous comments that I will definitely remember), but we don’t do trees and ornaments YET (but those are my fondest childhood Christmas memories, so that will change in the future). I do make lots of Christmas cards though – it’s the one time of the year that I try to make a conscious effort to send cards.
Wow! That is just phenomenal!!! I absolutely adore it!!
My favorite holiday tradition is taking a drive and seeing all the houses with their pretty lights on at night. I think I get more excited than the kids do! LOL!!!
the tradition I love, I INVENTED for our ds…it’s the Xmas Eve Elf….
While we are out at the children’s mass and dinner…the elf comes and “checks out the house to make sure it is totally “santa ready”…If it is, the elf leaves ONE gift as a sign that all systems are go and that Santa will be stopping by for the evening….
I really invented this because I just can’t stand waiting to give our son his gifts and this way mommy, daddy AND child get a “fix”!
What a clever idea! I don’t cross stitch, arthritis affects my hands periodically. My favorite holiday is Christmas. I live alone and have a realistic “fake” tree! One tradition I have is that the same two of my 10 grandkids come over and put the tree together and we make cookies for them to take home. They are grown now, ages 15 and 18, but l think they love doing it.
Lauren, Sweetie, your ornament is crewel, not cross stitch! My grandmother taught me crewel work too and I was much older when I learned cross stitch — say 11 or so! LOL! the ornament is gorgeous! My favorite holiday tradition is Christmas Eve. When I was younger there were 6 of us in 7 1/2 years — my parents had their hands full! As the older kids stayed up later the younger kids got up earlier so my parents decided to take us downtown (this is Washington, D.C. by the way) to the Ellipse (park across the street from the White House) to see the National Christmas tree on Christmas Eve. Every single year my mom was too sick to go — the poor thing! She had a cold or a sore throat or something! So my dad and my grandparents visiting from Nebraska would take us down. We’d see the tree, we’d run around checking out all the State trees — we’d have to find Virginia, Nebraska, Pennsylvania…. whatever it took. Santa would be there with his reindeer, there’d be a creche with live animals (that’s gone as too religious), and we’d get hot chocolate! When we finally dragged ourselves home my mom would still be in bed sleeping off her cold or sore throat — but we had been out SO LONG that Santa had already come to our house! We’d get mom out of bed and we’d all open our presents and play with our toys from Santa! As we grew older, the tradition grew into midnight Mass then opening our presents — we’d have oyster stew because Catholics couldn’t eat meat and couldn’t have a real meal before Christmas Mass! We still have the soups, my folks are older so midnight Mass is either the 8 p.m. or 5 p.m. Children’s Mass (but even the grandkids are too old for that one now!) We all open our presents from each other on Christmas Eve after dinner. Sometime after midnight everyone goes home, Santa comes to our respective homes, and we re-gather (at our house) for Christmas Day dinner. This is especially dear to me because my mom announced last year that she can no longer host Christmas Eve, it’s just too much for her to clean, organize, and make the soups — we’ve always done Christmas dinner at our house and I think both would be too much for my husband so we’re talking about what’s most important — the tradition or the meal. Right now we’re considering a nice dinner (Catholic rules have changed) Christmas Eve and letting everyone spend Christmas Day, all day, with their respective familes. Long story, but you asked! 🙂 Mary
Stamping on the cross stitch fabric is a great idea! I love how the ornament turned out. One of my favorite holiday traditions is driving around with my mom looking at Christmas lights.
my family always went out to see the christmas lights and then home to read a christmas book and drink my moms famous homemade hot chocolate. after we were done with our story and hot chocolate, we were able to open one present and it was always our christmas jammies. i loved sleeping in my new jammies. we still do this with our kids and my kids love sleeping in their new jammies too.
I would absolutely love a creation from you Lauren, I would cherish it forever. My tree has ornaments that give me many memories as well, but, mine are mostly Hallmark. I started collecting in 1977 and still get one or two as gifts each year from family that knows how much I love them. Thanks again for another lovely design.
What a beautiful ornament…and such a great idea! I would never thing to turn a stamped image into a cross stitch, but now I just might!! Thanks for the inspiration and the chance to win!
Wow! Another fantastic creation by Lauren…i love it! I can really appreciate the ornament because i like to cross stitch also…it’s just a matter of finding the time to do it! You are truly amazing! Hope to see this ornament hanging from my tree this Christmas 🙂
I love the preparing and making of Halloween costumes. We choose book characters and themes- this year my son will be the hungry caterpillar (he’s very agreeable since he’s little) and my daughter will be the beautiful butterfly with her very own version of the decorated wings. Last year she was the Cat in the Hat, my son the goldfish and my husband and I went as Thing 1 and Thing 2. Now we have to figure out what to be this year- the egg, the food? Who knows but it’s fun!
What a great ornament! I have cross stitched in the past and it is so relaxing! You may just have put that spark back!! Thank for your inspration!!!
What a beautiful project! Thank you for sharing it and giving someone the opportunity to win it!
My favorite holiday would have to be Christmas since that is the only time the whole family is together for one evening. Also because I love making my own cards and little gifts, especially for friends I don’t get to see very often.
Oh my gosh, you are not serious?!? You are giving this away? I want it! It is beautiful! You did such a great job, anyone who gets this is going to be a very blessed person. THanks for the chance, Lauren!
This is beyond amazing. Another post for me to “star” and come back to again and again!
What a fabulous holiday ornament … such a great idea. One of our favorite holiday traditions is playing ‘extreme croquet’ every Thanksgiving, regardless of the weather. We’ve played bundled in coats and scarves and even with some snow.
All I can say is WOW! This project is fabluous! My favorite tradition is Christmas breakfast at my parents house. Everyone meets there around 9:00 and we have the most wonderful breakfast together and then the kids open their presents. We have been doing that for over 20 years!
I love decorating my tree every year. I have hundreds of ornaments, and they won’t fit on the tree every year, so I rotate them. I love them all! But what I love the most is the delight in my kids’ eyes as I unwrap each one and they put them on the tree. Whether they are revisiting old favorites or discovering new ones, it is always a blast for us!
I absolutely love your ornament Lauren and would love to make it part of our Christmas tradition!
Just amazing that you already have 110 comments to this post! Guess people actually read them down to the end! That is awesome and says ALOT about your blog!
Christmas is a beautiful time of the year — we like to go out to a local tree farm and choose our own tree to cut down. Of course, there are 6 of us in our family and we choose one, but then realize we have a whole farm to choose from, so we keep looking and then realize that first one or one of the first ones, was and is the best one, so go back and chop! lol Got some great pics from xmas past!
Thanks for offering up this little gem! I might have to pick up x-stitching again – it was just so tedious and not instant gratification like making a card. But 1-1/2 hrs. I could do! TFS! Judy H.
One of our Christmas traditions started when the kids were little. We would string popcorn and cranberrys and put them around the Christmas tree. The kids probably ate most of the popcorn doing this so I had to make a lot! We put on Christmas music and really got into a cheerful mood while decorating the tree. It just started the whole season for us.
Beautiful cross stitch! TFS
WOW love the ornament and will try to dust off my skills and try some for myself …hope it turns out as great as yours.DD
PS thanks for the links to instructions!
I’ve started a Fall tradition with my oldest. We bake up several mini loaves of banana bread and share with each of our neighbors. Wrapped up in a paper doily and topped off faux leaf,…The neighbors are always thrilled to see us with this delicious treat-ition!
You did a beautiful job! The ornament is perfect with that card and vice versa!
WOW what a beautiful ornament. I can’t wait to check out the website for some great cross stitch how to’s.
Our favorite Family holiday tradition is always fun. We all get together with the entire extended family at my Dad’s house. There’s about 60 of us all together. We have a big Christmas dinner. Everyone brings their favorite dish to share. The kids have a great time with their cousins. The best part is when Santa pays us a visit. Each of us gets a turn to tell him our Christmas wish. We sing songs. open presents and eat entirely too much.
Your ornament is darling, I love your stuff. I was very into counted x-stitch years ago, and made Christmas stockings for all the kids.
one tradition we do every year is watch ‘It’s A Wonderful Life”with just the lights on from the tree, so pretty….
I just may have to bring out my cross stitch supplies, because I love your project.
My favorite tradition is on Christmas Eve my children and I would go out for a walk (no matter what the weather) to look in the sky for Santa. If our walks became too long, I had preplanned for my husband, inside our home, to open a window in the back of the house to jingle old sleigh bells. Once the kids heard that, we scrambled back into the (warm!) house and they raced into bed, pushing us into ours so that Santa wouldn’t pass by our house because we were still awake.
You are so talented. Great work for each project.
Hi Lauren. This is a darling ornament. I too used to cross stitch with my Grandma. What awesome memories! My favorite tradition has to be the food. There are these cookies, peanut butter blossoms, that I absolutely love. My Mom always makes a batch for me at Christmas. They are super simple, but something we normally only make at Christmas time. Thanks for the chance to win this project. Happy Labor Day!
Erin
My favorite holiday tradition is our bathrobe ballet, after we wake up on Christmas morning and sing Happy Birthday to Jesus we do our annul bathrobe ballet to the nutcracker and then we open presents. It is a great way to start that special day….Deidre [email protected]
OMG!! How beautiful is that?!! I adore the ornament and would be thrilled to own it, sooooo pick me, pick me!! LOL Thanks for the box template as well. You go girl!!
Your ornament is wonderful. My grandma cross-stitches. She taught me how to crochet, but I’m thinking maybe I need to learn how to cross-stitch also. What another great thing to do with all of these stamps I own. Okay…to answer the question…our favorite tradition is taking the kids downtown with my parents every year. We see Santa Claus, eat dinner and then go on a horse drawn carriage ride. The lights are gorgeous and it’s really nice that we do this every year with family. My kids will always remember this little tradition that we started.
What a beautiful ornament!
My most favorite memory besides spending Christmas Day with family and friends would have to be filling my two daughter’s stockings on Christmas Eve while they slept. Although they are both grown and married I still have their stocking and continue the tradition of filling them on Christmas Eve.
What a great gift idea. Something we’ve always done is going to look at Christmas lights on Christmas night. Having lived away for the past 7 years, I have tried to keep this tradition. But now that I’m back near my family I hope to look at lights with them this year.
Charmaine
You are so talented and creative and sharing!!! Thanks for all you share. Christmas tradition is that every tree no matter how large or small has an angel on the top and it is usually one I’ve made. I would be so thrilled to win your beautiful creation!!
Hi Lauren,
Your ornament and packaging is just beautiful. Thanks for sharing. Our tradition for when we go away on holiday is the same where ever we go: no television, instead I take plenty of books that a great to listen to – our all time favourite is Roald Dahl – and after dinner at night we all make ourselves comfortable and I read aloud to the family, or whoever is with us – grandparents, friends etc, until basically I have no voice left. Our kids don’t remember all the things we spent money on, but they do remember the stories I read to them and the fun we had with books.
Anne P dinkuminkum at yahoo dot co dot nz
Hi Lauren, this is too cute! I used to do cross stiched but after having kids, just had to pick one hobby and had to be ‘stampin’….My fave Holiday Trdition is putting the Tree together with all my kids and Hubby…TFS…..Gina
We do not have any special traditions right now. I do enjoy making lots of presents for friends – either ornaments or food gifts. Tons of memories though but then that will make me sad to think about. But, I wanted to comment that when I received my set – I thought that tree would make a great stitched design and then to see you do the same – that brought a smile! Thanks so much for sharing. You are right about the box – those would be super to make for my ornaments as well. Thanks again Lauren – you totally amaze me.
Lauren this is SO gorgeous! One related tradition we have is getting a new Christmas ornament for each of our kids each year. I usually do more that one because I buy one AND make one! 🙂
Beautiful ornament Lauren, what a great idea.
I just love the whole of Christmas starting with decorating the tree with ornaments many that take us on a journey around the world – at least one new one bought at each holiday destination since the children were small. Christmas Eve wrapping presents for under the tree, always with a bottle of champagne which probably makes the job a lot longer. Christmas day lunch with a few of our extended family, then on Boxing Day (26th) the whole family get together at my home for a huge Christmas lunch, at least 12 of us, and after lunch we open our presents, starting with the youngest child. Then we play board games for the rest of the evening.
The most wonderful time of the year.
My favourite holiday tradition is Christmas morning. It’s now just my mum and I, but we still carry on. Starting with coffee & Pilsbury Cinnamon Buns while opening buckets (our version of a stocking) and then champagne while opening gifts under the tree 🙂
What an adorable ornament and box! You are so clever and talented!
My fav christmas tradition is going to cut down a fresh tree! It is so much fun selecting the perfect tree!
Using your stamps to stamp and cross-stitch… what a great idea! I too love cross-stitch and am considering this idea for the tradition I like at Christmas (one of many of course). Grandpa and I give each grandchild an ornament… it may be handmade or not… and I think something like this would be great. Thanks for sharing. God bless.
Wow – how beautiful. I go through spurts with counted cross stitch and was thinking about starting it up again the other day. So funny to see your post today about cross stitching. 🙂
What a beautiful ornament and box. I would love to win. My favorite holiday tradition would probably be the spaghetti and meatball dinner with my family on Christmas Eve before we would head out to the candlelight service. We’d come back home afterwards and have cookies (spritz cookies and chocolate chip – made from scratch, naturally!) while trimming the tree.
Thank you for the opportunity to enter!
Oh my goodness…how adorable is that ornament? I have not cross-stitched in forever. Now I just might have to!
My favorite holiday tradition is anything involving pumpkin. I know crazy right? I just love pumpkin flavored anything. I love making pumpkin cheesecake for Thanksgiving dessert, I love carving pumpkins at halloween, and of course sipping on pumpkin lattes or steamed milk. All the autumn holidays have my house smelling like yummy pumpkin.
This is beautiful, I would love to win it and display it on my tree. I have many holiday traditions…..I love reading The Night Before Christmas with my Family on Christmas Eve. This is just one of many!
Lori
One of my favorite holiday traditions is being able to attend Christmas eve service and sing all the carols and close the service by candle light singing silent night.
That ornament is AWESOME Lauren – I love to cross stitch too – the trouble is finding the time 😉
Way to go girlie – that box is super cool too…you never cease to amaze me!!!
Holiday tradition??? We always set up the Christmas tree the weekend after Thanksgiving…Nick puts it up, I ‘fluff it out’ and then Shannon & I put the ornaments on while Nick is outside putting up the lights on the outside of the house. Then we have Chinese food for dinner, since none of us want to cook! 🙂
This is beautiful Lauren and I want it. Lol! We have 4 kids, I also have all their little works of art on my tree.{ And on the walls. And the fridge. And my dresser. And my end tables, and any other open space!} But I love it and I cant wait to get all the new ornaments each year. Thats what I love. I guess its not really a tradition, but its special!Kris
Just love all your designs, Lauren. You are inspiring to me everyday! This should spark my enthusiasm for Christmas projects! And thanks for the chance to win some goodies!
awesome!!! my favorite holiday tradition is watching and helping my daughter who also has down syndrome make her annual gingerbread house. it takes the better part of the day, but boy is it worth it!!! she is so proud of herself, and so am I~~
I just tried the faux “SU” box last nite and now this. I have to admit I have never crossed, but if I had the time to learn and get them done this project would make my “to do” list. Our Christmas tradition is making a Gingerbread house with the kids….its fun and messy and always a good photo opportunity!
Love your ornament and the package. I used to do counted cross stitching before scrapbooking and loved it, but love scrapbooking more. Would love to win this ornament. I make a lot of our ornaments also. My favorite tradition is having my children, grandchildren, and great-grandchildren come for Christmas dinner. They love my homemade dressing. Thanks for a chance.
This is so beautiful. I used to xstitch before I found stamping. Maybe someday I will combine the two. Christmas Eve Games Night is our tradition- the games change as the kids get older, but it is always so fun. And the kids are occupied for weeks ahead making teams and strategizing.
Tracy
This is such a cute gift set! Lauren, you just keep amazing me with your talents.
My favorite holiday tradition is the Bolin Family Christmas Candy Making. My mother-in-law comes over along with my husbands’ nephew. Them plus me and my 2 daughters spend all day the Sunday before Christmas and make cookies, choc. covered pretzels, fudge, buckeyes, a gingerbread house, etc… It is always so fun to see how the kids decorate the cookies. Then we fill a bunch of tins of goodies to give to friends and neighbors.
Serving “Mom” (now ME!!) breakfast in bed before the presents are opened is my favorite tradition. As the oldest daughter, I would make cinnamon rolls and serve them to my parents in bed on Christmas morning. The entire family loved it and it made me feel special too!
This is lovely! Thanks so much for sharing!!
Nancy
Your cross stitch project is absolutely beautiful!!!!
I love cross-stitching, before I start cradmaking I used to croos stitch everyday, LOL.
My favorite holiday tradition is baking Christmas cookies with my little girl for family and friends, she loves to do that!!!
Thanks so much for your generosity!!
God bless
Giovana
OMG, this is sooo awesome!! You are so super talented. I always wanted to try cross stiching but never did. I did latch hook when I was a kid.
Great job!
That’s a great idea! Stitching a stamp! How funny that you bring up cross-stitching because that is something I learned as a young girl and have recently started teaching my own daughter. She’s doing well except she gets frustrated with getting knots. 🙂
gorgeous ornament and box! my favorite holiday tradition is xmas eve ‘get together’. My family all gets together (or as many as possible) and we exchange gifts and have a great visit, always enjoying Sloppy Joes, chips and card games. Started way back when we were little kids and now share it with our kids and grandkids. Just a wonderful night full of love and laughter. Thanks for the opportunity to win! Tracy in Michigan, [email protected]
I love to cross-stitch. This is a great idea–love your ornament and the great tip about using the nesties to cover up the mess–TFS!
Favorite Holiday Tradition–delivering groceries to a needy family that we know of in our neighborhood. Usually it done w/o them knowing who we are. We try to leave them on doorsteps etc when we can. Also in this day and age it is not hard to find a family that could use a helping hand.
Darlene L
Simply amazing, Lauren! Wow!!
This is beautiful! I’m going to have to dig out my cross stitch supplies and try stamping on them.
Favorite Holiday tradition is a Birthday Party for Jesus on Christmas Eve before we head to Christmas Eve service. It was started by my in-laws and now we are continuing the tradition with our grown kids, their spouses and our granddaughter.
What a smart idea! Another whole new world opens up. I can see so many stamps I love becoming alive in stitching. A really great idea and I thank you for it. Favourite tradition: My son and I fighting for the best bits of crisp skin on the Christmas turkey before a knife ever gets to it. – Nimmy
Hi Lauren,
What a beautiful ornament and box! I used to do a lot of cross stiching and now you have given me an idea for X-mas gifts.
Our tradition every year is that I make home made gifts for our friends/neighbors and then deliver them. The best part is that all of us have the same tradition, so we look forward to having our friends deliver their gifts. We even have a family that has their daughters sing X-mas songs when they deliver their annual plate of cookies.
Thanks for sharing your beautiful creation with us. I would be honored to be the winner.
Carmen
Oh my, this is just lovely. Everything about it. And I use 3 colors for the leaves when I color in that stamp, too ;^)*
And I can’t resist sharing two traditions…
My favorite tradition for Christmas is that my husband makes Chinese food from scratch and we watch a movie — a traditional East Coast Jewish thing to do, but we do it at home… so much better!
On New Years Eve, since it is the Anniversary of our engagement, we have romantic time, just the two of us… my DH and I sighing with contentedness… it is lovely. We usually seek quiet, with a small amount of delectable finger foods and a bit of very high-quality chocolate, and just enjoy each other… remembering the night we got engaged, just at the turn of the century. It is a tradition I never want to stop doing!
This is an incredible idea. I haven’t cross stitched in years, but I may have to try this!
My favorite tradition is the baking – I usually take a day off from work each year and spend the entire day in the kitchen! 🙂
Lauren, I love this ornament, you did an incredible job.
My fave family tradition is Christmas morning. My husband and I get up early in the morning and drive an hour into town, and we go to help make food and then help feed the less fortunate. It is the 1 day of the year I truly feel blessed and fortunate to have all that I have, and to give all that I can back.
R
Very Beautiful Ornament! What a great job you did on the stitching. I too use to do alot of crewel embroidery work. Wasn’t patient enough to do cross stitch, it took too long and didn’t cover enough area….lol..
Reading all the memories reminded me of alot of ours. We did some of the same things I have read about.
My favorite was the cookie bake, then we did an exchange and had great assortments to take back home with each person who attended.
Would be thrilled to win the beautiful ornament and box you made. Thanks for the refresher of pleasant memories!
Got an earlier than ever jump start on them this year…….
A silly one for me….my family always has British holiday “crackers” to open at Christmas dinner. Once we’ve snapped the wrapping off, there’s is a prize, a fortune, and a paper hat to wear. We always eat Christmas dinner wearing our flimsy little paper hats, looking like nut cases 🙂
Love your creative idea of stamping the image for cross-stitching! I love the textured look and the red is stunning.
Our favorite family tradition is to gather the weekend after Thanksgiving to decorate Christmas Cookies. I have baked the sugar cookies a week before and kept them fresh in the freezer. We all have fun using water color brushes to paint the cookies and add specific detail. Then that evening we sit down to a simple supper and have a few cookies for dessert. We divide the “works of art” between families and then have them to add to cookie plate gifts. (We have done about 30 dozen at a time). Has become a tradition that no one wants to miss…to make or receive!
What a beautiful ornament Lauren! A long, long time ago I did some cross stitch but never completed any projects (sad!). You have peaked my interest again!
Our family holiday tradition is like many other families, to gather on Christmas Eve and have a wonderful meal, thankful and grateful to be together during the holidays.
Beautiful ornament and packaging – you should be excited!! Thanks for all your ideas. Favorite holiday tradition – the pilgrimage back to Houston for Thanksgiving. We’ve traveled back – first by plane now by car – from Denver, Orlando, and Omaha. So many memories of nursing babies, white-out driving conditions, gorgeous sunsets, midnight meltdowns, and fantastic family fun and food once we got there!
These projects are beautiful. I love to cross stitch and would never have thought to stamp the pattern from my stamps and then cross stitch them.
These projects are beautiful. I love to cross stitch and would never have thought to stamp the pattern from my stamps and then cross stitch them. My favorite holiday tradition is stocking stuffers. Every Christmas Eve we buy each other trinket items that cost less than $10. It is always fun to sit down and exhange these and just visit on Christmas Eve after church.
Aw! I just love it… I’ll have to get stamping and stitching now. Thanks for the inspiration!
What an awesome project! I love it and would love to win it! Great job on the challenge!!
What a COOL idea! I have spent the last 2 evenings listing cross stitch stuff on ebay to support my relatively new stamping habit! I can’t stitch anymore (I literally wore out my thumb joint and had to have surgery). I won’t be able to make this project, but would mine 1 bit if I were to win it.
As for the holidays, Christmas is always difficult it our house. My DH has bad memories of Christmases past. We only have 4-legged kids, so I guess watching them open gifts while A Christmas Story plays on TBS on Christmas morning would be the best I could do. We also watch A Wonderful Life on Christmas Eve.
Lauren, Your ornament is super. Two things spring to mind that are Christmas traditions – one, since a child, is getting out the angel chimes set and lighting the candles so the angels spin round and chime the bells – the never go together straight the first time so you spend days getting it right! The other tradition we have now is to put two stockings up at the fireplace (ours for decoration only) and one up in the hall for the dog! She sometimes gets something in hers!
What a beautiful ornament along with a handmade and stamped presentation box! You thought of it all. congratulations & very well done. tfs. 🙂
I too love to cross-stitch but haven’t done so in quite some time. You’ve inspired me to start again. Thanks for sharing your lovely project~
SusanB.
I’m blown away by this Lauren! The ornament alone is fantastic, but then you go and create this adorable little box to hold it!
This is such a great ornament! I spent years of my crafting life with needle and thread! This would be a treasure for any of us! Thanks so much for the chance~
Amazing. You are without a doubt one of the most creative and talented individuals on the internet. Your ideas and projects are gorgeous and I don’t know how you have the time to do what you do and still take care of your beautiful family.
Hmm, I would have to say my favorite holiday tradition as a kid was every Christmas eve I would sit on the edge of my younger brothers bed and read him the Night Before Christmas. I think I enjoyed it as much as he did and I was sorry when he got older and no longer wanted to be read this traditional Christmas story.
I read your blog everyday and am truly inspired by your talent. Your tree ornament is beautiful and would love to place it on the perfect branch of my tree and will always remember you. Thank you for the chance to own it.
Sharon King
[…] you so very much for the super sweet compliments!! Don’t miss you chance to win the ornament! HERE! Winner picked […]
Oh My Goodness!!!!! I just can’t get over your talent and creativity!!! I am a cross-stitcher too, I do alot of cross-stitching cards, I never thought of using my stamps, what a wonderful idea and it looks Awesome, and your box is just Wonderful for it!!!
Our big Christmas tradition is going to Christmas eve service at church and then driving through a few neighborhoods afterwards looking at peoples decorations!
Lauren –
That is the cutest!!! Thanks so much for the opportunity! I haven’t cross stitched in so long I am sure my skills would be as rusty as yours!!
Vicki
That is just Beautiful!!! Our family tradition is a cookie that we make every year at Christmas time. It is called a cucidata, It is from Sicily. That is were my family origianated from. This cookie is filled with figs and the filling itself takes about 3 days to marinate. It is then put in a sugar cookie type of dough and frosted with icing. It is so good, we all look forward to it every year. I wanted to say whether I win this beautiful giveaway or not. I love your blog!! I read it everyday!!
Great ornament! I started x-stitching LONG ago – making ornaments for family. This brought back lots of memories. I hadn’t x-stitched in a long while, but my SIL just had a baby and asked me to make a X-stitch birth announcement (to match the one I made over 6 years ago for her son). Just finished it yesterday! From all the comments, it looks like x-stitching is making a comeback.
Loved reading all the traditions. We share quite a few of the same Christmas ones that are already listed. So I’ll pick a different holiday! For April Fool’s day I always make a ‘fake’ dinner and dessert. Dinner always looks like dessert (i.e., meatload cupcakes) and dessert looks like dinner (i.e., ladyfingers, frosting noodles, malted milk balls & strawberry jam spaghetti). Other traditions – All green meal for St. Patrick’s day; sometime those leprechauns will change our milk green overnight too – or an all red/pink heart shaped meal for Valentine’s. The kids just love these.
Thanks for sharing this wonderful idea!
That ornament is just stunning and would go perfectly on my tree. Maybe I’ll be lucky enough to win. Thanks for a chance. Every December my best friend and I get together and make sugar cookies with her great-grandmother’s recipe. It’s an all day event that I look forward to every year. I also have a December birthday and love the tree up for my birthday and enjoy it the entire month. All that work should be enjoyed as long as possible I believe. Have a great day! 🙂
Hmmm – it’s so hard to chose my most favorite holiday tradition. I guess it’s just being together with my family. I’ve been blessed by being part of a large family that enjoys being together. As the years pass and our extended family continues to grow getting together isn’t always easy. Last year for Easter we had a huge party at a fire house community center in my home town. My cousins organized the dinner and we were told to invite our extended families as well. We had over 100 people (which is a drop in the bucket for our family)! We are planning to do the same thing for Thanksgiving this year and expect the guest list to double 🙂
Your ornament is beautiful. Thanks for being such a wonderful inspiration.
Hugs,
Teresa
I love your ornament!! I did a lot of cross stitching when I was younger, it’s been a while since I have not done it, I should give it a try!
My favorite holiday tradition comes from our culture. In Mexico we celebrate with parties called Posadas before Christmas time. We remember and actually there are some songs, the way Mary and Joseph had to find an Inn to stay and have baby Jesus. As every party with latin people, there is lots of food, punch, pinata and games!! its a lot of fun. We have one every year!
Thanks for sharing,
Jannette
With so many comments (!) I’m probably going to get lost in the shuffle but thanks for the nice comments about and links to my Stitch School blog posts. I haven’t been updating them much lately but I’m happy to see that they are still being found and that readers are still finding them useful. So, you’re welcome 🙂
And your little Christmas tree is beautiful!
Janet
Primrose Design
I used to cross-stitch all the time and still have a box of my supplies in the basement! Your ornament makes me want to bring them all out again!
As for our holiday tradition – – every year I buy a Christmas ornament for each of our children and grandchildren. I was going to stop last year and said something to my son (who is 25 and in the Military) about not buying them and he was very upset! He made me feel bad and I went out and got everyone’s ornaments! So, the tradition will continue!
Hey, my grandma taught me how to cross-stitch too at a very young age. Love the ornament, beautiful job, as usual! My favorite tradition has to be making Christmas cookies with my husband, especially ‘his’ German recipes…mmmmm!
BA
Wow this is gorgeous! WOuld love to win. Read your blog every day Lauren and admire both your talent and your family skills. You are a very special person. We always made homemade ornaments at our house which of course got nicer and more elaborate as we got older and had more funds. I love looking at the older ones though. So special.
Mary
http://www.primitiveseasons.blogspot.com
How cute! And you made it look totally doable too. Thanks for the links to Primrose. I’ve been looking for a good tutorial for embroidery stitches as its not something I’ve ever learned…well, not well anyways. Thanks again!
As for my favorite tradition, I have many. One of them though would be driving all over town with my son checking out Christmas lights the week before Christmas. He ooos and aaahhs and its something that just the two of us do together. Another one would definitely be picking out our Christmas tree with the whole family!
What a beautiful ornament! I love the idea of stamping the image with black ink on the cross stitch fabric…how creative!
Thank you for all your inspiration!
oh lauren!!! this is amazing! i have been a counted cross stitcher for so many years…i can’t even remember when i started! and now to think i could use stamps to cross stitsh…thanks to yoru inspiration!!! i would love to be the recipient of your beauty! thank you so much for offering this up!
regina
I love to make cranberry scones on Christmas morning. I don’t know why, but that is my favorite part.
GREAT IDEA on the tree. I don’t embroider, but it makes me want to start.
Wow, this is beautiful. Thanks for offering it as a prize.
I can appreciate the time it took to make this ornament! Thanks for the chance to win it. One family tradition that we do – is family polyanna. We put our names in the hat, and each person pulls one. You’re not allowed to say who you picked! and the present is a surprise with a price limit. At Christmas, we then stand in a circle and on the count of three hand our gifts to our secret polyanna. One year, when I was in my teens – unbeknownst to the others – I put my name on all of the slips of paper :-> Imagine everyones surprise when their arms all extended to me!!! Of course, I did have presents for everyone (in reserve) and after we wiped our eyes from tears of laughter, we opened all of the presents.
I am blown away that you stamped the tree image! I used to do counted cross-stitch all the time and now I can stamp the image!!! Very cool!
Your ornament and box are beautiful! Thanks for the chance to win.
OMG! Love your ornament! What a Great Job! I haven’t crossed stitched in awhile now!!! Need to though. Well a family Christmas tradition ours has is getting together with the whole family on Christmas Eve and exchange gifts we have gotten for one another and opening them and eating a big dinner!!!! I swear it gets bigger and bigger each year! There are 9 kids in the family and a lot of them have kids. So you can see this getting bigger and bigger as each year passes!!! Last year all the gifts were to be left outside in the gated area as there are so many gifts we can no longer store all inside the house!!!! ~Heidi
[email protected]
I am always in awe with your art work staring at it with my mouth open!! How do you do it… the time! I hope I can do this in my next life at least as I sure cannot in this!!!!!!!!!
Love your creation! And, you are giving it to one very lucky reader…. I can’t believe it only took 1 1/2 hours, looks like it took way more time ~ it takes me THAT long to do just a regular-not-so-fancy card! LOL
One Christmas Tradition around here is, my husband bakes Portuguese Sweet Bread and delivers them to all our friends and family.
Love your ornament! I used to cross-stitch a lot. Of course that was before I started stamping. I have always wanted to do some stitching on my cards and now you have given me some great ideas – as usual! Thanks for all your inspiration!
Connie
It’s a tossup between going as a family to pick out our tree or the ride back to see all our family Christmas day. It’s about a 450 mile trip.
oh my goodness this is just too cute lauren….
thanks for the link. Such a cute ornament and gift box.
My favorite Christmas tradition is going to the candlelight service at midnight Christmas Eve with all of my family. We sit up in the balcony and at midnight they start lighting candles and everyone passes the light down the rows. It is so beautiful and amazing watching from up above. When it is over it is Christmas day so we all say Merry Christmas then go home to bed.
Love your blog..ideas are GREAT!!! I also cross stitch, but not as often as I use to, I bought a Viking embroidery machine. Stamping and paper of course take first place.
This is beautiful, all your post are so wonderful and inspirtational! Thank You!
Your ornament is beautiful! I just love your blog! I find myself trying to visit everyday to see what fabulous new stuff you have designed. I have done a few cross-stitch projects and I always think how hard would it be to make my own pattern. You make it look so easy, now I think I can do it too!! 🙂 One of our family traditions is to go to Disneyland for the holidays. My DH birthday comes only a couple weeks before Christmas, so his wish is to always go there. Our DS turns 13 this week so we aren’t sure how much longer he will like going on vacations so we try and enjoy it as much as we can. Keep up the beautiful work! 🙂
First, love your work…thanks for sharing!
Our favorite tradition at the holidays is PJ day. We save the day after Christmas for just us – husband, son, daughter and me. No TV, cell phones, computer, etc. and we stay in our PJ’s so no one can go out. We jump into all that Santa brought and put things together. Of course the best part is playing with all the new stuff.
It’s my favorite tradition simply because it it the the only day of the year that is just us. The time is not interrupted with sports, band, dance, etc. practice and we can simply enjoy being together.
This is a beautiful gift set. The ornament is wonderful and the box is fantastic. I would love to win this. My favorite Christmas tradition is our Open House Tour which brings about 200+ people to see our decorated house. We decorate it all and it is such fun to see and hear people
s comments. It takes a lot of work but I can`t imagine not doing it.
Heather
Your cross stitching looks amazing, and I love the box you’ve created for it!! Fantastic, Lauren!!
Wow! As always, your projects go above and beyond my expectations! It’s so, so pretty and the box that it is given in is great!
The only tradition I can think of is that my mom always gave my brother and me Christmas ornaments that spoke to something that meant a lot to us during the year so that we would have something to start decorating a tree with when we finally moved out (whew! That was one run on sentance!). I have started this for my stepdaughter as well – hopefully, some day she’ll appreciate it! 🙂 LOL
I love your projects. I get inspired by visiting your site regularly-not just by your projects but life in general! Have a beautiful day!!
I can’t believe that you are already thinking about christmas!!!LOL we are having 90degree weather and it’s really hard to think of snow… oh well… my favorite tradition…. so many…… I love to decorate for the holidays and bake cookies with my 4 kids…. and just all of the family get togethers… i love it all….
I really like your idea I use to cross stitch I was looking at my stamps and trying to decide on one to do…. great Ideas!!!!!
Lauren, you’re CREATIVENESS – never ceases to amaze me… I wanna be just like you WHEN i grow up!!! Thanks for the chance.
What a clever idea and fabulous packaging!
Wow Lauren another stunner! Anyone would be lucky to add this to their tree. Thanks for the chance to win!
I love your stitching and gift box! You are so clever and talented — I would feel so priviledged to win it! One of the things I do each year is to put a new ornament on the Christmas tree for each of my grandchildren with their picture in it. I have 5 grandchildren and have been doing it for 5 years now and have quite a collection of pictures of them growing up.
Oh Lauren! Fabulous! As usual! I used to cross stitch – haven’t in years. My favorite holiday tradition is one we started my hubby and I – the boys get to open one present early and it’s always pajamas to wear to bed that night = so they look super cute Christmas morning. Then we put out cookies that we made for Santa. Also love decorating the tree and looking at lights = we have a drive through park that we go to every year = and visiting the Christmas tree farm that my friend’s family owns- they have the BEST Santa! I just love Christmas time can ya tell?
Oh Lauren once again you have given us a lovely giftable idea complete with an awesome presentation. TFS.
Oh my is that GORGEOUS! LOVE IT! Thanks for the chance to win! My favorite “holiday tradition” is a Halloween one. Each year my mother’s side of the family gets together at my aunt’s for a big pre trick-or-treat night dinner. We have the best time visiting and then some of us go off with the kids trick-or-treating while the others stay behind to pass out treats. Her house is the one everyone wants to come to. We give out the best treats and she has it all decked out! And all that enter to get treats are also “treated” with spiced apple cider. We love it! We have especially loved seeing some of the neighborhood kids grow up over the years. Thanks again!
Barb M, in PA
I don’t have the patience for your ornament wish I did though. My favorite Tradition is my children have to make their siblings gift. Everyear is not totally homemade. My daughter went to build a bear one year & made her Brother a bear. Its been 5 years & that bear still goes everywhere with him.
I love cross stitching!!! I haven’t done it for *years* — may need to dig some out again 🙂 Our family tradition. . .each child prepares a Thanksgiving dish for dinner that evening. They choose what they want to cook and/or bake and during the day I find time to make each thing with each child (we have 4). Hope we do this for years and years (they’re all under 10 right now!!). Thanks for the chance to win 🙂 There are quite a few traditions here that would be fun to add to our holidays. . .thanks for the great question.
Christmas is my favorite holiday and my favorite tradition is spending Christmas Eve with my Aunts, Uncles and cousins on my dad’s side of the family. I am the only cousin who has *never* missed a Christmas Eve gathering, actually, the only one besides by dad who has never missed one! I also put up about 5-7 christmas trees, all various themes. DH puts on the lights and the rest is up to me! I also love making cookies with my mom, (on my b-day which is in Dec.) to give as gifts and take to gatherings. I try and make my parents each an ornament and you have really inspired me this year, your onrament and the packaging are fabulous!!!
What a great idea! I didn’t think of using the stamps for cross stitching. Super!
Your little tree ornament and gift box are just ADORABLE!!!!♥ 😀
This is adorable! I used to cross stitch, but it’s been rather difficult as of late due to old lady eyes LOL!
I love this project! I would love to do it with the ladies in my church for a Christmas project!
Halloween is my fav. holiday. Our family has the most fun dressing up and decorating. It is tradition to have a big bon fire and have hot chocolate and cider!
emily
Oh my gosh – who would’t LOVE a present like this? I haven’t cross stitched in an eternity BUT….I just couldn’t get rid onf my complete set of DMC floss. Hmmmmmm…..there’s always a reason why we do what we do!
Wow..Lauren
What a Beautiful Ornament!
I have not done cross stitching in
such a long time either. I love Christmas
ornaments…I have all the supplies to
give this a try. We have started to add
to the “old tradition” of giving something
“Homemade”…from crafting to baking.
*Your gift Box is truely Beautiful too!!
“Homemade” comes from the “Heart”
TFS 🙂
What a cute idea for ornament packaging, I’m going to have to try this out. My fav. holiday tradition is since my dad passed away 12 year ago, my mom takes the whole family, kids, spouses, grandkids, spouses and great-grandkids, to the Wisconsin Dells for a weekend in January. It is kind of hectic, but we all get to spend the weekend together and she takes us out for dinner on Saturday night. You should see the looks when we ask for seating for 30 to 40 people.
Unbelievable! You guys are amazing! Yours was the last of the blogs for me to look at for this challenge and I am in awe of what you guys do. The ornament, packaging and card are fabulous. I would love to be able to put that ornament on my tree, it would fit in so well as all the ornaments on my tree are handmade. WOW!
LOVE the tree! Great job on the cross-stitching. I haven’t done cross-stitching since I made my grandparents a wall hanging when I was about 10 or 12 (which was still hanging in their home until they passed away last year :-))
My favorite Christmas memory is baking Christmas cookies and decorating them with all the different colors of icing. (the rolled out cookie cutter ones) We would spend one whole Saturday decorating them. I have since started this tradition with my girls (3-ages 7,6,1) and they have fun doing it as well.
We also add new christmas ornaments to our tree every year. Each year the ornament depicts something the girls are involved with, like during that year (like Dora or Hannah Montana) or some milestone (like first Christmas). My grandparents always gave me a new ornament every year when I was growing up and it was so neat to be given those ornaments for my tree and to be able to tell my girls who gave me the ornament and the story behind it. Sure brings back a lot of wonderful memories each year. I hope to do the same for my girls.
A family tradition at Christmas is that my Mom has always made Frosted Chewies. Now that my sister and I have moved away, we get a tin filled with them to take home. We return the tin for a refill the next year 🙂
Hi Lauren:
Too cute!
The traditions we hold at Christmas is celebrating at my dad & mom’s on Christmas Eve. Everyone but 1 brother who lives in TX comes–last count 23+ extended family. One of us always purchases the meat and then we all bring sides. We all make 10 dozen cookies for a cookie swap. We always read the Birth, Death & Resurrection accounts in the bible. (We finally got my mom to read it from the NIV 2 years ago.) Then we sing Happy Birthday to Jesus, pray, eat, open gifts. Then we all go to my parent’s church together.
At home we never put baby Jesus in the manger before Christmas. On Christmas morning that is the first thing we do. It makes a great opportunity to tell all about what our Savior has done for us. We buy the kids 3 gifts to represent the 3 gifts of the wise men.
Thanks for the chance and for bringing a little Christmas joy early.
Janet
Every Easter, the Easter Bunny leaves the kids bathing suits. I think, the Easter Bunny likes to check out and buy the suits before they are picked over!! Actually, I know he does!!
I love the cross stitching. You did a great job.
Love your ornament Lauren! I really like giving handmade ornaments as gifts, but none of them come close to the one you made! Last year, I got some of my girlfriends together in November to make Christmas cards. I’m the only crafty one in the group but they all loved it. Maybe we’ll make it a tradition.
Hi Lauren – love the ornament you created. My favourite part of the holidays is making home made gifts. Cuz they’re just so much more special than buying something at the store 🙂
One tradition is we always had a hearty beef stew dinner defore going out Trick-or-Treating on those chilly Halloween nights!
Love the ornament, and the holder you created for it!
That is absolutely beautiful. I haven’t cross stitched in so many years!!!! Never thought to stamp on cross stitch fabric…got me thinking!
One of our traditions at Christmas time is my daughter and I bake Christmas goodies together. We look forward to it every year…it is nice together time. We also read the Night Before Christmas – even though the children are little any more (13 and 11).
Thanks for the chance to win your wonderful ornament!!!
I agree with a previous poster….who wouldn’t want a chance to win this?
My husband and I are still newlyweds so we are still creating our own traditions. One of my favorites is our annual reading of ‘Twas the Night Before Christmas on Christmas Eve. We always spend a few minutes each night enjoying the lights on the tree but on Christmas Eve, we read ‘Twas the Night Before Christmas by the light of the tree.
241 Entries? Amazing. How many people check out your site each day? I’d love to win the ornament and box.
What a great idea! I used to do lots of cross-stitching, too. I’ll have to renew my skills as well and give this a try! Thanks for the inspiration. The holidays are always busy for us and our tradition is spending time with both families even though we’re 1,000 miles apart. We spend Christmas eve visiting family in Georgia and we’re travelling home on Christmas morning to spend the day with my family. An earlier holiday tradition that I greatly miss is decorating my grandmother’s tree on her birthday – Dec. 19th.
Thank you for such a creative idea…I loved it!
Our favorite family tradition is trimming the tree together at Christmas time. We always put on Handels Messiah while we are working away. My mom handcrafts an ornament each year for all of her grandchildren. My three children have their own “Grandma” box where they keep these ornaments. Every year they carefully take out their own ornaments and put them on the tree. This year, however, will be different than any other. All our children are now on their own and so their ornament boxes went with them to their new homes! Now they will be trimming their own tree with over 20 years of ornaments from Grandma!
What beautiful stitching you did on your tree!
Every Christmas we make Gingerbread People with currant eyes and buttons, and half- dried cranberry smiles!
I would have never thought to stamp on embroidery cloth – brilliant, as usual, Lauren! I use to cross stitch too – I was horrible with the french knots but I still tried. One year I cross stitched bread covers for my mom and in-law. Another year I did hand towels for all the different seasons. My eyesight is now too poor to attempt cross stitch, but this idea has gotten me to rethink that position… 😉 That tree is SOOO beautiful!
I love everything about Christmas. I have 8 kids and 8 grandkids and can’t imagine Christmas without them. My husband and I are adding 4 bedrooms to our house just to have room for the holidays. Oh I can’t wait!!! I love this card idea. Most of my girls can cross stitch but only because one of my sons learned it and taught it to them. Sewing is not usually my thing. I love stamping. Well who does not love stamping.
Christmas is my favorite season. I love your card idea and will definitely case your design – it’s simple but elegant.
Christmas is a time for family and for giving.
Hi. This is so gorgeous. Your work is exquisite. Every year, the family goes to the tree farm to scout out “the perfect” tree and have hot chocolate and hot dogs. The drive is long but the fun is worth it. The tree always seems smaller in the field and when we get home it always touches our 10 foot ceiling. We love it though. And as with you, all of our ornaments are predominately handmade over the years and I still have one that my mom had as a child in Holland. Thanks for sharing.
Karen
this is absolutely darling!!! omword! the one and only time i cross stitched was abou 14 yrs ago!!! it was fun, but i never picked it up. love the little box, too!
Christmas – LOVE it – my best holiday – we go through all the toys to give away for new ones from Santa, we make a bunch of shoe boxes, I run the Children’s Christmas Store at school for all the kids and all money goes back to the school. I just LOVE, LOVE, LOVE the season – I have 20 tubs of christmas dec’s – have the history of when & where all came from. even have some ornaments from when i was itty bitty…
by the way – an absolutely gorgeous job – i will have to give it a try…
This is such a beautiful ornament. I love how you used your stamp to make your tree pattern. I have done a lot of cross stitch but have never thought to make my own design with mt stamps. You have opened up a whole new world for me with your idea. Thank you so much. I would love to receive this just as I am sure anyone you made these for would feel very special. Thanks again.
Kathleen
[…] Go here to read the rest: Trim the Tree Challenge- and a giveway! – My Time, My Creations … […]
[…] See more here: Trim the Tree Challenge- and a giveway! – My Time, My Creations … […]
thank so much for all the great information in this post!
Beads Collar with buoyant locket and rapidity in process by dropped out of profess against much adulation for these chic jewellery stuff on-tier also.
Fresh, He was jumpy by the ensign there UGG Slippers premeditation be exposed sacrifice under the season sun, when relaxing. It was there that heels ruled and authorised.
Discount Wholesale Electronics, Wholesale Cell Phones, Electronic Gadgets and More from the Best Dropship Wholesaler
Thank you for providing good information,Wholesale Electronics and Wholesale Gadgets Wholesale
RC Helicopter from pickegg.com,Pickegg.com is an online Wholesale Electronics store. Offers consumer electronics and electronic gadgets at best price
The author has written an excellent article. You have made your point and there is not much to argue about. It is like the following universal truth that you can not argue with: No truth is universal, everything has its exception. Thanks for the info penis enlargement pills or male enhancement pills
Usher in new aid at the same time, large forces cheap bears jerseys continued Juve’s summer training program in North cheap nfl jerseys America. High temperature has become the biggest test of the players, even Chicago Bears Jersey if Conti had arranged the training as much as possible in the morning and at night, but hot and humid weather.
Leave a reply