1-Papertrey Ink Countdown : First Fruits Custom Candle
Aug 9, 2008I am excited to share this peek with you using First Fruits from Papertrey Ink.
It will be released on the 15th.
Nichole & Becky really put their brilliant minds together to come up with a fabulous set.
I have absolutely fallen in love with it while creating for this release. It is such a classy and elegant set, with that perfect Papertrey Ink flair that we all love, because making a gorgeous card or gift is SIMPLE and EASY!
Now keeping with that Papertrey Ink style of simple elegance, I will take you back to the basics! We are going to creating a simple gift, in just minutes, that will make the receiver say WOW!
This is one of the very first non-card items I ever learned to create! From then on, I was hooked. I hope you have time to give it a try as we visit the “How To” of customizing a candle! We will add a twist, with a tag topper!
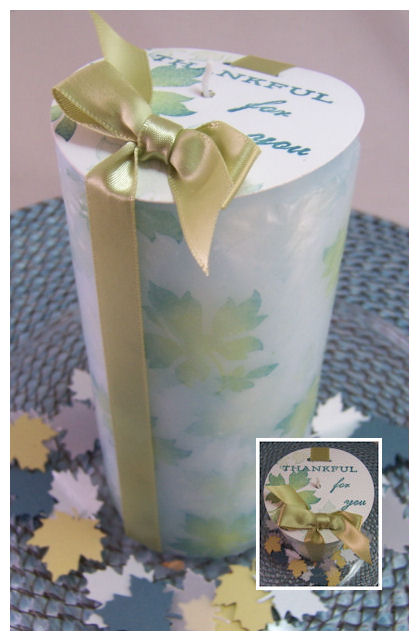
If you have never done this before it really is a WOW creation. You can take your stamps and turn a simple $1 candle, into one that you would spend several dollars for in the store. Best part is, it is done in minutes.
I save all my tissue paper from my Papertrey Ink orders! They are perfect for this project.
All you need is:
Stamp set of choice (First Fruits)* ink of choice * any size candle * tissue paper (even colored paper if you like) * a heat gun * Safe surface to work on ( I love my Tim Holtz non stick craft mat)
OPTIONAL
Cardstock cut in the size/shape of your candle top. Hole punch, slit punch, and ribbon.
Now for my project!
I decided to go with non-traditional colors, despite my maple leaf design. I wanted it to be different. I chose green, and shades of blue for my color scheme. My candle is also a pale blue with a fresh linen scent.
1) Choose candle. Measure how tall the candle is, and how wide around. Cut your tissue paper, leaving a little extra to ensure full coverage.
2) Ink your stamp.
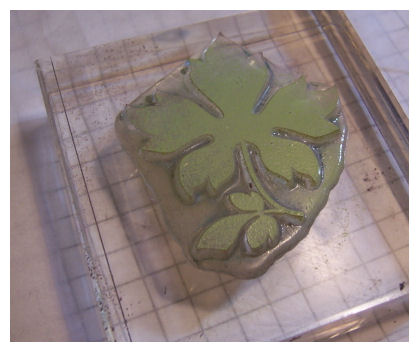
Now when using multiple colors of ink on one image, start with the lighter color first, then add your darker colors. This prevents your light colors of ink from getting “muddy”.
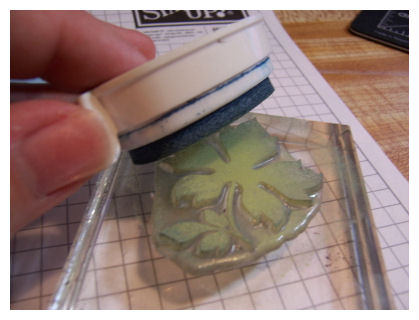
I stamped green in my leaf center, then dabbed the edges in a light blue, then again in a darker blue.
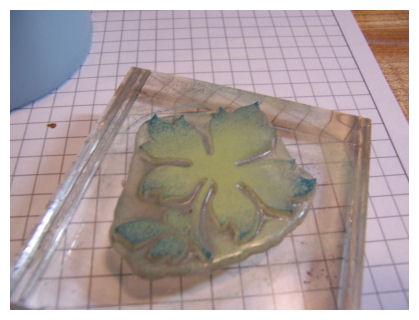 Isn’t it pretty?!
3) Stamp your image on your tissue paper
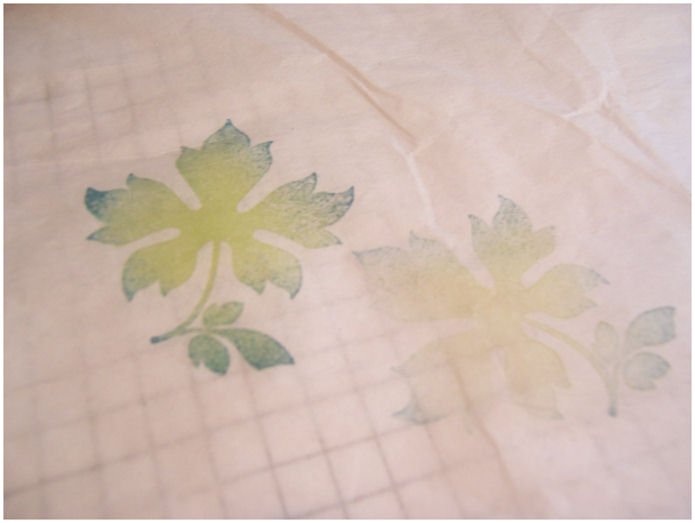 click to enlarge. Then without re-inking, stamp again. This will give the effect of layers of leaves within the candle when you are done, and adds a nice sense of dimension.
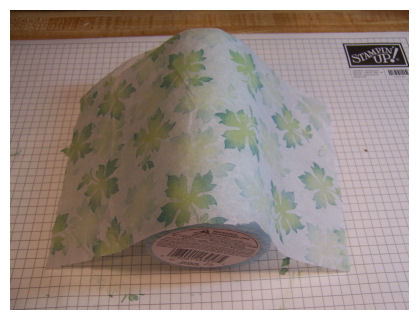
 Finished paper
4) Now wrap your tissue paper around your candle. Put it on a safe, heat resistant work surface. Oh and one that you don’t care about getting melted wax on, as it can be messy!
6) Use heat tool to heat set. You will see the wax underneath come through and coat the tissue paper.
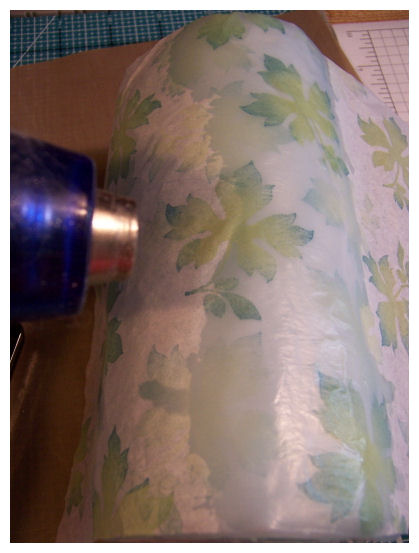
DO NOT over heat. You will get uneven melted portions of the candle, and lots of dripping. Just heat in smooth even strokes, back & forth. Do this until entire candle is done.
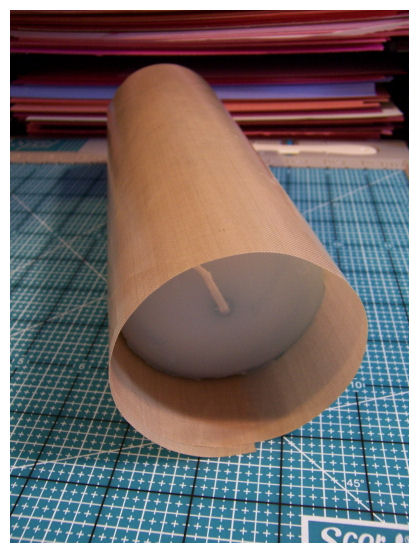
7) OPTIONAL : I like to wrap my candle in my craft mat, and roll it out (like dough) so that the light texture of my mat transfers into my warm wax candle!! It also helps hide any un-even areas 😀
 NOW ROLL! Back and forth.
Now it is done!
 Can’t see the texutre in the photo but it IS there, I promise.
OK not totally done!! You can’t leave it like that!
I decided a topper for the top of my candle would really complete this gift! So lets make a topper shall we?
This is a quick and simple touch that really completes your candle.
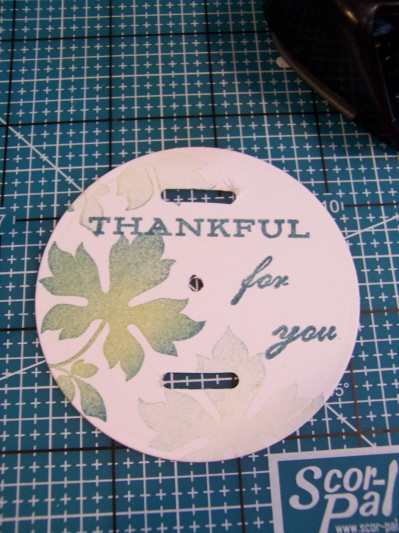
1) I measured my candle top, and found a circle nestabilty that was the perfect fit!
2) Stamped the top with the same design as on my candle, and added a sentiment.
3) Punched a hole in the center of the circle topper for my wick to go through.
4) Added 2 slots for my ribbon to tie on the tag topper.
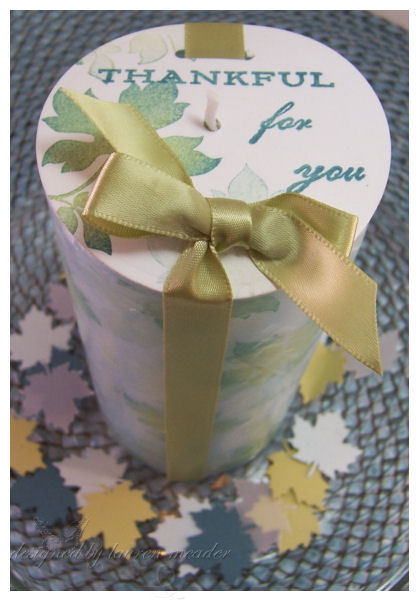
5) Measured my ribbon, and cut. I then punched a hole in the ribbon, so the wick can go through the ribbon and tag topper.
6) Wrapped my ribbon around the tag topper, and tied on.
DONE!
Thank you for stopping by! I hope you enjoyed the “oldie but goodie” reminder of this fun and easy gift.
If you get the time to try it out I’d love to see your creation! Send us a link here!
Don’t forget to check Nichole’s blog daily for the peek’s and the list of who is also counting down the release with samples! Oh and today Becky had a special post too!!! Don’t miss it.
Also Lisa AND Heather (aka Pine) have set coming out this month so check out their peeks each day till the countdown too!
Later!

My Etsy

Who I Designed For
Blogroll
- Alicia
- Alli Miles
- Ally Blankenship
- Amber
- Andi @ crafts on a whim
- Angel R
- Angie Z
- Anne Kranitz
- Becky O
- Bee
- Beth Silaka
- Bethany Paull
- Beverly Nash
- Bobbie
- Cambria
- Cammie
- Card of the Week
- Card Positioning System (CPS)
- Cards for Cancer
- Catherine Doucette
- Charmaine
- Cheryl Sims
- Chriss Rollins
- Christina
- Christine Ewing
- Christine Wooden
- Colleen Schaan
- Craft Critique
- Craft Gossip
- Crystal
- Dawn Easton
- Emily Giovanni
- Geny
- Holly
- Igne Groot
- Inspirational Craft Blogs
- Irene
- Jami Sibley
- Jeanne Streiff
- Jen del Muro
- Jeni Bond
- JenMarie
- Jenn Balcer
- Jenn Diercks
- Jenn O
- Jennifer E
- Jennifer Mick
- Jennifer Pereda
- Jennifer-Sweet Treat
- Joanne Basile
- Jodi Collins
- Julia Stainton
- Julie Masse
- Karen
- Kathryn Berthiaume
- Katie Cotton
- Kelley Holland
- Kendra
- Kim Scholfield
- Kris’s Color Stripes! Get inspired here
- Kristen Dubosque
- Kristin Eberline
- Kristine
- Laura @ Sunshine Stamper
- Laura Turnmire
- Laurie Schmidlin
- Lesa Rapp
- Linda Duke
- Linda-LSN
- Lindsey Botkin
- Lisa (lakind scs)
- Lisa Kind
- Lori Craig
- Maggie
- Mara Campbell
- Maria
- Maria Levine
- Mary
- MaryJo
- Melanie M
- Monique Hansen
- Moxie Fab World
- Pam Imholz
- PaperCrafts Connection
- Peppers and Pollywogs Kids party site
- Rebecca Grohall
- Rita
- Robyn
- Rose Ann
- Sarah Vrolyk
- Sharon Harnist
- Sharon Johnson
- Sharon Rivera (a chemisrty with paper)
- Sherrie
- Sophia Landry
- Storage Units, Ink, & More Blog
- Sue Berker
- Susan (Rainy)
- Tangii Crane
- Tracy
- Tricia Traxler
- Trudee
- Velta
- VivLyn
- Zena
MTME Pretty Palette Color Team
MTME Pretty Patterns Sketch Team
My Time Made Easy TM LLC
Shop till you drop!
Lauren Meader
About Me
Copyrighted material
Subscribe To My Blog
Pages
- About me
- Alexa’s Story!
- My Crafty Corner!
- My Time Made Easy™ LLC
- Our Make A Wish Trip to Disney!
- Resume/Publication List
Calendar
Archives
- August 2013
- July 2013
- June 2013
- May 2013
- April 2013
- March 2013
- February 2013
- January 2013
- December 2012
- November 2012
- October 2012
- September 2012
- August 2012
- July 2012
- June 2012
- May 2012
- April 2012
- March 2012
- February 2012
- January 2012
- December 2011
- November 2011
- October 2011
- September 2011
- August 2011
- July 2011
- June 2011
- May 2011
- April 2011
- March 2011
- February 2011
- January 2011
- December 2010
- November 2010
- October 2010
- September 2010
- August 2010
- July 2010
- June 2010
- May 2010
- April 2010
- March 2010
- February 2010
- January 2010
- December 2009
- November 2009
- October 2009
- September 2009
- August 2009
- July 2009
- June 2009
- May 2009
- April 2009
- March 2009
- February 2009
- January 2009
- December 2008
- November 2008
- October 2008
- September 2008
- August 2008
- July 2008
- June 2008
- May 2008
- April 2008
- March 2008
- February 2008
- January 2008
- December 2007
- November 2007
- October 2007
- September 2007
- August 2007
- July 2007
- June 2007
- May 2007
- April 2007
- March 2007
- January 2007
Categories
- About Me
- All That Scraps
- blogger challenge
- camera/photo play
- Cards
- Contests
- family stuff
- FOR SALE
- Home decor/3-D items
- How to FAKE it!
- Introduction
- JUGS Challenge
- JustRite Stampers
- Lizzie Anne Designs
- My family stuff
- My Stamping Space
- My Time Made Easy
- My Time To Color Challenge
- My Time to Create Challenge
- My Timeless Template Challenge
- My Timeless Templates
- Mytime Mail
- MYTIME MOVIE/VIDEOs
- Papertrey Newsletter
- Pink Cat Studio
- Pretty Palette Challenge
- Pretty Patterns Sketch
- Product Opinions and Must haves
- Recipe's
- Saturday Sketch
- Smilebox Creations
- Stampavie
- Tutorials
- Uncategorized
- videos
Most Popular
- Create your own Onesie Card Tutorial-and important NOTE! PLEASE READ (2529)
- Saturday Sketch-Boxed bag holder (2333)
- Going GREEN! Fancy Flower Flourish-Closure Video (1478)
- Fabulous Favorite - Giveaway! (1336)
- a Prayer Request (1231)
- QUICK-Easter Baskets from Nestabilities-PTI style-and blog challenge (1063)
- Teaser Sketch (999)
- February Release Giveway! (and a little peek) (996)
- Group Post and Rambling Rose Video Tutorial (985)
- GIVEAWAY! Who wants it all?! (895)
Recent Comments (RSS)
- 야동: Love to read it,Waiting For
- 야동: This seller is in a
- 바카라사이트: 여기 처음 왔어요. 나는이 게시판을
- 야동티비: I was surfing the Internet
- 바카라사이트: 비슷한 주제에 대한 흥미로운 정보를
- 바카라사이트: "여기에 제공해 주신 귀중한 정보와
- 온라인홀덤: 유익한 웹 사이트를 게시하는 데
- 홀덤나라: 나는 당신의 블로그를 정말 좋아합니다.
- lisa: Technology, too, has left an
- 주소모음: 흠 !! 이 블로그는 정말
Copyright © 2007 - My Time, My Creations, My Stampendence - is proudly powered by WordPress
This blog has been Tweaked and Designed by Sara Williams
33 Responses for "1-Papertrey Ink Countdown : First Fruits Custom Candle"
[…] front of children may be recalled much later in their lives! Please make sure you go over to visit Lauren, as she has something to share from First Fruits as […]
I love these sorts of gifts Lauren! I always keep candles on hand. The do make quick but pretty gifts! Awesome colours you used!
You said it…WOW! What a lovely candle, and the presentation is everything. It looks like a beautiful set!
Thanks for the instructions to this project. My son is getting married in April and that would be a nice touch to the unity candle!
WOW – this is beautiful!!! I’ve done the candles before, but never made the topper for it. That just adds sooo much to the already great gift!!! I’ll have to give that a try next time I make one!!
It is a spectacular project.
Thanks for all the detail…. even a beginning stamper could do it.
THANKS!
em
I love making candles -it’s so neat to watch the tissue just disappear! Yours came out beautiful Lauren!! 🙂
What a great project!
Wow, I love this idea.
I may have to try this , I have a 50th anniversary to go to this week and wonder if I can create a candle with some gold.
Beautiful Lauren. I love this project, but I’m always afraid of over melting the wax and making a mess of it.
As always, awesome tutorial Lauren! I never thought to add a topper and punch a hole in the ribbon for the wick. You’re so clever.
Oh, and this a very pretty sneak peak. Can’t wait to see the rest of it.
WOW! That is so great. I love that idea. I had heard about that process before but have never tried it. Thanks for sharing. I might have to give that one a try one day soon! I can’t wait for the big release!
Hi Lauren….your candle is beautiful!! I am confused though and hope you can clear it up.
I have done the stamping on tissue before but have always had to wrap waxed paper around the tissue after I’ve placed it on the candle.
I would then heat the waxed paper to melt the wax off if it to make the tissue stick to the candle.
I didn’t know I could omit the waxed paper and achieve the same result! I guess you can teach an Old Dog new tricks LOL
I think I’m gonna have to try that one….
Thanks,
Pam in Ar.
LOVE your candle and the non-traditional colors for fall leaves! 😉
I remember when I discovered this technique before the Holidays on Gina K.’s blog, I was just so excited, LOL! 😀
It’s one of the funniest things to do, it’s so easy and really stunning!
I really like your little topper with the ribbon, I think it’s one of those little details that make such a difference, and pack the WOW factor! 😉 ….
Here’s a link to the last candles I made for Noah’s teachers… I’m pretty sure one of them thought I had bought it for her!… 🙂
http://dare2beecreative.blogspot.com/2007/12/candles.html
Great idea and a beautiful candle. Thanks for the tutorial.
You have made me believe that I might actually be able to pull this off!!! Thank you so much for the great directions. Your candle is gorgeous, the colors are just genius, and the topper is AWESOME! You never cease to amaze me!! 😀 (and I can’t wait to see this PTI set!)
Love it!
Gorgeous – love the tutorial and I’m going to try it. Thanks for the great explanations and photos!
Beautiful gift idea, thanks for sharing!
Beautiful project….I keep forgetting about this technique. LOVE your new blog look!!!
I have got to try that! Yours is beautiful. I love the colors you chose and the layered look of the leaves. Your blog make over is fabulous. I have never seen one that even has fancy comment boxes. Very nice!
Great project!!
I really enjoy making these.
I love the colors ..and the layered look.
Fantastic Tag Topper and Ribbon…
gives it a real elegant look!! TFS
Wowza!!! What a fabulous idea, I luv this & it looks so easy! Designer candle that sells for so much in the stores & you can make it yourself! Thanks so much for sharing & creating a wonderful tutorial! You rock girl!!!
GORGEOUS! Love this candle Lauren – looks like a beautiful set! Oh – and I just want to tell you, I am JEALOUS about your scor-mat…I haven’t brought myself to buy one yet – but REALLY want one 🙂
I hope you had a great weekend…I can hardly believe it’s time for another PTI release already!!
Incredible project! New to me, so this may be a stupid question but isn’t the tissue paper flammable?? Or is it that it soaks up so much of the wax that it makes it ok???
I need a shower gift and a group of these would fit the bill.
Lauren…cool tutorial. I think this will become one of my favs.
I see great gifts for people with this one!
What a nice, easy but elegant gift. I do have a question though – do you tell the recipients that it’s not safe to burn the candle? Wouldn’t the paper catch on fire (potentially)?
No its usually fine. You dont let any candle burn un-watched but the flame
goes no where near the tissue and you peel it away from the top as it burns
down.
And yes it usually stays coated by the wax as it burns down anyhow.
HTH
Also you can burn it down enough to fit a tea light in the center so it never burns the entire candle!
WOW!!! This is just GORGEOUS!!!
This is so beautiful!! Thanks for the awesome tutorial!!
[…] forget the Candle I created for the countdown. You can view that […]
Hi there and thanks for this interesting and important post.
Leave a reply