Archive for July, 2008
More YUMMIES!
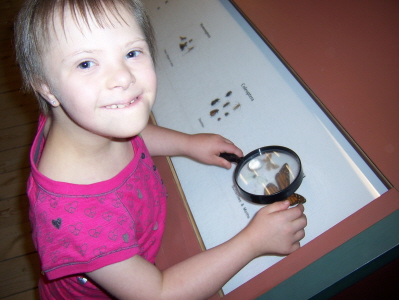
Jul 6, 2008 Author: mytime | Filed under: CardsSorry this is WAY late. I spent the day with my kids and hubby. We went to Squam Lake. It is a nature hike where you learn about wild animals, in their natural habitats. It was fun. A little hot, but fun all the same. We all learned a lot. I think Jay and I were more fascinated than the kids though! LOL!
We learned about Fishers, saw mountain lions (they were really fascinating), bears, owls, fox, and eagles to name a few. There were foot print samples of each animal, pelts to touch. The kids thought it was HILARIOUS that they had actual samples of each animals “Scat” (aka POOP) so you can tell what type of animal is in the forest by looking at the poop, and how you can tell what they eat-YUCK! Yet interesting all the same.
We went to the Beaver show. Now did you know that beavers are the 2nd largest rodent?
Um, yeah! Well let me tell you, that thing was determinded to get off that table. We were VERY close. When it came time for questions that is what I asked
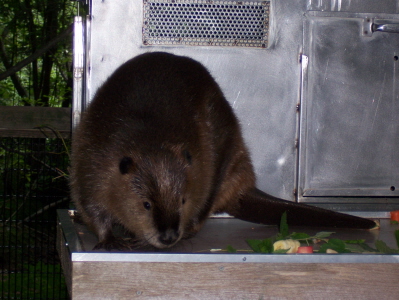
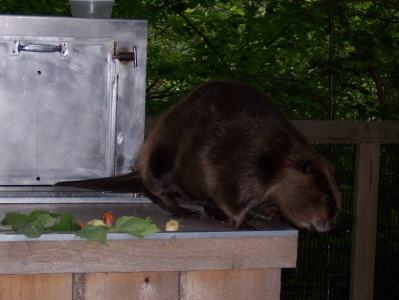
So I raise my hand and say-“Can beaver’s jump? Like off that table?”
Thankfully he said No! But he has fallen off in attempts before.
He kept trying to get off the table. I would have gone crazy if that happened! Funny they don’t bit humans or anything, but at the end of the day they are STILL a rodent.
There was a RODENT exhibit! EW! Rodents are the largest populated thing in the US. (OK so I forgot my technical terms but you get my point).
Amber made this MOUSEY face when pointing to the mouse photo. It was HILARIOUS if you were there.

Then her and Alexa were peering in at a little mouse family-can you see the mice???
OH GOD! I wanted to die. Me and rodents-not cool.
I want to own an Owl! LOL! I knew I loved all these cute owl images for a reason. Mice are their prime prey. LOVE owls, HATE mice.
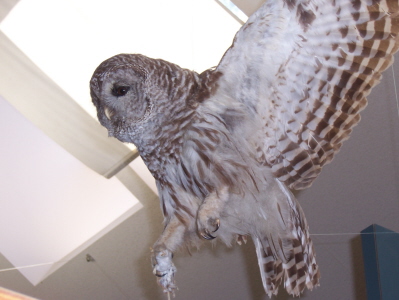 See the mouse in his claw.
Here are some other photos:
Alexa was showing me the butterflies up close (note her earrings!!)
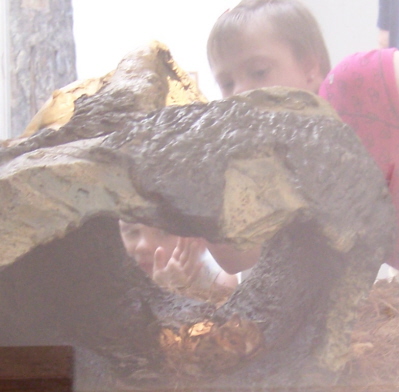
Noah climbs up to a cave playhouse thingy.

Then the kids nest to the bear pelt.

There are lots more but I don’t want to bore you with everything. It was just a good educational day.
Anyway-lets think treats.
Sweet Treats! Don’t miss your chance to get your own set—>HERE!
That is today’s set feature here. Christine has put together new Kits-so my ideas here today share MY take on what can be done using ONLY what comes in the kit! I hope you like it 😀
 I scream you scream, we all scream for ice cream!
I HAD to make a ice cream cone! This uses ALL nestabilities, and my mosiac tile cuttlebug folder 😀 So cute. It is a SQUISHED version from this creation.
Is that bear not the CUTEST ever? Oh gosh I just love it.
Then you have that monkey!!
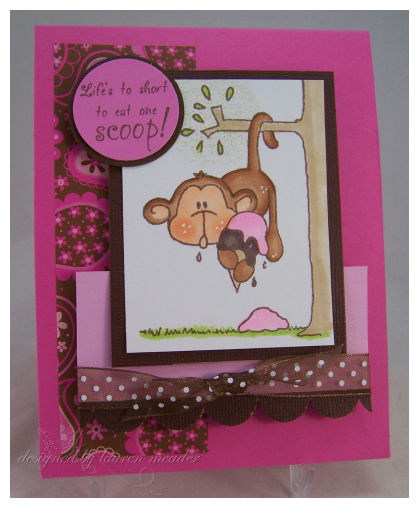 I just adore these animals she does. MUST Haves!!
Here is the kit info. The release is tomorrow night 10pm EST!! WAHOO!! Must haves.
In Christine’s words:
I mentioned before that this month would be our first ever card kit. I drew the stamps specifically for the card kit. Since everyone loves Monkey, he is back with a new friend, a bear. And what is better in the summer months than ice cream?The kit will contain:10 pieces of cardstock 6 pieces of pattern paper7 yards of ribbon36 brads16 gems1 Stardust Glitter Pen1 Sweet Treats Stamp Set1 Instruction sheet to make 5 cards
There is enough in this kit to make the 5 cards plus plenty more. This will be an every other month kit.
——————————————————————————————————————————————-
Pretty cool huh? So that is it for me. I’ll post my MFT stuff tomorrow. The kids have swimming lessons in the morning and its Alexa’s first day of Summer School. I am going to be one insane person this week!!! You have no idea!
Thanks for reading!
Later-
Sketch time!! And some samples.
Jul 5, 2008 Author: mytime | Filed under: Cards, Saturday Sketch, UncategorizedI hope you all had a fabulous 4th of July! I know we did. It was my grandfather’s 74th birthday. I hope to share photos when my camera batteries are re-charged!!
Time has flown by. I signed my children up for swimming lessons and I was reminded of when my grandfather taught me how to swim over 25 years ago! Today’s stamp set goes with my thoughts today. Those were great times at my grandparents all summer long. My grandfather would play “shark” and chase us around the pool. We would spend an hour creating a “whirlpool” so we could get caught up in the circling motion. We would spend HOURS in that pool. They had a screen house that we would then sit in the glider chairs and just listen to the buzzing of the electric lines of the hot day, and watch all the June Bugs try to get into the screen house. The second we were dry we were back in the pool. Just great memories there. Obviously since the 4th of July is my grandfathers b-day, this time of year always gets me thinking like that.
So, anyway the day was great. I decided that this card, with somewhat 4th of July colors would be our sketch for this weekend. This set is called Summertime Fun. You can view it, and the other design team samples HERE! Don’t forget to enter to win a free set of your own 😀 The release of the 3 new sets is the 7th!! Party starts on the forum at 8pm EST-10pm EST
I hope you enjoy it. Its got some good layering going on! LOL! Take the risk!


The paper for this is by Making Memories. I just love the boy themed colors. I hope you get to try it as well. Send us a link here if you do, so we can see your take.
Now let me share some other fun creations I made using this set-
I adore this card 😀 It uses American Crafts paper/ribbon. It was inspired by my layout for the sketch today, just mixed up a bit 😀 The colors are super summer fun!!
Monkey Fun
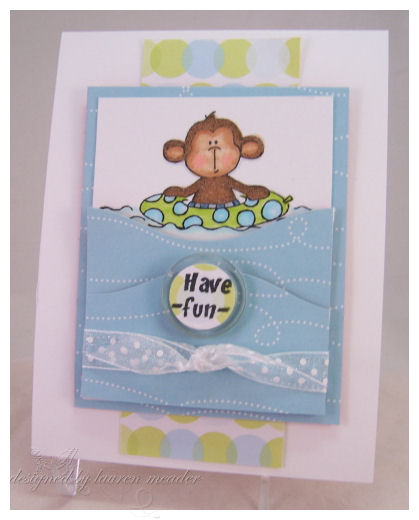 He is flocked. Isn’t he just the cutest thing ever? I love him floating on the “waves” like that.
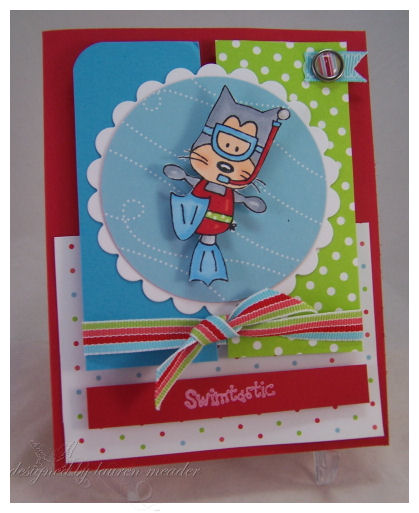
Lulu scuba dives-a gel card
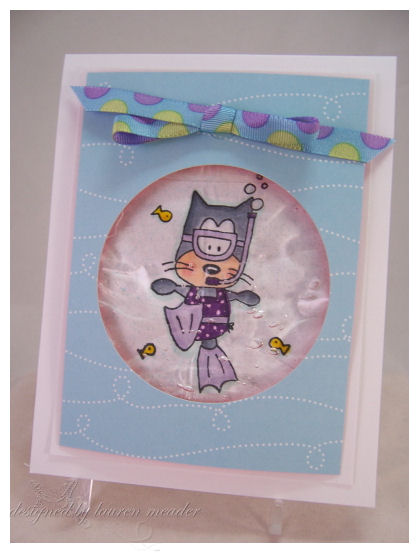 This was a super quick card. I wish I could have incorporated some purple paper but my brain was DEAD when I made this one! LOL!
I have MANY more samples to share, just not today!
I also want to wish Kim from MFT a HUGE Happy Birthday since today is her 40th!!!!!! I made something special for her, but I will share that tomorrow. Oh and I still have more MFT stuff to share from the new release! YEAH!
OK I need to run and take the kids to Canobie Lake 😀 Later!
Some questions answered
Jul 5, 2008 Author: mytime | Filed under: UncategorizedWOW! Who would have thought my Papertrey Ink newsletter project would spark such a flurry of questions & emails! LOL! As I sit I have over 400 emails all asking the same questions. I thought I had covered everything, but I guess I didn’t. Sorry.
I am swamped so figured I better answer you ALL here.
ALL the supplies I used have a LIVE link as to where I purchased them. Please click on the name, that is underlined, and it will take you to the site where the item can be purchased.
The Yasumoto Pearlescent watercolors I used can be bought —>HERE! I think that was the biggest question. No doubt Kim will be sold out as soon as everyone realizes that! LOL! They are super awesome, and give a great shimmer.
As for the sandwich for your cuttlebug machine and nestabilities I did put the directions in #3. MANY people are confused as to the “black mat” layer. I bought my 2 mats a while ago, when they sold you a tan, and black mat. You can use just use/buy 2 tan mats for the nestabilties/cuttlebug combo as well to get the embossed circle.
So sorry for all the confusion.
The other questions I got swamped with were about the Amish Friendship bread.
This is the starter bread directions:
1 pkg. active dry yeast
1/4 cup warm water (110°F)
1 cup all-purpose flour
1 cup white sugar
1 cup warm milk (110°F)
Directions:
1. In a small bowl, dissolve the yeast in warm water for about 10 minutes. Stir well.
2. In a 2 quart glass or plastic container, combine 1 cup sifted flour and 1 cup sugar. Mix thoroughly or the flour will get lumpy when you add the milk.
3. Slowly stir in warm milk and dissolved yeast mixture. Loosely cover the mixture with a lid or plastic wrap. The mixture will get bubbly. Consider this Day 1 of the cycle.
For the next 10 days handle starter according to the instructions above for Amish Friendship Bread.
——————————————————————————————————-
I hope that answers everything for everyone 😀
Thanks for reading, and let me know if there is anything I left out.
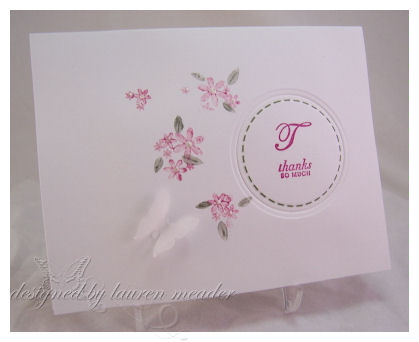
Simple Shimmer Card Wrap Set
Jul 3, 2008 Author: mytime | Filed under: Cards, Home decor/3-D items, Papertrey Newsletter, Tutorials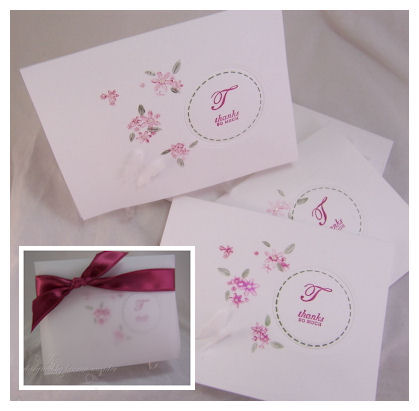
Simple Shimmer Card Wrap Set
I can think of so many occasions where a gift of Thank You notes would be the perfect gift. Maybe even elegant wedding favors. I will share a simple technique, that takes the “plain Jane” single layer set, and makes it a real “WOW”! The simple vellum card wrap will only add to the beauty, and give you a easy perfect package for you to present your set.
You will be amazed at how fast this set can come together. Another great idea for those who need to mass produce an elegant gift set.
Monogram sets are the hottest thing right now. Sometimes you aren’t sure “which” initial to use for your monogram, or WHO you are going to give the set to. Feel free to get creative, and use a sentiment in place of the initial.
What makes this set so beautiful is that by using the Pearlescent watercolors, you are adding a soft and subtle shimmer, that isn’t messy, and wont rub off. It has the effect of a watercolored image. It is another use for this type of coloring medium that is often forgotten and under-used.
Then, you add that embossed circle, and it really adds some dimension and interest, without over powering the soft shimmering flowers with a layer.
First you will need to assemble your supplies.
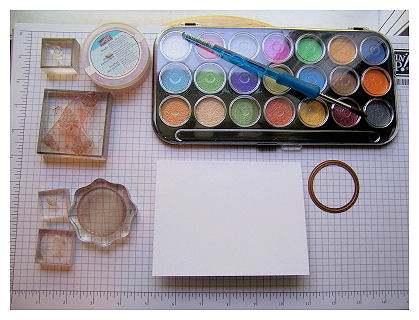
For this set I am using:
Papertrey Select White cardstock, Vellum Cardstock
The flower cluster from Piece of Cake, Borders & Corners Circle set, the “T” from Ambassador Monogram, and “thanks so much” from Mixed Messages.
Always Artichoke ink, and Purely Pomegranate ink.
Martha Stewart Butterfly Punch, glue dots.
Pearlescent Watercolors by Yasumoto, with water, and paint brush, White Opal Liquid Pearls, and the Circle Nestabilities.
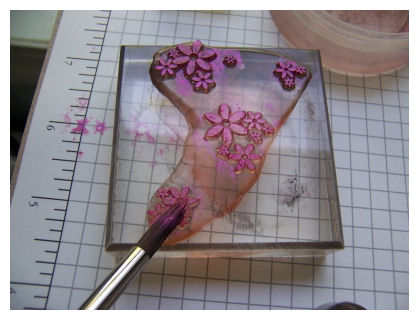
Step 1-Use only a little water, and your pink pearlescent watercolor, and create a “paste-like” mixture. Paint the pearlescent paste onto your flower cluster. Stamp onto card base
NOTE: Don’t use to much water, or your flowers will be runny, and unrecognizable.
TIP: When making a set-do each step on each card first, before advancing to the next step. This will make production of multiples of a card go much quicker. Example-do all the pink flowers on each card base, before starting the next step.
Step 2
Do the same thing for your leaves, using a green water color.

Step 3-
Emboss a circle into your card.
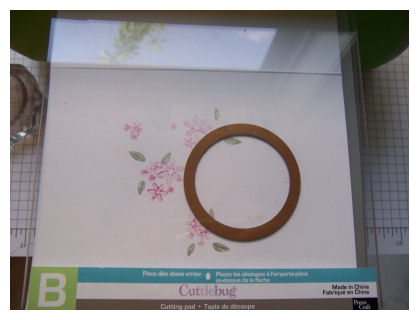
Step for this may vary depending on the machine you use. I am using my Cuttlebug.
To JUST emboss a layer I personally find this sandwich helpful for me.
A plate, B plate, black mat, tan mat, cardstock, nestability die (cutting side down), and B plate.
EDITED TO SAY: Or just 2 tan mats. I have an older mat set.
This gives me a nicely embossed circle
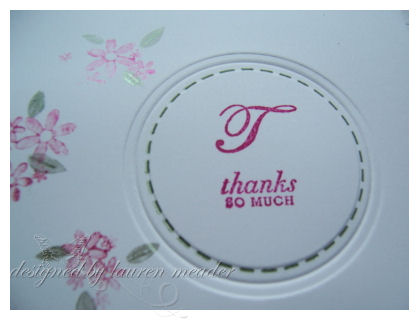
Step 4
Stamp the stitched circle onto the center of the embossed circle, in artichoke ink. It fits just outside the smallest embossed rim.
Then stamp the “T’ and sentiment, in pomegranate ink.
Step 5
Apply liquid pearls to the flower centers.
This gives a subtle 3D effect, and continues the subtle shimmer.
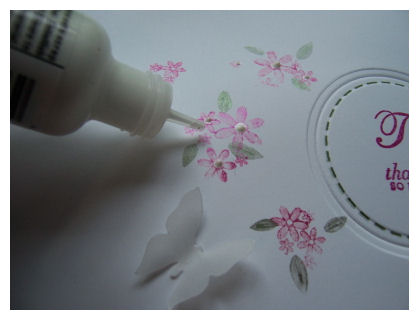
Step 6-
As you can see above, punch a butterfly out of vellum cardstock. Adhere with wings popped forward, using a clear glue dot.
Step 7-Creating the holder.
This holder is meant to house 4 cards with envelopes.
Take your vellum cardstock and cut 5 3/4 X 11
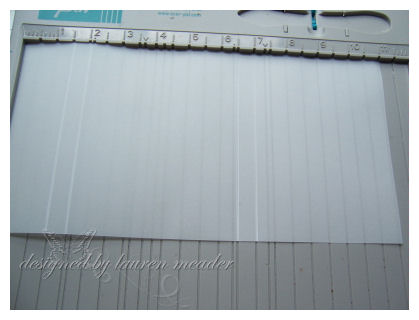
Along the 11 inches score at
1 1/2 –
2-
6 1/2-
7.
Score along lines. Put cards inside. Tie around a ribbon to hold closed.
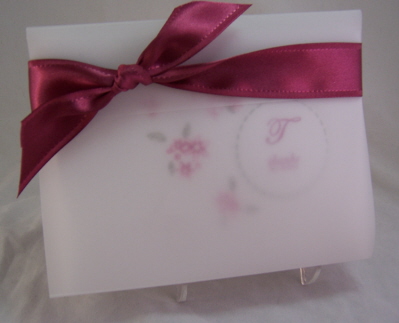
Simple as that.
Thank you for taking a peek at my little set. I hope you take the time to try it out.
I’d love to hear your thoughts. Should you decide to make your own-send us a link!
Enjoy the day
Do you love Basic Grey?
Jul 3, 2008 Author: mytime | Filed under: UncategorizedWell my friend of a friends is selling hers at COST! Limited supply.
She just had twins (awe!!!) and is getting out the selling buisness.
So who wants to take it off her hands?! Great deals…………
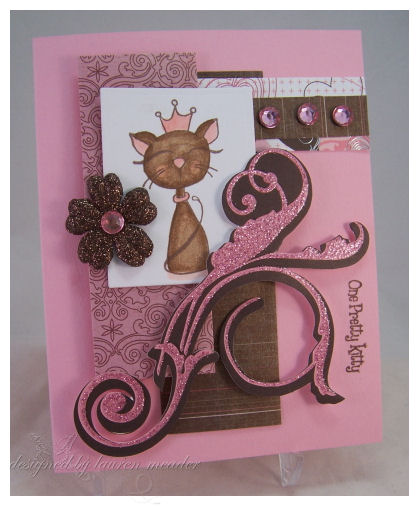
Pretty Kitties Preview-and another mouse tale-
Jul 3, 2008 Author: mytime | Filed under: CardsUGH! Sorry I missed the MFT party last night. Did you make it to the release? What did you get???
Jason got an urgent work assignment last night, and it required him to be online while on the phone! He is a computer geek 😀 I was freaking out that I couldn’t get online, but hey his job pays the bills. He had to do customer support till late in the evening. Poor guy. He has been coming home and pulling some extra hours from here since work is so crazy busy. I am happy he can work from home like that through rather than be stuck at work an hour away all night. I am really looking forward to the long holiday weekend with him & the kids. We are celebrating at my mom’s. I swear I only see her like 2-3 times a year. LIFE. Gets too crazy sometimes. Good thing for holidays. Gives you a reason to STOP and make time for family.
My PTI newsletter goes LIVE late tonight 😀 Im so nervous! LOL! I know it seems silly, but the expectations of keeping up with the greats is a little scary at first. I hope you all get to check it out and like what I have to share 😀
Well today is a preview for one of the 3 sets being released from C.C. Designs.
This set is called Pretty Kitties! Do you want to win your own set?
CHECK THIS OUT<——–
 Pretty Kitty
When I saw the princess one, I had to use my SEI Au Chocolat paper! Its just fit for her Royal Kitty. With pink & brown and a dash of bling, who wouldn’t love her?
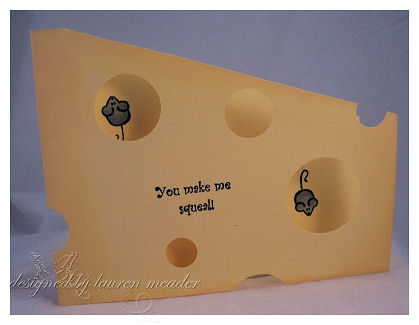
Then I thought of the cat loving the mouse. Or maybe loved chasing the mouse 😀

This used the Pretty Kitty set and Big Ol’ Backgrounds in hearts The paper collection is by Scenic Route (I’m in love with that stuff). This is a rather funky card, and layout. But fun too.
When I saw the mouse image I was so excited. Its WAY cute. Cathy Indelicato has a card on the ATS Blog with the little hole for the mouse-LOVE that idea!! TOO cute!!While I HATE mice this one is too cute to not love.
You know I had to give it it’s own card!
I have mice on the brain!!
Yes, they are BAAAAAAAACCCCCCCCCCCCCKKKKKKKKKKKKKKK!!!!!!!!!!!!!!!!!
Last time we got rid of them with DeCon. Love that stuff. Well we now have bought MORE stock in it.
Last week (about midnight) before going to bed (yes I am a night owl) I went upstairs to check on the kids. We do this every-night before bed.
Well Alexa is STILL awake-squished herself up to the top of her bed, and is hugging her pillow with WIDE eyes.
I said “Alexa are you OK? What’s the matter?”
She pointed to the corner of her room and said “Im scared of the RAT!” Now the WAY she said it was so soft and full of expression. It was really cute, and scary!!!!!!
“I said “WHAT?! The rat? What rat? Where?
As she pointed that thing went running towards her closet, near ME! I jusmped up onto her bed and began to screech! OK so NOT a good parent thing to do. We are suppose to act OK when things are not, and here I am bouncin on her bed screeching as loud as I can “Jay!!!!!!!!!!!! Get up here right now there is a mouse! EEEEKKKKK!!!”
So he comes running up stairs. Now the mouse is under Alexa’s doll bed. 3 cats surround the thing. Alexa and I are sitting at the top of her bed, and she is hugging her pillow. Jay moved the doll bed, and the thing goes to run. He begins to smack it with his shoe! I begin FREAKING out (and poor Alexa is freaking out. I was NO help!!) So I put the pillow over her face and screeched don’t look! Don’t Look!!
The mouse runs into a shoe in her closet and Jay picks it up and tosses it into the middle of the room! OMG! I could NOT believe he did that. I wanted to DIE. So its begins to skitter and the cat hunt is on. It runs right under the closet door.
DARN! So he gets the DeCon (the kids closet doors lock from way up top) and he puts it in the closet. The cats just sit and wait by the door. Alexa says ‘Where is the rat?” I told her daddy killed it and its gone. Sometimes white lies are a OK thing. I know I wasn’t going to sleep if I knew a mouse awaited in my closet. I didn’t sleep for a week the last time! I felt awful for freaking her out even more. That was NOT a good influence. In my defense I am usually REALLY good about not showing my kids something freaks me out. We deal with BIG stuff here, but when its in the rodent family and is actively running around my home I can’t help what human nature takes over. I know it may even seem silly but I have issues with rodent. BIG ONES!
So the next morning I awake to a faint squeaking noise. My eyes pop open, like a horror film! I bolt up in bed and listen. Yes its a squeak. I go to get out of bed and I have 3 cat tails twitching crazily from under the bed skirt. I shake Jay awake, and tell him “I think there is a mouse under the bed”
He gets up and sure enough the cats had some fun, but didn’t finish him off. Jay grabbed his work gloves to take it outside. He said Oh! Its tiny. He is just a baby. No worries.
NO WORRIES??? WHAT? A baby!! you know what that means? That he has at LEAST 6 sibling babies somewhere with him! How can he say No worries!!
Anyway-we have DeCon everywhere and haven’t seen a thing since. All I know is this is NOT cool!!!!!!!!!!!
I have no idea why we have more mice NOW! Its summer. Why can’t they go find some dump to feed off? You would think my house were a pit, but it really isn’t. I clean EVERYDAY!! My cabinets get cleaned, I wash my floors every other day, I vacuum twice at day-morning and evening, and I have 3 cats ready to pounce, and a dog that has no idea what they are doing but wants to join in the fun anyway!
UGH! Well that is all for now.
I hope you all have a FABULOUS 4th of July! Check in later today or tomorrow for the newsletter!! And pray these mice are GONE 😀
Lauren
Well it is Wednesday. I have lots to do to prepare for the 4th!! Its my grandfather’s birthday that day, so we always try to have a celebration for him.
I am making a KILLER summer Trifle that I hope to share photos this weekend with you all 😀 REALLY FABULOUS! Need to go buy a trifle bowl, and the ingredients today to hopefully I beat the mad holiday rush.
Here is the ingredients for a PERFECT summer triffle 😀
Buy 2 pre-sliced Sarah Lee Pound cakes (usually frozen-just de-that that before)
Frozen Strawberries (de-thawed)
Whipped cream
Raspberry Jello
Snack pack cups of Vanilla pudding (lazy man’s way) or make your own vanilla pudding
Seedless Raspberry Jam
Macaroon cookies
Using the pound-cake-and raspberry jam, and make sandwiches. Cut into small sandwich cubes.
Layer on bottom of bowl
Squish up frozen strawberries (and a little sugar) and layer over cake
Another layer of sandwich cubes
layer macaroons, then vanilla pudding. End with cake layer.
Make raspberry jello-poke a LOT of holes into the dessert and pour into trifle mix. Make sure you make a LOT of holes so you don’t get Jello POCKETS. Refrigerate for 2 hours. When ready to serve top with whipped cream (and fresh strawberries optional)
That is it. Its is SO delicious. If you have someone with Coconut allergies OMIT the macaroons. What I love about is its NO BAKE!!! YEAH!! So simple to whip up last minute 😀
So speaking of celebrations………………MFT is having their 2 year Birthday release and celebration tonight. She is releasing 4 sets and 2 singles. I have a good 8 samples in all to share! LOL! But figured I’d do a little at a time 😀
This one is of my FAVORITE creations from the release:
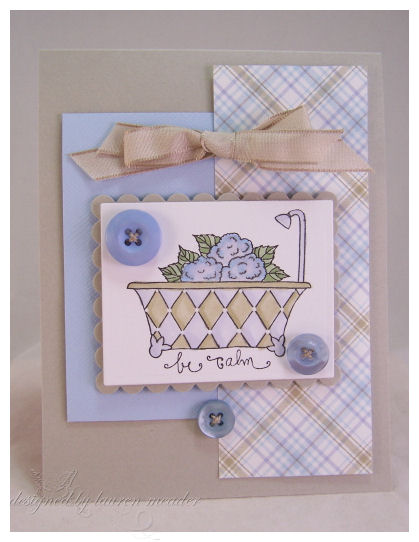
Be calm
Isn’t this card just that? Calming. I so love it. I love the colors and the layout. Crisp clean and simple. One of those simple OH’s!
I am on such a button kick its ridiculous! I have no idea why, but I love it. I have this large mix bag of buttons (I believe its from Foo Fa La) and they are just the prettiest collection, of all colors. Soooooooo happy I splurged the $5 for the bag because digging through and finding all the perfect pretty buttons to match, and actually finding them is so fun.
Next is another of my favorites :
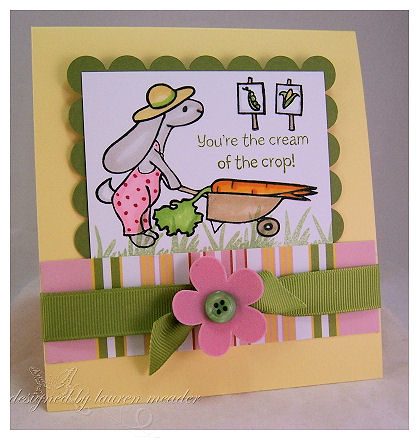 Gardener Flopsy
I love this one too. Summer colors, simple clean layout. I love the velvet flower in the center. Just FUN!
Call Me! PUT the sunglasses on for this one! LOL!

I love this layout too. I do love the bright cheery colors, even though its a little much. This SCREAMS teen card doesn’t it? I know I sat on the phone like this endlessly talking to my BFF’s! Or boys! LOL! This set MAKES you want to be bright & cheery.
This Making Memories paper is so fun. I have used it on numerous cards, and always like the colors.
I just took the phone from the main image and popped it out with a square punch, to make it like 2 people chatting it up 😀 The bling Bella Dots are the perfect teen touch too.
So that is that.
My Favorite Things will be hosting a New Release Cocktail Party tonight (July 2nd) 9-11pm EST EASTERN time. July marks MFT’s 2nd birthday AND Kim’s 40th birthday, so there are LOTS of discounts and deals this month in addition to all the MFTeasers and your chance to become MFT’s next Guest Designer! Check out the MFT forum for all the details!
We are releasing:
Gardener Flopsey
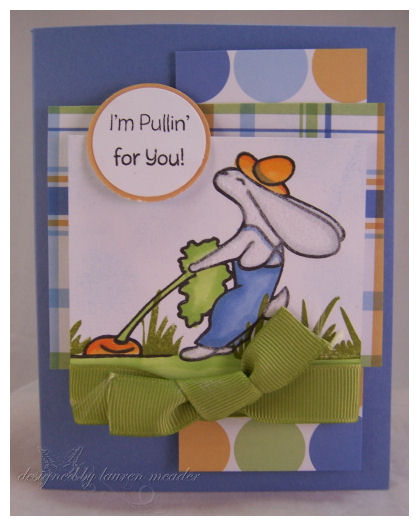
I’m Pullin for You
Peppermint – Annie LaPoint
Be Calm – Annie LaPoint
Bunny Slippers
Call Me! – MINI of the month
To celebrate the MFT birthday:
*$2.00 US shipping for under under $40, and for Intl orders and US orders over $40, they’ll receive the same $2.75 discount until July 15th.
*FIRST 50 orders will receive a full sized stickles glitter glue!
*The Girl Who Wants It All special for the July Collection is $49.95. These specials will ONLY run for the release month.
I hope to see you later at the MFT party!!
Trio of posts today
Jul 1, 2008 Author: mytime | Filed under: UncategorizedIf you are visitng today-be sure to SCROLL down! I posted three different posts today! WHEW! You don’t want to miss any of it.
Now that is as exhausting as creating is -3 blog posts.
Thank you for checking in with me here 😀
Take me out to the ballgame!
Jul 1, 2008 Author: mytime | Filed under: CardsGrand Opening 😀
Finally!! Storage Units, ink & more is ready for orders!! You can also find the winners to all of the sets that the design team were giving away, as well as the winner of the MOTHERLOAD of GIVEAWAYS!!
Here is the last of my teaser samples. This set is called Put Me in Coach

How super cute is that set? Having a boy in T-ball I love the baseball themed stuff. This set has some great images and better yet sentiments 😀
OK I gotta run 😀
Enjoy the release.
Its in the Bag Challenge!
Jul 1, 2008 Author: mytime | Filed under: Home decor/3-D itemsSo Nichole has challenged us to use her FABULOUS Coffee Bags in a fun way.
Make sure you check out all the Senior Design Team members blogs 😀
I LOVE challenges and I especially LOVE altering stuff (in case you didn’t notice :D) Altered gift packing is just so fun, and your recipients feel special that not only did you make a card, but you took the time and attention to the packaging. Packaging doesn’t always have to be something complex and difficult. Keep it simple.
The greatest thing about these Coffee Bags is not only are they STAMPABLE, but the interior of the bags are lined with waxed paper, which will prevent any oils from the treats they contain from seeping to the outside of your project.
I really love her coffee bags for gift giving. Usually we think a great time to send treats is during the holidays. That isn’t always the case though. Don’t you love when people think of you ALL year? Receiving a gift for NO reason is the BEST!
So here is my gift idea:
A few months ago my friend Paulette sent me this wet mix in a ziplock bag. It was for
Amish Friendship Bread. I had to take the 10 days to make the mixutre. Then separate it out and pass the mix along to a couple of people.
The idea behind Amish Friendship Bread is that it is the chain letter of the baking world. The idea is very simple: a friend gives you a cup of yeast culture (also known as “starter”) and a copy of instructions. Following the instructions, you add sugar, flour and milk and it rises. Eventually, you end up with 4 cups of the starter. You use one cup to make bread (the instructions provide you with the recipe), keep one cup to start a new cycle and give two cups to your friends. Each of your friends also gets a copy of the instructions for what to do with the yeast starter. The latter part makes it somewhat like a chain letter. Of course, Amish Friendship Bread does not come with any promises of riches for those who spread it on or curses for those who don’t.
It was created because the Amish believe that we live in a fast paced world. Fast food, lack of time taken to enjoy the cooking/baking process with family & friends. By giving and receiving the kit, you are not only sharing of yourself, but taking time in the fast paced life to stop and make something from scratch so it is home made.
I made the bread and it tasted AMAZING!!!! So I promptly passed it along. Ever since I hoped to get more 😀 I made a starter to pass along, and decided this is how I am going to give this mixture.
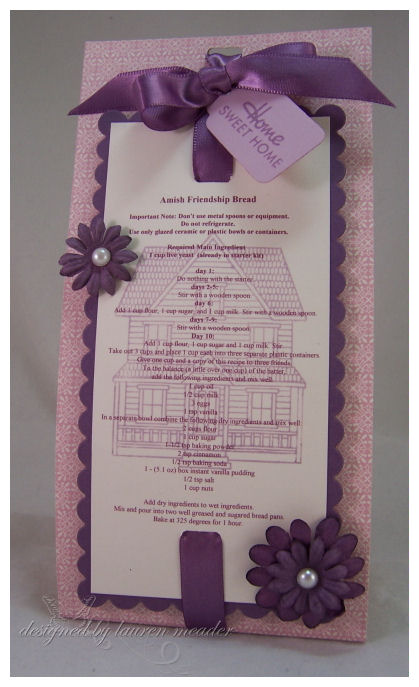
 click to enlarge
I typed up my recipe/instructions, then resized them to fit my project. I then printed them in a plum color onto vintage cream cardstock. I then used the house image Boards & Beams, and stamped the house in Lavendar Moon.
I took my LONG rectangle scallop nestabilities to die cut the long scallop mat from Plum Pudding cardstock. I layered on my recipe. The best part about this bag is I didn’t ADHERE the recipe to the bag. It is just held on with the ribbon. Now the person receiving it can slip it off and keep the recipe for future use 😀
I used my Guidelines patterned paper to make a simple cover for my bag. I felt it was very in theme with the simple Amish way of living.
I used my Making Memories ribbon slot tool to then string though my simple satin ribbon, which holds my recipe in place, as well as my tag with my greeting. I then kept it simple with decorating it using prima flowers and adhesive pearls.
Once it was decorated ( 3 bags took 20 minutes 😀 to make including printing recipe) I poured in my mixture.
TIP: I wrapped my bags with saran wrap before pouring anything, just in case I spilled anything, my bags wouldn’t be ruined. 😀 Which me being the messy clutz I am, they would have been ruined. LOL!
I hope you enjoyed this simple project, and you take the time to make one for a friend, family member, teacher or neighbor!
Here is the recipe-you can just copy & paste !
Amish Friendship Bread
Important Note:
Don’t use metal spoons or equipment.
Do not refrigerate.
Use only glazed ceramic or plastic bowls or containers.
Required Main Ingredient1 cup live yeast (already in starter kit)
day 1: Do nothing with the starter. days
2-5: Stir with a wooden spoon. day 6: Add 1 cup flour, 1 cup sugar, and 1 cup milk. Stir with a wooden spoon.
days 7-9:Stir with a wooden spoon.
Day 10: Add 1 cup flour, 1 cup sugar and 1 cup milk. Stir.
Take out 3 cups and place 1 cup each into three separate plastic containers.Give one cup and a copy of this recipe to three friends.To the balance (a little over one cup) of the batter,add the following ingredients and mix well.
1 cup oil
1/2 cup milk
3 eggs
1 tsp vanilla
In a separate bowl combine the following dry ingredients and mix well:
2 cups flour
1 cup sugar
1-1/2 tsp baking powder
2 tsp cinnamon
1/2 tsp baking soda
1 – (5.1 oz) box instant vanilla pudding
1/2 tsp salt
1 cup nuts
Add dry ingredients to wet ingredients.
Mix and pour into two well greased and sugared bread pans.
Bake at 325 degrees for 1 hour.
————————————————————————————————————————-
My Etsy

Who I Designed For
Blogroll
- Alicia
- Alli Miles
- Ally Blankenship
- Amber
- Andi @ crafts on a whim
- Angel R
- Angie Z
- Anne Kranitz
- Becky O
- Bee
- Beth Silaka
- Bethany Paull
- Beverly Nash
- Bobbie
- Cambria
- Cammie
- Card of the Week
- Card Positioning System (CPS)
- Cards for Cancer
- Catherine Doucette
- Charmaine
- Cheryl Sims
- Chriss Rollins
- Christina
- Christine Ewing
- Christine Wooden
- Colleen Schaan
- Craft Critique
- Craft Gossip
- Crystal
- Dawn Easton
- Emily Giovanni
- Geny
- Holly
- Igne Groot
- Inspirational Craft Blogs
- Irene
- Jami Sibley
- Jeanne Streiff
- Jen del Muro
- Jeni Bond
- JenMarie
- Jenn Balcer
- Jenn Diercks
- Jenn O
- Jennifer E
- Jennifer Mick
- Jennifer Pereda
- Jennifer-Sweet Treat
- Joanne Basile
- Jodi Collins
- Julia Stainton
- Julie Masse
- Karen
- Kathryn Berthiaume
- Katie Cotton
- Kelley Holland
- Kendra
- Kim Scholfield
- Kris’s Color Stripes! Get inspired here
- Kristen Dubosque
- Kristin Eberline
- Kristine
- Laura @ Sunshine Stamper
- Laura Turnmire
- Laurie Schmidlin
- Lesa Rapp
- Linda Duke
- Linda-LSN
- Lindsey Botkin
- Lisa (lakind scs)
- Lisa Kind
- Lori Craig
- Maggie
- Mara Campbell
- Maria
- Maria Levine
- Mary
- MaryJo
- Melanie M
- Monique Hansen
- Moxie Fab World
- Pam Imholz
- PaperCrafts Connection
- Peppers and Pollywogs Kids party site
- Rebecca Grohall
- Rita
- Robyn
- Rose Ann
- Sarah Vrolyk
- Sharon Harnist
- Sharon Johnson
- Sharon Rivera (a chemisrty with paper)
- Sherrie
- Sophia Landry
- Storage Units, Ink, & More Blog
- Sue Berker
- Susan (Rainy)
- Tangii Crane
- Tracy
- Tricia Traxler
- Trudee
- Velta
- VivLyn
- Zena
MTME Pretty Palette Color Team
MTME Pretty Patterns Sketch Team
My Time Made Easy TM LLC
Shop till you drop!
Lauren Meader
About Me
Copyrighted material
Subscribe To My Blog
Pages
- About me
- Alexa’s Story!
- My Crafty Corner!
- My Time Made Easy™ LLC
- Our Make A Wish Trip to Disney!
- Resume/Publication List
Calendar
Archives
- August 2013
- July 2013
- June 2013
- May 2013
- April 2013
- March 2013
- February 2013
- January 2013
- December 2012
- November 2012
- October 2012
- September 2012
- August 2012
- July 2012
- June 2012
- May 2012
- April 2012
- March 2012
- February 2012
- January 2012
- December 2011
- November 2011
- October 2011
- September 2011
- August 2011
- July 2011
- June 2011
- May 2011
- April 2011
- March 2011
- February 2011
- January 2011
- December 2010
- November 2010
- October 2010
- September 2010
- August 2010
- July 2010
- June 2010
- May 2010
- April 2010
- March 2010
- February 2010
- January 2010
- December 2009
- November 2009
- October 2009
- September 2009
- August 2009
- July 2009
- June 2009
- May 2009
- April 2009
- March 2009
- February 2009
- January 2009
- December 2008
- November 2008
- October 2008
- September 2008
- August 2008
- July 2008
- June 2008
- May 2008
- April 2008
- March 2008
- February 2008
- January 2008
- December 2007
- November 2007
- October 2007
- September 2007
- August 2007
- July 2007
- June 2007
- May 2007
- April 2007
- March 2007
- January 2007
Categories
- About Me
- All That Scraps
- blogger challenge
- camera/photo play
- Cards
- Contests
- family stuff
- FOR SALE
- Home decor/3-D items
- How to FAKE it!
- Introduction
- JUGS Challenge
- JustRite Stampers
- Lizzie Anne Designs
- My family stuff
- My Stamping Space
- My Time Made Easy
- My Time To Color Challenge
- My Time to Create Challenge
- My Timeless Template Challenge
- My Timeless Templates
- Mytime Mail
- MYTIME MOVIE/VIDEOs
- Papertrey Newsletter
- Pink Cat Studio
- Pretty Palette Challenge
- Pretty Patterns Sketch
- Product Opinions and Must haves
- Recipe's
- Saturday Sketch
- Smilebox Creations
- Stampavie
- Tutorials
- Uncategorized
- videos
Most Popular
- Create your own Onesie Card Tutorial-and important NOTE! PLEASE READ (2529)
- Saturday Sketch-Boxed bag holder (2333)
- Going GREEN! Fancy Flower Flourish-Closure Video (1478)
- Fabulous Favorite - Giveaway! (1336)
- a Prayer Request (1231)
- QUICK-Easter Baskets from Nestabilities-PTI style-and blog challenge (1063)
- Teaser Sketch (999)
- February Release Giveway! (and a little peek) (996)
- Group Post and Rambling Rose Video Tutorial (985)
- GIVEAWAY! Who wants it all?! (895)
Recent Comments (RSS)
- 야동: Love to read it,Waiting For
- 야동: This seller is in a
- 바카라사이트: 여기 처음 왔어요. 나는이 게시판을
- 야동티비: I was surfing the Internet
- 바카라사이트: 비슷한 주제에 대한 흥미로운 정보를
- 바카라사이트: "여기에 제공해 주신 귀중한 정보와
- 온라인홀덤: 유익한 웹 사이트를 게시하는 데
- 홀덤나라: 나는 당신의 블로그를 정말 좋아합니다.
- lisa: Technology, too, has left an
- 주소모음: 흠 !! 이 블로그는 정말
Copyright © 2007 - My Time, My Creations, My Stampendence - is proudly powered by WordPress
This blog has been Tweaked and Designed by Sara Williams