Halloween Treats!
Jul 31, 2008This is post 1 of 3 for today! Please SCROLL down so you see all three!!! PLEASE READ THEM! LOL! I think I developed carpal tunnel typing them all up 😀
It’s the first of August! Can you believe that? WOW! Time is flying by. Before you know it, it WILL be Halloween. I am always looking for cool and fun things to do with my kids and/or for their classmates. Maybe this time I will be ahead of the dash (yeah right! LOL!)
Nichole has challenged the team to come up with some fun Halloween treats.
You can see what everyone else has done here:
I decided to share a cool recipe that is fun, and you can let this kids help with. Hope you like it, and give it a try!
Here goes…………….I would like to share with you my Little Pumpkin Pop-In ©
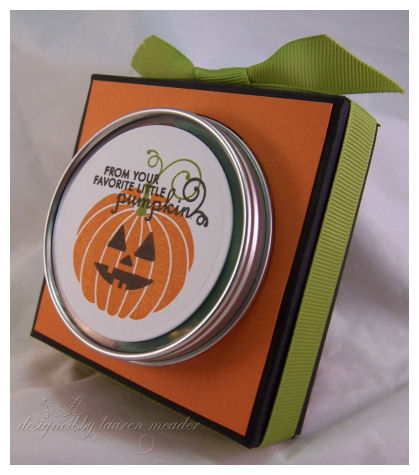
This is a little container cover I made to “pop-in” the super cute 2.5 oz. clear top round tins. Buy them now people! LOL!
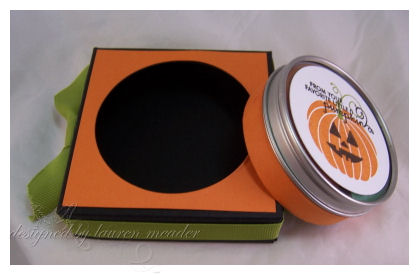 Tin out of the Pop-In ©
I love how it dresses this little tin up. Rather than just having a wrap around the bottom, it really gives you an entirely new gift option.
Please don’t ask me for directions. This is a teaser of more to come!! I am so excited, I can hardly stand it, but that is all I’m saying for now (BHWAHAHAHAHAHA insert my evil little happy laugh). Let’s just say I have been busy, busy, busy.
OK moving on.
I used the Spooky Sweets set for my lid.
I wanted my lids to be super quick and easy to mass produce-think 3 kids……. X’s however many students they have in their classes……………so about 40 kids minimum. SIMPLE.
By now you are saying OK so how is this sharing a fun & cute Halloween treat?
Well its what’s inside that is the FUN part!
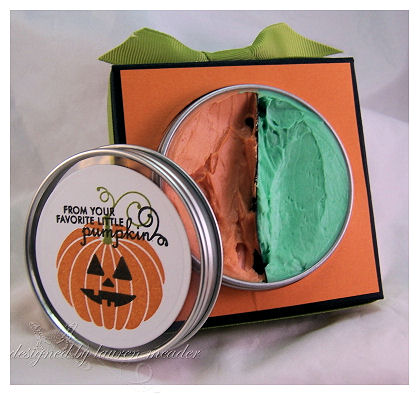
Monster Mash Make-up!
2 TBS solid shortening (AKA Crisco)
1 TBS cornstarch
4-5 drops of food coloring
Make-Up sponges
1) Mix shortening and cornstarch together in a small bowl, until smooth.
2) Add in food coloring. Mix till well blended.
READY TO GO!!
When you are done just rinse off with warm soap & water.
You can whip this up at home in minutes! The kids will love it.
OK I know you are saying EW! But the kids are saying YEAH!!!
Trust me me-Kid tested!! MOM Approved 😀
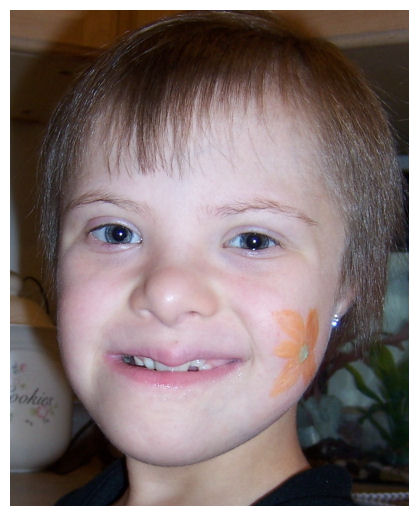
My Little Pumpkin Amber
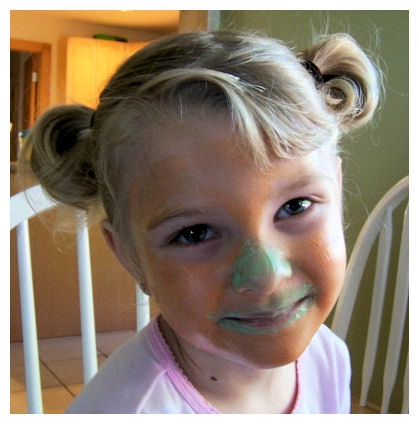
OK I never claimed to be an artist! This is as good as it gets. Amber saw the tin and wanted her face to be painted like the pumpkin stamp. I have to admit I was nervous that her face would be stained orange by the food coloring, but it came right off and NO perma-pumpkin face! LOL!
Next up is Alexa-my flower child. She was not wanting her face painted! She said she just want a little flower on her cheek. UGH! That meant I had to “draw/paint”. YIKES!
Now we have Noah-who wanted to be half “The Hulk”, and half boy.
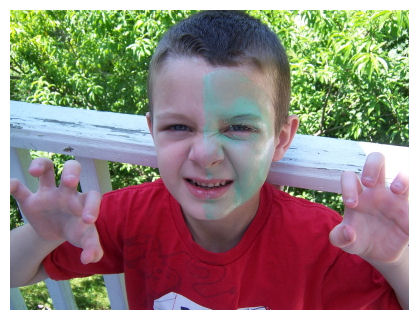
Unfortunately he was “itchy” and scratched it off while I got the camera. It’s one of those things-when you know you can’t touch something you have too! That is his mean face. Still looks cute to me!
All in all it was a super fun & easy afternoon craft and would make great “make-up” for girls or obviously face painting. No expensive paint kits to buy.
I love the idea of making several colors and giving these to the kids classmates. It really whips up quick, just add to the recipe to suit the number of people. The batch above fits perfectly into the tins, if that is any indication. SO each color batch makes a 1/2 of the tin.
So that’s it for me. I hope you like my idea of a fun Halloween treat! Afterall they get PLENTY of candy right?
Thank you again for checking in with me.

My Etsy

Who I Designed For
Blogroll
- Alicia
- Alli Miles
- Ally Blankenship
- Amber
- Andi @ crafts on a whim
- Angel R
- Angie Z
- Anne Kranitz
- Becky O
- Bee
- Beth Silaka
- Bethany Paull
- Beverly Nash
- Bobbie
- Cambria
- Cammie
- Card of the Week
- Card Positioning System (CPS)
- Cards for Cancer
- Catherine Doucette
- Charmaine
- Cheryl Sims
- Chriss Rollins
- Christina
- Christine Ewing
- Christine Wooden
- Colleen Schaan
- Craft Critique
- Craft Gossip
- Crystal
- Dawn Easton
- Emily Giovanni
- Geny
- Holly
- Igne Groot
- Inspirational Craft Blogs
- Irene
- Jami Sibley
- Jeanne Streiff
- Jen del Muro
- Jeni Bond
- JenMarie
- Jenn Balcer
- Jenn Diercks
- Jenn O
- Jennifer E
- Jennifer Mick
- Jennifer Pereda
- Jennifer-Sweet Treat
- Joanne Basile
- Jodi Collins
- Julia Stainton
- Julie Masse
- Karen
- Kathryn Berthiaume
- Katie Cotton
- Kelley Holland
- Kendra
- Kim Scholfield
- Kris’s Color Stripes! Get inspired here
- Kristen Dubosque
- Kristin Eberline
- Kristine
- Laura @ Sunshine Stamper
- Laura Turnmire
- Laurie Schmidlin
- Lesa Rapp
- Linda Duke
- Linda-LSN
- Lindsey Botkin
- Lisa (lakind scs)
- Lisa Kind
- Lori Craig
- Maggie
- Mara Campbell
- Maria
- Maria Levine
- Mary
- MaryJo
- Melanie M
- Monique Hansen
- Moxie Fab World
- Pam Imholz
- PaperCrafts Connection
- Peppers and Pollywogs Kids party site
- Rebecca Grohall
- Rita
- Robyn
- Rose Ann
- Sarah Vrolyk
- Sharon Harnist
- Sharon Johnson
- Sharon Rivera (a chemisrty with paper)
- Sherrie
- Sophia Landry
- Storage Units, Ink, & More Blog
- Sue Berker
- Susan (Rainy)
- Tangii Crane
- Tracy
- Tricia Traxler
- Trudee
- Velta
- VivLyn
- Zena
MTME Pretty Palette Color Team
MTME Pretty Patterns Sketch Team
My Time Made Easy TM LLC
Shop till you drop!
Lauren Meader
About Me
Copyrighted material
Subscribe To My Blog
Pages
- About me
- Alexa’s Story!
- My Crafty Corner!
- My Time Made Easy™ LLC
- Our Make A Wish Trip to Disney!
- Resume/Publication List
Calendar
Archives
- August 2013
- July 2013
- June 2013
- May 2013
- April 2013
- March 2013
- February 2013
- January 2013
- December 2012
- November 2012
- October 2012
- September 2012
- August 2012
- July 2012
- June 2012
- May 2012
- April 2012
- March 2012
- February 2012
- January 2012
- December 2011
- November 2011
- October 2011
- September 2011
- August 2011
- July 2011
- June 2011
- May 2011
- April 2011
- March 2011
- February 2011
- January 2011
- December 2010
- November 2010
- October 2010
- September 2010
- August 2010
- July 2010
- June 2010
- May 2010
- April 2010
- March 2010
- February 2010
- January 2010
- December 2009
- November 2009
- October 2009
- September 2009
- August 2009
- July 2009
- June 2009
- May 2009
- April 2009
- March 2009
- February 2009
- January 2009
- December 2008
- November 2008
- October 2008
- September 2008
- August 2008
- July 2008
- June 2008
- May 2008
- April 2008
- March 2008
- February 2008
- January 2008
- December 2007
- November 2007
- October 2007
- September 2007
- August 2007
- July 2007
- June 2007
- May 2007
- April 2007
- March 2007
- January 2007
Categories
- About Me
- All That Scraps
- blogger challenge
- camera/photo play
- Cards
- Contests
- family stuff
- FOR SALE
- Home decor/3-D items
- How to FAKE it!
- Introduction
- JUGS Challenge
- JustRite Stampers
- Lizzie Anne Designs
- My family stuff
- My Stamping Space
- My Time Made Easy
- My Time To Color Challenge
- My Time to Create Challenge
- My Timeless Template Challenge
- My Timeless Templates
- Mytime Mail
- MYTIME MOVIE/VIDEOs
- Papertrey Newsletter
- Pink Cat Studio
- Pretty Palette Challenge
- Pretty Patterns Sketch
- Product Opinions and Must haves
- Recipe's
- Saturday Sketch
- Smilebox Creations
- Stampavie
- Tutorials
- Uncategorized
- videos
Most Popular
- Create your own Onesie Card Tutorial-and important NOTE! PLEASE READ (2529)
- Saturday Sketch-Boxed bag holder (2333)
- Going GREEN! Fancy Flower Flourish-Closure Video (1478)
- Fabulous Favorite - Giveaway! (1336)
- a Prayer Request (1231)
- QUICK-Easter Baskets from Nestabilities-PTI style-and blog challenge (1063)
- Teaser Sketch (999)
- February Release Giveway! (and a little peek) (996)
- Group Post and Rambling Rose Video Tutorial (985)
- GIVEAWAY! Who wants it all?! (895)
Recent Comments (RSS)
- 야동: Love to read it,Waiting For
- 야동: This seller is in a
- 바카라사이트: 여기 처음 왔어요. 나는이 게시판을
- 야동티비: I was surfing the Internet
- 바카라사이트: 비슷한 주제에 대한 흥미로운 정보를
- 바카라사이트: "여기에 제공해 주신 귀중한 정보와
- 온라인홀덤: 유익한 웹 사이트를 게시하는 데
- 홀덤나라: 나는 당신의 블로그를 정말 좋아합니다.
- lisa: Technology, too, has left an
- 주소모음: 흠 !! 이 블로그는 정말
Copyright © 2007 - My Time, My Creations, My Stampendence - is proudly powered by WordPress
This blog has been Tweaked and Designed by Sara Williams
33 Responses for "Halloween Treats!"
[…] Original post here […]
Where on earth do you get the time??? All of your stuff is awesome, and you have three gorgeous children to boot!! Happy Halloween.
Lauren you are AMAZING girlie! You need to sprinkle some of that creativity my way!!
It certainly looks like fun to me!!! I can’t believe what you get accomplished! If you could just package some of your energy and creativeness, you’d be a millionaire!
What a great idea Lauren! Super cute presentation too!
too, too cute Lauren! I love it~thanks for sharing and giving us the recipe!! Always fun~
Cute idea & luv the kiddie models for the make-up, such adorable faces!!!
Very cute, and the kids look adorable as always. LOVE your packaging with the tin popping out of the box. 😀
It’s such a coincidence that you made your own face paint! My sis gave my DD a book and some face paints, so I have been being forced to learn how to paint a wide variety of cat faces on her little mug. Consequently, I have been looking at a lot of face painting sites on line, but yours is the first one that told me how to make my own–good to know the food coloring doesn’t stain their faces! Super cute packaging idea too!
I love it! This will be a big hit at school. You will be the coolest mom ever. Make sure you put on the bottom of the tin….Kid tested/Mother approved
Another wonderful creative and talented project. I might just make some of these for my nieces and nephews. Thanks for sharing. Your the best.
Lauren, how COOL! My son would think you hit a winnner here too, and your packaging is FABULOUS!
You are fabulous, you know that? The tin is super cute and your kids are even cuter!
SORRY!!!!!!!!!!!!!!!!!!!!!!
Just HAVE to do it…………………
CAN I HAVE DIRECTIONS??????????????????????
Just Kidding :~) :~) :~)
Great job…can’t wait to see the rest.
Have a great weekend,
Pam in Ar.
Oh my you have been busy. You know we all want to ask for the directions now. I can’t wait to see what you have up your sleeves now. Too fun!
Fantastic! Love the packaging and what a clever, fun and entertaining favor for kids. You are soooo
talented. Can’t wait to see more.
So sweet! And you can also have a tin of homemade play-doh too!
oh..this is super duper cute! i LOVE it. how long did you leave it on their face? Just wondering if the longer you leave it on..the longer it might stain. Or be hard to get off?!? Just curious!
Super Cute! I can’t wait to see “the more to come” part!
This is just a fabulous idea. TFS
lol…Adorable photos!!
Clever Idea…cute Gift…
Sweet Tins…and love your pop-in box 🙂
Thanks for sharing your recipe.
(this does wash off easily…right) lol
OKay…I won’t ask for directions…
but I’ll watch for you to post them
sooner or later 🙂 TFS
Hugs…
Dee
You are just so stinkin’ clever! I LOVE this!!!
Awesome!
I just sent you an email…
I just love this project!
I’m glad it washes right off. I’ve done a few things to where I wasn’t so lucky! LOL!
Hugs!
How fun…..now to find some kidos to do this for!……I have an empty house and grandkids 3000 miles away!
You know, when I first saw this on your blog I thought — yuk, too messy. But then I saw the smiles on your darling children’s faces and realized, it’s not about me, but about kids having fun on Halloween. Thanks for sharing this very cool project.
OH how adorable! Too, too CUTE! Where do you come up with this stuff?
OMG, your kiddies are adorable. And what a super cool project!
I love it! I am a face painter, and I love this idea! I am going to have to scoop this from you! THANKS!
[…] […]
this is such a wonderful alternative to candy (the kids do get so much…) great presentation. your kids are adorable. tfs!
SO cute! :O)=
zgymac0416pl mactrplgtim Tory, American designer, Longchamp Outlet who keeps in thoughts the Longchamp Sale two important guidelines Longchamp Bags in his thoughts even though developing a bag,Longchamp Bags developed these bags. Longchamp Handbags distinctive colours and sizes are accessible in these fashionable bags. Longchamp Bags each and every on the bags is distinct and really fine-looking in look. Marc Jacobs Handbags They define their usefulness from their spaciousness.Christian Louboutin outlet The big sized handbags have a Christian Louboutin Sale superb lots of zipped pockets Christian Louboutin Sale within plus they could be employed by university heading female, Isabel Marant Boots mothers of little Hermes Kelly childrento placed their essentials in them and also specialized girls who need to hold bundles of documents just about every evening to office. There are also handbags obtainable in tiny sizes. These little sized kinds are perfect for formal characteristics including special birthday functions and anniversary occasions.
I am looking forward to reading new articles. Keep up the good work!
Examine was fascinating, remain in contact…
make sure you stop by the web-sites we follow, which include this 1, given it signifies our picks through the web…
{Online|On-line|On the internet|On the web|On the net|On line|Internet|Over the internet|Via the internet|Web based|Using the web} {Article|Post|Write-up|Short article|Report|Posting|Piece of writing|Guide|Content|Document|Brief article}…
The knowledge brought up on the post are some of the greatest on hand…
Leave a reply