1. Countdown Faux Quitled Heart – Lauren’s Lovely Lid Frame
Jul 9, 2008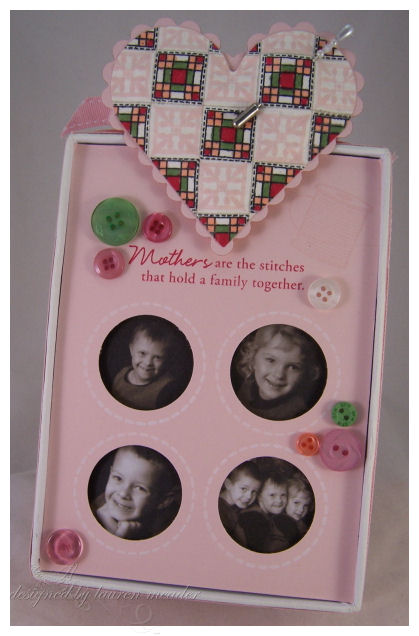
Well today I am very excited to be able to share with you a peek at a new set called Quilter’s Sampler, a cool technique, and a super fun use I found for Papertrey Ink’s exclusive Just Hatched Egg Boxes. I like to call it Lauren’s Lovely Lid Frame. I know, not too original.
Christmas is JUST around the corner, and these would make great gifts for the grandparents, or other people in your life that you have the PERFECT photo’s to showcase for them!! I recommend getting your Holiday photos done EARLY. Then you beat the rush. Oh, and get gifts done sooner 😀 These are great to mail to far away family members instead of that traditional Christmas card, that they are most likely going to trash :C These are photos of my children last year at Christmas. Make the photos black & white and it doesn’t matter what color they wore, or what color you are doing for your frames. They will match everything!
So grab your coffee because you all know how long winded I can get, especially when I am excited to share something new and fun 😀
This idea came about because I have SEVERAL of these boxes in my craft room. The “issue” is that I have been using them to store my craft items, because they are the PERFECT size for a lot of my storage needs. I know! They are suppose to be decorated! But I can’t help it, I love them for everything. Now since I am using the box BOTTOM, I have many TOPS & Egg holder pieces left over.
I don’t know about you, but I can’t throw a good thing away, so I had to find a USE for it.
That is how Lauren’s Lovely Lid Frame came to be.
This project is recycling at its best 😀
So let’s get started!
Step 1
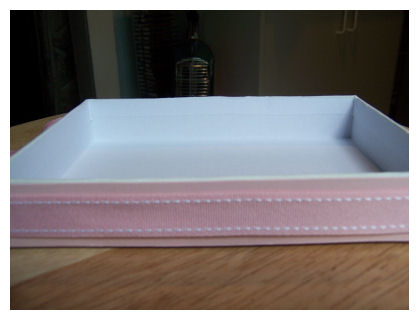
Cover the sides of your Just Hatched lid with cardstock. Tie around ribbon.
Step 2
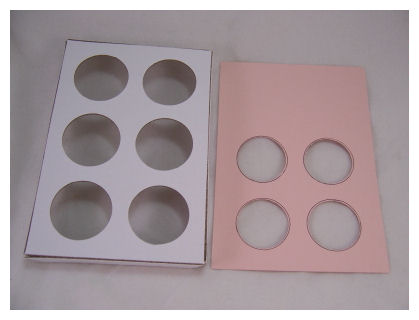
Make your template for you photos. Simply measure, and cut your cardstock the same size as your Just Hatched egg insert. Turn over, and trace 4 of the 6 holes. Punch out holes from cardstock. The SU! 1 3/8 circle punch is perfect for this step.
Step 3

Stamp cover as desired. I LOVE this sentiment in the set. So perfect, so true.
For this I used Sweet Blush Cardstock, Sweet Blush Saddle Stitch ribbon, the NEW! Quilter’s Sampler and Borders & Corners Circle set, Sweet blush ink, CTMH craft white, and SU! Regal Rose. Then adhere to Just Hatched insert. I used red-line tape for this.
Step 4

Then place desired photos behind the insert, careful to center them, and adhere them into place.
I use red-line tape, along the sides to hold insert in the lid.
I also finished my design with some Foo Fa La buttons.
Now we come to the Faux Quilted Heart “pin cushion” detail.

Here is what you need to do to achieve that FAUX flannel/suede/brushed cotton/fabric look.
A paper crimper,and for this Vintage Cream cardstock
Step 1
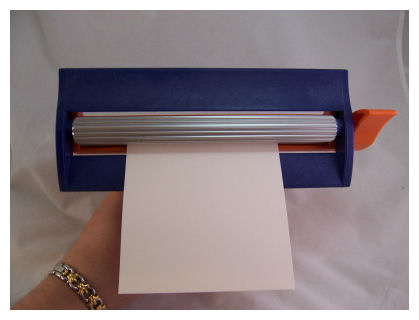
Cut your paper a bit larger than you need for the project. Then run it through your paper crimper. Do this numerous times.
Step 2
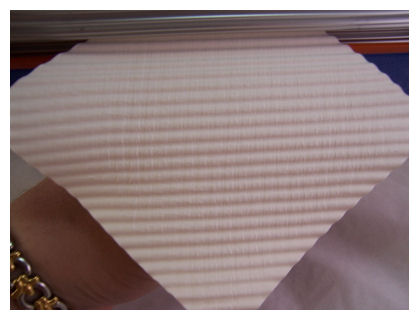
Run your paper through your crimper in another direction, numerous times. This is breaking down the fibers in the cardstock, and it eventually allows the layers to be separated.
Step 3
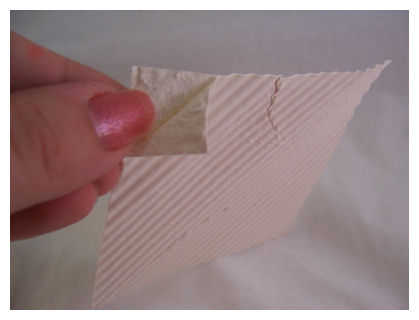

You will see the edges separate a bit, or have a bit or curl to them. Get in between the layers, and GENTLY pull apart. You will have 2 pieces to use.
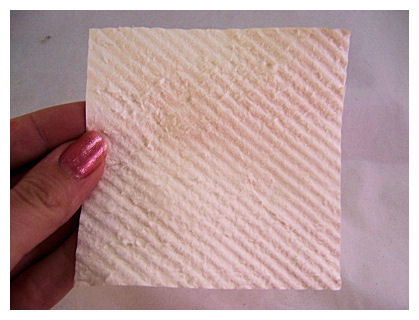
Now you are ready!
I like to take my bone folder, and rub back and forth over the finished piece. to remove any obvious crimper lines.
Now we stamp!!!
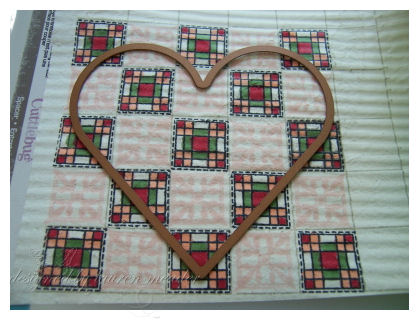
For this project I used the ever popular Guide Lines to help me create my “quilted” look for my project.
I found it best to stamp your guide lines in a lighter color, but one that is visible enough for you to see while you attempt to align your images. Once the grid is filled in you will not notice the guide lines.

I stamped my guide in Sahara Sand, on the TEXTURED side of my cardstock. I then took my desired image from Quilter’s Sampler, and stamped it in black, in every other square. I colored the pattern using my Copic Marker’s. I colored to corners (in pink) to look like hearts 😀 I used somewhat of a traditional country color scheme for this “quilt”.
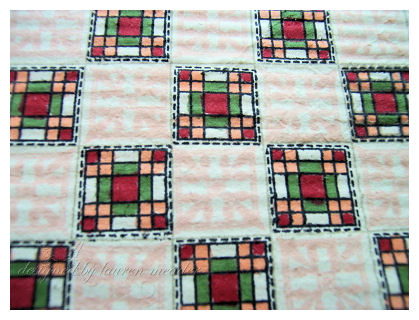 See you BARELY notice the guide lines 😀
I then stamped an image from Guide Line’s (since the two come together like MAGIC via Nichole Heady’s brilliant mind), in sweet blush ink, to break it up. It also appears to be like a patterned fabric square.
NOTE: Due to the broken and soft fibers/texture this has, don’t fully color in each block as some of the ink may over-run a little. They will fill in by themselves a bit.
Now for the die cutting-
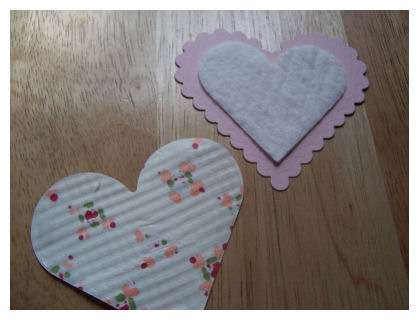
I put my die cut heart where I thought I would have the best finished design. Then die cut the image.
I used a size larger, scallop die cut for the back layer.
I then used a smaller heart die, to cut my quilter’s batting. Then layered it onto the scallop heart layer. I applied adhesive around the entire back, outside edge of my stamped heart image. Then adhered it all together!
This gives the LOOK of a quilted heart 😀 See the close-up.
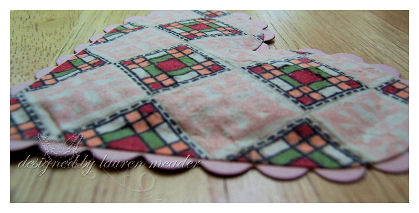
Now because of the batting layer, you can also use a stick pin in the heart as well, which again reinforces the LOOK of a quilted fabric heart, with not a stitch of sewing! It’s all ink and cardstock. Pretty fun huh?

Now to complete this frame-I just cut some cardstock 2 1/2 X 6. I scored at about 1 1/2 inches, to create a “stand”. A very simple solution so it stands up at my desk.

That is IT! It really is a QUICK gift idea. Using Guide Lines makes it really go fast!
This is a perfect gift especially if you have some of these tops/inserts going un-used! These boxes are just PERFECT for all year, not just EASTER!! It’s literally thinking outside the “box” here.
Well let me know what you think! I hope you enjoyed my long winded tutorial! I had fun trying to come up with something you would like and find useful-especially for the holidays.
I’m sure you have already checked Nichole’s blog for her peek!! Don’t miss the countdown there, and each day a different Senior Design team member will have a peek as well.
Thank you all for reading and the love & support each of you offer’s.
Till tomorrow.

My Etsy

Who I Designed For
Blogroll
- Alicia
- Alli Miles
- Ally Blankenship
- Amber
- Andi @ crafts on a whim
- Angel R
- Angie Z
- Anne Kranitz
- Becky O
- Bee
- Beth Silaka
- Bethany Paull
- Beverly Nash
- Bobbie
- Cambria
- Cammie
- Card of the Week
- Card Positioning System (CPS)
- Cards for Cancer
- Catherine Doucette
- Charmaine
- Cheryl Sims
- Chriss Rollins
- Christina
- Christine Ewing
- Christine Wooden
- Colleen Schaan
- Craft Critique
- Craft Gossip
- Crystal
- Dawn Easton
- Emily Giovanni
- Geny
- Holly
- Igne Groot
- Inspirational Craft Blogs
- Irene
- Jami Sibley
- Jeanne Streiff
- Jen del Muro
- Jeni Bond
- JenMarie
- Jenn Balcer
- Jenn Diercks
- Jenn O
- Jennifer E
- Jennifer Mick
- Jennifer Pereda
- Jennifer-Sweet Treat
- Joanne Basile
- Jodi Collins
- Julia Stainton
- Julie Masse
- Karen
- Kathryn Berthiaume
- Katie Cotton
- Kelley Holland
- Kendra
- Kim Scholfield
- Kris’s Color Stripes! Get inspired here
- Kristen Dubosque
- Kristin Eberline
- Kristine
- Laura @ Sunshine Stamper
- Laura Turnmire
- Laurie Schmidlin
- Lesa Rapp
- Linda Duke
- Linda-LSN
- Lindsey Botkin
- Lisa (lakind scs)
- Lisa Kind
- Lori Craig
- Maggie
- Mara Campbell
- Maria
- Maria Levine
- Mary
- MaryJo
- Melanie M
- Monique Hansen
- Moxie Fab World
- Pam Imholz
- PaperCrafts Connection
- Peppers and Pollywogs Kids party site
- Rebecca Grohall
- Rita
- Robyn
- Rose Ann
- Sarah Vrolyk
- Sharon Harnist
- Sharon Johnson
- Sharon Rivera (a chemisrty with paper)
- Sherrie
- Sophia Landry
- Storage Units, Ink, & More Blog
- Sue Berker
- Susan (Rainy)
- Tangii Crane
- Tracy
- Tricia Traxler
- Trudee
- Velta
- VivLyn
- Zena
MTME Pretty Palette Color Team
MTME Pretty Patterns Sketch Team
My Time Made Easy TM LLC
Shop till you drop!
Lauren Meader
About Me
Copyrighted material
Subscribe To My Blog
Pages
- About me
- Alexa’s Story!
- My Crafty Corner!
- My Time Made Easy™ LLC
- Our Make A Wish Trip to Disney!
- Resume/Publication List
Calendar
Archives
- August 2013
- July 2013
- June 2013
- May 2013
- April 2013
- March 2013
- February 2013
- January 2013
- December 2012
- November 2012
- October 2012
- September 2012
- August 2012
- July 2012
- June 2012
- May 2012
- April 2012
- March 2012
- February 2012
- January 2012
- December 2011
- November 2011
- October 2011
- September 2011
- August 2011
- July 2011
- June 2011
- May 2011
- April 2011
- March 2011
- February 2011
- January 2011
- December 2010
- November 2010
- October 2010
- September 2010
- August 2010
- July 2010
- June 2010
- May 2010
- April 2010
- March 2010
- February 2010
- January 2010
- December 2009
- November 2009
- October 2009
- September 2009
- August 2009
- July 2009
- June 2009
- May 2009
- April 2009
- March 2009
- February 2009
- January 2009
- December 2008
- November 2008
- October 2008
- September 2008
- August 2008
- July 2008
- June 2008
- May 2008
- April 2008
- March 2008
- February 2008
- January 2008
- December 2007
- November 2007
- October 2007
- September 2007
- August 2007
- July 2007
- June 2007
- May 2007
- April 2007
- March 2007
- January 2007
Categories
- About Me
- All That Scraps
- blogger challenge
- camera/photo play
- Cards
- Contests
- family stuff
- FOR SALE
- Home decor/3-D items
- How to FAKE it!
- Introduction
- JUGS Challenge
- JustRite Stampers
- Lizzie Anne Designs
- My family stuff
- My Stamping Space
- My Time Made Easy
- My Time To Color Challenge
- My Time to Create Challenge
- My Timeless Template Challenge
- My Timeless Templates
- Mytime Mail
- MYTIME MOVIE/VIDEOs
- Papertrey Newsletter
- Pink Cat Studio
- Pretty Palette Challenge
- Pretty Patterns Sketch
- Product Opinions and Must haves
- Recipe's
- Saturday Sketch
- Smilebox Creations
- Stampavie
- Tutorials
- Uncategorized
- videos
Most Popular
- Create your own Onesie Card Tutorial-and important NOTE! PLEASE READ (2529)
- Saturday Sketch-Boxed bag holder (2333)
- Going GREEN! Fancy Flower Flourish-Closure Video (1478)
- Fabulous Favorite - Giveaway! (1336)
- a Prayer Request (1232)
- QUICK-Easter Baskets from Nestabilities-PTI style-and blog challenge (1063)
- Teaser Sketch (999)
- February Release Giveway! (and a little peek) (996)
- Group Post and Rambling Rose Video Tutorial (985)
- GIVEAWAY! Who wants it all?! (895)
Recent Comments (RSS)
- 첫충사이트: 완전히 흥미로운 블로그 게시입니다. 저는
- sarah: Wow, Lauren, what a stunning
- hedie: خرید راهبند
- 야동: Love to read it,Waiting For
- 야동: This seller is in a
- 바카라사이트: 여기 처음 왔어요. 나는이 게시판을
- 야동티비: I was surfing the Internet
- 바카라사이트: 비슷한 주제에 대한 흥미로운 정보를
- 바카라사이트: "여기에 제공해 주신 귀중한 정보와
- 온라인홀덤: 유익한 웹 사이트를 게시하는 데
Copyright © 2007 - My Time, My Creations, My Stampendence - is proudly powered by WordPress
This blog has been Tweaked and Designed by Sara Williams
98 Responses for "1. Countdown Faux Quitled Heart – Lauren’s Lovely Lid Frame"
Wow…that is absolutely beautiful! Wish my mom was alive to make something like this for her. Actually…I didn’t start crafting until after she died…darn it! Sorry…just a little moment there…now it is over. :o)
Lauren, this is gorgeous!!! Beautiful job!
What a clever idea! You are just so talented!
Another fabulous idea and great tutorial. You just never cease to amaze me!
Wonderful ideas Lauren. But then you do have the most beautiful children to finished off your projects to a “T”.
Lorri
Absolutely BRILLIANT!! In my book, you are the BEST designer around!! TFS!!!
Today is payday….and I literally had an order ready to go for Nichole….when is this set available? I need it yesterday!!
Brilliant! I love that. What a great way to use your left-overs. Thank you so much for sharing with us.
Lauren I don’t know where you come up with your ideas, but this is pure genius. It is so pretty and you pay such close to the details. It is just beautiful. One question — was that actual quilters batting that you used? Just curious.
Creativity=Lauren=Beautiful
What an absolutely wonderful project Lauren. I love the dimension of your heart…and your detailed instructions are so clear and easy to follow.
Oh, my this is stunning….and coming from a quilter, seamstress….I love it!
AHHHH you kill me woman!! WOW and WOW and OH my gosh WOW… Yes your Mojo is on FIIIIRRRREEEEEEEE.. lol.. Amazing I love this project! Oh its so sweet and those pics are so prefect! WOW.. Ok I know I keep saying Wow but OH MY GOSH you are truly amazing 🙂
This is just fabulous, love the heart, making it look and feel like a quilt with the batting inside. Loved how you used the egg boxes.
What a wonderful way to start my day–Lauren and my cup of coffee!! What a fantastic idea. I have one of those egg boxes here and didn’t know what to do with it. Now I have an idea. You are fabulous. Thank you for posting this.
Cheryl
Amazing! I just don’t understand how you can doubt your creativity! You stun me with every new project – you are truly gifted by God! Thanks for sharing your gift with us. Beautiful project – as usual. Love the touch of the batting.
Lovin this quitled look. Your card is beautiful and I just love all the special details you add to your projects.
All I can say is WOW! You rock!
What an awesome idea…Love this project~ Just beautiful!
are you kidding me!!!!! you amaze me!
BEAUTIFUL!
Wow, this is really pretty! I just love your creativity! Thanks for showing us everything along the way!
I can’t wait to make one of these for DH’s mom.
Hugs!
What an adorable project! You are the queen of these 3D projects!! Nicole is lucky to have you on her design team!
Great job…you always seem to think outside of the box!
Thi is INCREDIBLE! I cannot wait to see this set, you have done a wonderful job with this project, so creative! Mwah!
LeAnne
YOU ARE INCREDIBLE!!!!!!!!!!!!
I do not know when and how you manage to do all you do! And when do you have time to even think that creatively!?! Great job! I love it!
Kim
Ohmigosh! This is ADORABLE!!! Though I looove love love your professional and perfect looking frame and cant wait to make some myself. I am thinking this would be an uber awesome thing for KIDS to do!! HOW WONDERFUL!!!!!!!
As usual. I just love yer stuff. Thanks for flooding us with uber cool things.
Sooooooo cute. My grandmother is, probably like everyone elses, a quilter. She would love this, I may just have to order this set now. Keep up the good work. Blessings and Hugzzzzzzz, Erin Perez
This is just so beautiful! Very clever recycling project. I am a quilter and I am in love with this set. I can’t wait to get my hands on it! Thanks for the inspiration.
This is just a great project! I am so glad you showed the heart up close – I didn’t catch the detail in the first photo. Wow – great job!
So clever and adorable! A beautiful job as always!!
I LOVE it Lauren – what a beautiful frame…and that ‘quilted heart’ is just great! WAY TO GO … did I mention I Love it!?!?! 🙂
Well knock me over and steal my lunch money……….this is SO COOL! I love how it looks like fabric!!!!!!!
You are SO SMART!!!!!
Fantastic job, Girlfriend! I LOVE this! I also love the applique looking pink block from the Grid Lines set! Too cool!
WOW, this is really beautiful. Great job!
[…] Adams – Stamp Yourself Silly Kirsten Dubosque – Confessions of a Naptime Stamper Lauren Meader – My Time, My Creations, My Stampendence Sara Redman – Desperate Stamper Misti Ryal – Misti Stamps 4 […]
What a gorgeous and innovative project, Lauren! You never cease to amaze me with your talent and creativity!!
Fabulous creation Lauren! Love the “quilted” effect! Awesome!
I forgot to tell you, you’ve been tagged!
This is a wonderful project, love it!
Fantastic idea Lauren. I have one small question. Where do you get the stick pins? Thanks for sharing with us. You are truly amazing.
What an AWESOME project! you never fail to amaze me. Absolutely beautiful gift that I am going to have to CASE. Thanx again!
Holy Wah! This is just fantastic! Very creative and unique. Perhaps I’ll finally get my crimper out to use. ;-0
Your frame is fabulous! I always loved quilts and wanted to learn how to quilt but I just don’t have time or patience for that now! I think it’s wonderful that Nichole brought quilting to stamping! I think I’ll have to get that stamp set as some point (and the guide lines too, and probably the polka dots too….LOL 😉 )
This is all probably gonna have to wait but it’s for my wishlist…
Your fluffy heart is awesome, the batting inside makes all the difference! 😀
Never in my wildest dreams could I come up with something so brilliant! I bet Nichole had to catch her breath when she saw this project! Simply lovely! I want to do that heart and put it on a card!
Sandy Kay
Where does your creative genius come from??? I would love to know because I want to go there! This is beyond fabulous! And what a great set Nichole has put together!
[…] […]
What a perfectly gorgeous and lovely way to use the egg box!! The pictures of your children are so adorable. Your creativity seems to know no bounds. I love this and everything you do!! Your heart quiltlet is amazing! TFS!
THUD! =)
Way to go Lauren. Thanks for showing this. And I can’t throw anything away either. 🙂
Lauren just beautiful TFS.
Lynn
WOW!! Blown away by this. Incredible!
Thanks for sharing!
Awesome project.
You cease to amaze me Lauren – this IS a beautiful gift project. I love it!!!
Wonderful tutorial on everything Lauren. I had a question pop up while going through your instructions, and then you’d answer it! Love how you acheived that flannel look. I did a tutorial on my blog today that created dimension like yours, but I used a cotton ball. Why didn’t I think of batting?!
Holly
I love this project. You are so creative!!!
moannnnnnnnnnn — this is so gorgeous and lovely. I feel like weeping in joy at the beauty and sentiment and love you’ve put into this.
Awesome! Love the quilited look! I may have to pick up some batting, do you think they sell it in small quanities? LOLOL!
Lauren—you are in a league all of your own…..I can’t even begin to compete! Stunning! You go girl!
Oh, Heavens! This is marvelous. You know, gal — I am glad I know about this blog and have the opportunity to visit it. I wish I knew YOU more Personally, and could give you a big squeeze. HOW INSPIRING!
Hugs,
Julie
Love it Love it Love it!!! Your creativity continues to amaze me. I just took up quilting a year ago, so what a fun way to incorporate quilting and card making. Your blog is the BEST out there!! 🙂
Lauren you blow my mind with your creativity! Love all your work!
Thanks so much!
This is simply adorable! I can’t believe all the creativity you have stored up in that young body of yours! I bet you’re about to burst at the seams!! What a darling gift idea!! You have the cutest kids and they look like they enjoy having their pictures taken! You are lucky!!
Wow! This is darling – love your flannel technique. You are just an incredibly creative person – thanks for sharing.
Lauren, this is amazing! You are beyond my powers of description–SO creative! You ROCK!
Wow!!! This really is amazing and so cool. I love the idea. so many ideas so little time, right? 🙂 TFS!!! You are awesome.
Awesome! I’m a quilter, and this is just fabulous! What a great job!!!! This stamp set is on the TOP of my list! TFS a wonderful post!!!
Gorgeous…
two questions… 1) where did you get those pens with the pearly things on them? and 2) can I do the crimping thing without a crimper?
Em
Lauren, this is beautiful & makes an absolutely heart warming gift for any family member. Just beautiful.
You are so very talented & I thank you a million times over for all your creativeness that you share every day with all of us! Thank you so much!!
Do you know when this set will be available & from who? I think you said Paper Trey Ink, but not sure?
This is WONDERFUL! And the instructions are so nice and easy to follow! Thank you for that! The pictures of your precious children are priceless!
Ok I’m back from my OH MY GOSH I think I am going to fall on the floor cause I’m so tired cause we traveled so much today trip… lol.. BUTTTT guess what was in the mail!! The cards for Garrett!!! THANK YOU SOOO MUCH I will make sure I tell him you made cause I don’t want him thinking I got super duper OH MY GOSH HOW THE HECK SHE GOT SO MUCH talent all of a sudden! LOL LOL…
HUGSS!! and thank you!!
OMG!! Your creativity never ceases to blow my mind! This is so creative and awesome!!!
Lauren,
This is ABSOLUTELY beautiful! You are sooooo creative! I just love to see what you have done each day, and you seem to have a wonderful family, too. I just don’t know how you do it all. You are an inspiration to us all! Thanks for sharing and being the bright spot in my day!
Carolyn
Amazing!!!!! Is there going to be a new stamp set with quilt ideas (Quilter’s Sampler) or did I miss something in all my excitment of the project. The way you crimped the paper and took it apart was totally amazing too. Gotta get one of those too now. Your inspiration is just amazing. Thanks so much for sharing!
You are so very creative, this is just to adorable, and so love your quilted heart, Beautiful peice!
…and this is why your blog contines to be my favorite and the first I visit each day. You are amazing, Lauren!
What a beautiful creation. Great techniques used and you explained them so well.
thanks
This is so cute! What a great project!
Oh Lauren…This is absolutely Gorgeous!!
Who would have thought…. You would..
Thats who! Those clever ideas…
just keep popping!! lol
Really Beautiful…I love every detail!!!
Thanks for Sharing!!
Dee
I bow to your geniusness…is that a word??? This is absolutely fantastic!!! Deidre M
Very cool!!!! Thank You For Sharing!!!!
Lauren, this project really blew me away. I had no idea you could break the paper down like that, and adding the batting really makes it look so authentic! Awesome project!
awesome tutorial – really nice finished project too – love how you used your nesties to cut out that heart – I guess I initially thought you just cut it out with scissors – this idea is much better!
FABULOUS!!! Thanks for sharing in such detail!
BA
84 comments?! Seriously?! My favorite was “thud:D” I think we all agree that you’re off the hook amazing.
You were (no surprise) the Project of the Week over at Card of the Week.com
You can check out the original post at http://www.cardoftheweek.com/2008/07/card-of-the-w-3.html
If you would like an “I was featured on” button for your blog, email me at [email protected] and I’ll get you the code.
Thanks for sharing your talent with us!!
[…] […]
What a gorgeous project! I just love the quilted heart! Thanks so much for sharing your amazing ideas with us!
{{{hugs}}}
I love your lid frame, and your tutorial is fantastic!! Beautiful project, Lauren!!
OMGOSH!!! I’m completely in love with your faux suede, quilted heart! I love the Guide Lines set and am anxiously awaiting the quilt set! Thanks so much for the wonderful inspiration!
[…] Don’t miss my sample & tutorial Lauren’s Lovely Lid Frame […]
[…] would NOT close! You may even decide to omit the lid! I did a great project using my lid –>here<–, so no […]
I cased this idea to make some name tags for a ladies event at church. It really made me realize the amount of work that went into your project. It was so beautiful I had to try it. The texture was fantastic. I wanted the tags to look like old quilts and they do!
I forgot to put a link to my project in my comment.
http://craftycatspot.blogspot.com/2009/02/name-tags-for-spring-cardinal-regional.html
Welcome to our good reputation online store. Here Mens Nike Air Max 2012 White Red is designer shoes,cheap nike air max,cheap nike shox mens and nike shox clearance market. Our company is a professional manufacturer and exporter,dealing brand shoes like nike dunks,Mens Nike Air Max 2012 White Orange Nike air max skyline,cheap mens nike air max 2012,new nike air max 2012 mens sale,cheap nike shox R4 mens,nike shox R4 mens sale,Mens Nike Air Max 2009 White Gray BlackMens Nike Air Max 2009 White Gray Black mens nike shox R4 sale,nike shox R4 sale,cheap nike shox R4 and so on,nike air max 90,180,360,2011,2012 with high quality on cheapnikeairmaxs.org.
Thank you for browsing and enjoy your shopping.
Cheap Ralph Lauren Polo Shirts On Sale in Ralph Lauren Outlet Online is Ralph Lauren Mens Long Sleeved Sweater Polo Blue Yellow Cotton special design and manufacture for the celebration of the official sponsorship of the Ralph Lauren Sale Ralph Lauren Mens Long Sleeved Sweater Polo Blue White Cotton team with star player Nacho. This limit edition polo shirt for women is available on Ralph Lauren Mens Long Sleeved Sweater Polo White Red Cotton Ralph Lauren Outlet Online Store,Ralph Lauren Polo Shirts is really worth collecting.
Funny, I was discussing this thing with my older sister the other day, now I’ll have one particular much more argument in my hand when it’ll appear to confrontation when once more.
Cheers for this content, guys, continue to keep up the good work.
Cher propriétaire du blog ! Je tiens à vous remercier pour fournir autant d’informations utiles. Merci 1000 fois ! Bravo !
Leave a reply