Simple Shimmer Card Wrap Set
Jul 3, 2008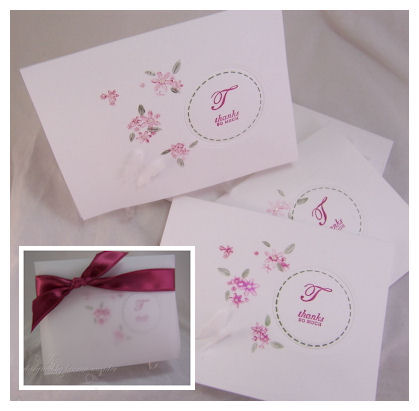
Simple Shimmer Card Wrap Set
I can think of so many occasions where a gift of Thank You notes would be the perfect gift. Maybe even elegant wedding favors. I will share a simple technique, that takes the “plain Jane” single layer set, and makes it a real “WOW”! The simple vellum card wrap will only add to the beauty, and give you a easy perfect package for you to present your set.
You will be amazed at how fast this set can come together. Another great idea for those who need to mass produce an elegant gift set.
Monogram sets are the hottest thing right now. Sometimes you aren’t sure “which” initial to use for your monogram, or WHO you are going to give the set to. Feel free to get creative, and use a sentiment in place of the initial.
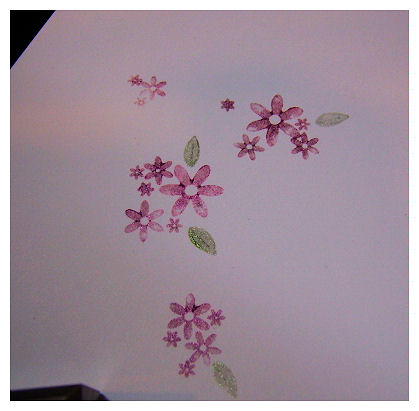
What makes this set so beautiful is that by using the Pearlescent watercolors, you are adding a soft and subtle shimmer, that isn’t messy, and wont rub off. It has the effect of a watercolored image. It is another use for this type of coloring medium that is often forgotten and under-used.
Then, you add that embossed circle, and it really adds some dimension and interest, without over powering the soft shimmering flowers with a layer.
First you will need to assemble your supplies.
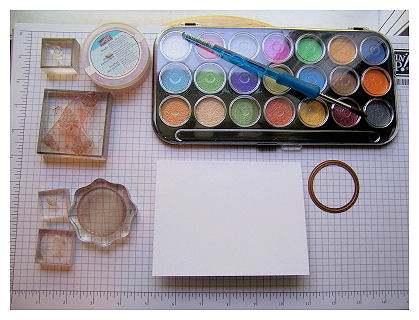
For this set I am using:
Papertrey Select White cardstock, Vellum Cardstock
The flower cluster from Piece of Cake, Borders & Corners Circle set, the “T” from Ambassador Monogram, and “thanks so much” from Mixed Messages.
Always Artichoke ink, and Purely Pomegranate ink.
Martha Stewart Butterfly Punch, glue dots.
Pearlescent Watercolors by Yasumoto, with water, and paint brush, White Opal Liquid Pearls, and the Circle Nestabilities.
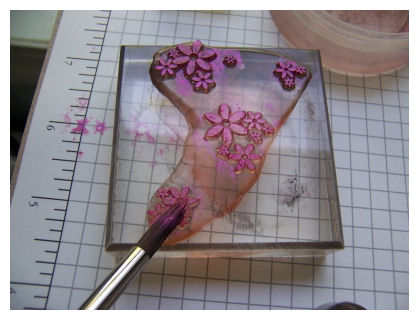
Step 1-Use only a little water, and your pink pearlescent watercolor, and create a “paste-like” mixture. Paint the pearlescent paste onto your flower cluster. Stamp onto card base
NOTE: Don’t use to much water, or your flowers will be runny, and unrecognizable.
TIP: When making a set-do each step on each card first, before advancing to the next step. This will make production of multiples of a card go much quicker. Example-do all the pink flowers on each card base, before starting the next step.
Step 2
Do the same thing for your leaves, using a green water color.

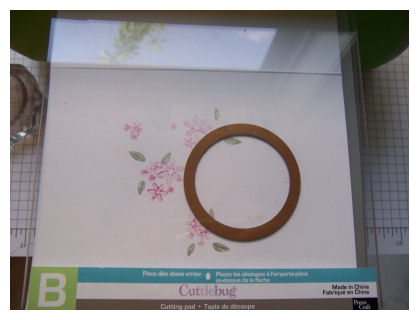
Step 3-
Emboss a circle into your card.
Step for this may vary depending on the machine you use. I am using my Cuttlebug.
To JUST emboss a layer I personally find this sandwich helpful for me.
A plate, B plate, black mat, tan mat, cardstock, nestability die (cutting side down), and B plate.
EDITED TO SAY: Or just 2 tan mats. I have an older mat set.
This gives me a nicely embossed circle
Step 4
Stamp the stitched circle onto the center of the embossed circle, in artichoke ink. It fits just outside the smallest embossed rim.
Then stamp the “T’ and sentiment, in pomegranate ink.

Step 5
Apply liquid pearls to the flower centers.
This gives a subtle 3D effect, and continues the subtle shimmer.

Step 6-
As you can see above, punch a butterfly out of vellum cardstock. Adhere with wings popped forward, using a clear glue dot.

Step 7-Creating the holder.
This holder is meant to house 4 cards with envelopes.
Take your vellum cardstock and cut 5 3/4 X 11
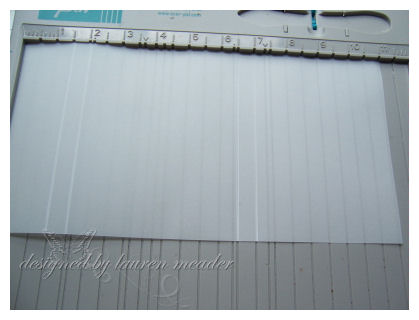
Along the 11 inches score at
1 1/2 –
2-
6 1/2-
7.
Score along lines. Put cards inside. Tie around a ribbon to hold closed.

Simple as that.
Thank you for taking a peek at my little set. I hope you take the time to try it out.
I’d love to hear your thoughts. Should you decide to make your own-send us a link!
Enjoy the day

- RSS feed for comments on this post
- adding machine
- how to use an adding machine
- My Time, My Creations, My Stampendence » Some questions answered
- us florist shops
- My Time, My Creations, My Stampendence » Marvelous Monogram
- tie holder
- martha stewart wedding
- cutting machine
- TheRedHairedGirl » Trying Something New!
- wedding cake supplies
- seo madrid
Trackbacks
My Etsy

Who I Designed For
Blogroll
- Alicia
- Alli Miles
- Ally Blankenship
- Amber
- Andi @ crafts on a whim
- Angel R
- Angie Z
- Anne Kranitz
- Becky O
- Bee
- Beth Silaka
- Bethany Paull
- Beverly Nash
- Bobbie
- Cambria
- Cammie
- Card of the Week
- Card Positioning System (CPS)
- Cards for Cancer
- Catherine Doucette
- Charmaine
- Cheryl Sims
- Chriss Rollins
- Christina
- Christine Ewing
- Christine Wooden
- Colleen Schaan
- Craft Critique
- Craft Gossip
- Crystal
- Dawn Easton
- Emily Giovanni
- Geny
- Holly
- Igne Groot
- Inspirational Craft Blogs
- Irene
- Jami Sibley
- Jeanne Streiff
- Jen del Muro
- Jeni Bond
- JenMarie
- Jenn Balcer
- Jenn Diercks
- Jenn O
- Jennifer E
- Jennifer Mick
- Jennifer Pereda
- Jennifer-Sweet Treat
- Joanne Basile
- Jodi Collins
- Julia Stainton
- Julie Masse
- Karen
- Kathryn Berthiaume
- Katie Cotton
- Kelley Holland
- Kendra
- Kim Scholfield
- Kris’s Color Stripes! Get inspired here
- Kristen Dubosque
- Kristin Eberline
- Kristine
- Laura @ Sunshine Stamper
- Laura Turnmire
- Laurie Schmidlin
- Lesa Rapp
- Linda Duke
- Linda-LSN
- Lindsey Botkin
- Lisa (lakind scs)
- Lisa Kind
- Lori Craig
- Maggie
- Mara Campbell
- Maria
- Maria Levine
- Mary
- MaryJo
- Melanie M
- Monique Hansen
- Moxie Fab World
- Pam Imholz
- PaperCrafts Connection
- Peppers and Pollywogs Kids party site
- Rebecca Grohall
- Rita
- Robyn
- Rose Ann
- Sarah Vrolyk
- Sharon Harnist
- Sharon Johnson
- Sharon Rivera (a chemisrty with paper)
- Sherrie
- Sophia Landry
- Storage Units, Ink, & More Blog
- Sue Berker
- Susan (Rainy)
- Tangii Crane
- Tracy
- Tricia Traxler
- Trudee
- Velta
- VivLyn
- Zena
MTME Pretty Palette Color Team
MTME Pretty Patterns Sketch Team
My Time Made Easy TM LLC
Shop till you drop!
Lauren Meader
About Me
Copyrighted material
Subscribe To My Blog
Pages
- About me
- Alexa’s Story!
- My Crafty Corner!
- My Time Made Easy™ LLC
- Our Make A Wish Trip to Disney!
- Resume/Publication List
Calendar
Archives
- August 2013
- July 2013
- June 2013
- May 2013
- April 2013
- March 2013
- February 2013
- January 2013
- December 2012
- November 2012
- October 2012
- September 2012
- August 2012
- July 2012
- June 2012
- May 2012
- April 2012
- March 2012
- February 2012
- January 2012
- December 2011
- November 2011
- October 2011
- September 2011
- August 2011
- July 2011
- June 2011
- May 2011
- April 2011
- March 2011
- February 2011
- January 2011
- December 2010
- November 2010
- October 2010
- September 2010
- August 2010
- July 2010
- June 2010
- May 2010
- April 2010
- March 2010
- February 2010
- January 2010
- December 2009
- November 2009
- October 2009
- September 2009
- August 2009
- July 2009
- June 2009
- May 2009
- April 2009
- March 2009
- February 2009
- January 2009
- December 2008
- November 2008
- October 2008
- September 2008
- August 2008
- July 2008
- June 2008
- May 2008
- April 2008
- March 2008
- February 2008
- January 2008
- December 2007
- November 2007
- October 2007
- September 2007
- August 2007
- July 2007
- June 2007
- May 2007
- April 2007
- March 2007
- January 2007
Categories
- About Me
- All That Scraps
- blogger challenge
- camera/photo play
- Cards
- Contests
- family stuff
- FOR SALE
- Home decor/3-D items
- How to FAKE it!
- Introduction
- JUGS Challenge
- JustRite Stampers
- Lizzie Anne Designs
- My family stuff
- My Stamping Space
- My Time Made Easy
- My Time To Color Challenge
- My Time to Create Challenge
- My Timeless Template Challenge
- My Timeless Templates
- Mytime Mail
- MYTIME MOVIE/VIDEOs
- Papertrey Newsletter
- Pink Cat Studio
- Pretty Palette Challenge
- Pretty Patterns Sketch
- Product Opinions and Must haves
- Recipe's
- Saturday Sketch
- Smilebox Creations
- Stampavie
- Tutorials
- Uncategorized
- videos
Most Popular
- Create your own Onesie Card Tutorial-and important NOTE! PLEASE READ (2529)
- Saturday Sketch-Boxed bag holder (2333)
- Going GREEN! Fancy Flower Flourish-Closure Video (1478)
- Fabulous Favorite - Giveaway! (1336)
- a Prayer Request (1231)
- QUICK-Easter Baskets from Nestabilities-PTI style-and blog challenge (1063)
- Teaser Sketch (999)
- February Release Giveway! (and a little peek) (996)
- Group Post and Rambling Rose Video Tutorial (985)
- GIVEAWAY! Who wants it all?! (895)
Recent Comments (RSS)
- 바카라사이트: 여기 처음 왔어요. 나는이 게시판을
- 야동티비: I was surfing the Internet
- 바카라사이트: 비슷한 주제에 대한 흥미로운 정보를
- 바카라사이트: "여기에 제공해 주신 귀중한 정보와
- 온라인홀덤: 유익한 웹 사이트를 게시하는 데
- 홀덤나라: 나는 당신의 블로그를 정말 좋아합니다.
- lisa: Technology, too, has left an
- 주소모음: 흠 !! 이 블로그는 정말
- FutureGen Apps: Thank You For Sharing fantastic
- 웹툰사이트: 터키에서 온라인 스포츠 베팅을 할
Copyright © 2007 - My Time, My Creations, My Stampendence - is proudly powered by WordPress
This blog has been Tweaked and Designed by Sara Williams
205 Responses for "Simple Shimmer Card Wrap Set"
Looooove it!
Very Pretty…
looks so delicate..
Very elegant gift set!
very pretty!! i love the envie…
These are so cute. I have two wedding within the next 2 months and have been racking my brain thinking about what do do for the gifts. I am sure I will add more than just the cards but this is such a great start. Thanks for sharing your ideas with us. I will definitely thinking about this when I sit down to creat later.
This is beautiful, a very elegant project.
Everything you do is so beautiful Laurnen. You amaze me girl!
Love love love your work. I’m going to try this too!
Another beautiful project, Lauren! Where you get your constant stream of creativity is beyond me, but the hits just keep on coming! Thanks for sharing!
That’s gorgeous!! Great tutorial!! Hope you have a fab holiday weekend!!
this is beautiful! i have the perfect person for this…and, can think of a whole lot more! thank you!!
chelle
oooh this is awesome Lauren!! I’m drooling all over it!
Absolutely gorgeous! What a wonderful gift this would be.
[…] […]
What a beautiful set! Thank you for sharing. 🙂
Karen
Wow!!! What a beautiful card!!!
These are just gorgeous! Love the pearlescent watercolors, the embossed circle, and the vellum enclosure! What a beautiful work of art all together!
~Kendra
Beautiful, understated elegance. Please tell me, which company makes the pearlescent watercolours? thank you.
Lovely and sooooo elegant…thank you for sharing the “how to”.
Jan
[…] […]
I would love to know where you purchase vellum cardstock. Thanks for letting me know about the vellum you used on the Simple Shimmer Card pack that you did for Papertrey.
These are just gorgeous. Very stylish 🙂 Thankyou for sharing 🙂
Simply Beautiful!
Very simple yet so elegant. Will definitely give this a try.
what a great gift idea, I love the vellum holder
What a beautiful and delicate card and gift idea! Love it!
You still manage to WOW me everyday. Thanks for the inspiration
Hey Lauren,
Happy 4th – hope you have a great day with your family. As always you know how to deliver! Awesome project!
Hi Lauren…you did a fantastic job with your tutorial, but then again I haven’t seen anything you do not be first rate. Papertrey is lucky to have you :~).
I do , however, have a question for you. I’ve been seeing these nestabilities for a good long while now and haven’t purchased any as of yet. I have punches, cricut, cuttlebug, etc. tell me what makes these so special and do I really need them. Do I have to have special machines to use them??
Thanks Lauren….have a great 4th.
Pam in Ar.
These are so elegant and simply gorgeous. I will definitely be doing my own variation.
Oh Lauren, this is sooo pretty and I just received some of those wonderful pearly watercolors! Thanks for sharing this project!
{Pam in Arizona – the poster above me – if Lauren doesn’t get a chance to answer you, YES – you can use Nestabilities with your cuttlebug!}
This is absolutely beautiful. Never thought about using my nestie like that. Thanks for sharing and have a wonderful July 4th!
This is just gorgeous. Where do you get these watercolors?
Happy 4th.
Very lovely! Great tip to use the letter from a sentiment for the monogram.
Beautiful and very elegant! I love the PTI tutorials and hope to make some of these cards for my niece’s wedding gift in the fall! This technique would also be neat for the PTI swap on the cruise!
I want the watercolors, but can’t get into the linked site because of securtiy on my system. When I Google them, I get lots of mentions in blogs but no sellers. Can anyone help me find a site that sells them without requiring cookies? Thanks.
Beautiful set so elegant, I had a go at your saturday sketch, really great to work with, hope you can have a look, it’s on my blog…
http://paperbabe.blogspot.com/
Thanks for inspiring, Kim
Another wonderful creation from the mind of Lauren Meader. What a wonderful gift. I don’t know anyone who wouldn’t love a pretty little set of thank you cards (or whatever) including me – LOL. I love to keep up with your work – you inspire me!
So simple, yet so very elegant. These are just lovely. You always amaze me with your creations.
Lauren, another stunning project!
Holly
these are so dainty and cute…love the vellum wrap.
very elegant.
how elegant these cards are. Wow !! Thanks so much for sharing. I will certainly put this tutorial to good use. Again thanks.. MaryAnn
Oh my GOSH!!!!! This is beautiful. Lauren, you’ve outdone yourself! I absolutely love it! Keep up the fantastic work.
Rocking tutorial Lauren! Someday I’ll get the embossing part of the nesties figured out. Guess now I have to go buy pearlescent water colors! Those are Yummy!
Absolutel stunning! I can’t wait to get my nesties!
Thank you for taking the time to show us set by step how to do this! I really enjoyed it. Happy 4th.
Thanks for the great idea. I really like the flowers. Thankfully, I have all the supplies that you used!!!!!! I am on my way. I hope I can do as well as you did.
outstanding!
BEAUTIFUL!
Thanks Lauren.
em
Just beautiful. Thank you so much for sharing. You are a very gifted artist.
This is so beautiful Lauren! What a lovely gift it would make!
Understated elegance! I love the softness of this project. I, too, am curious as to where to get the vellum cardstock and the paints. I also have a question about the black you used in your sandwich. Would you please share what you use? You are amazing! You can take simple things and truly change them into elegance. Thank you for sharing!
oh, wow! What an exquisite gift! I love the wonderful details you used.
Lauren, this is truly beautiful, so soft and elegant. Thanks for sharing your creativity with us.
Very cool Lauren! This is beautiful…I’ll have to find some of that Pearlescent Watercolours. I have a question though…you said Black Mat and Tan Mat. I have a tan one…but what is the black one? Where do I find that? lol
Have a FAB 4th of July!
What a beautiful set of cards! The butterfly makes it perfect! Thanks for sharing.
You are such a rockstar. I love to come see the beautiful things you come up with. Unfortuntately, now I have to go spend more money to get some of those fun things you used. Haha! Keep up the good work. You never disappoint. =)
Gorgeous babe, just gorgeous!
Happy 4th!
Hugs,
Renee
So kewl, Lauren! TFS!!
so wonderful …I wish I had all your directions in a libray ..but i dont know how to down load this without all the other stuff ..I love this card ..Your wonderful Lauren .
Diana
Lauren, thank you so much for sharing this tutorial. Your work is exquisite and I gain so much inspiration from you.
Becky
Wow! So simple and so lovely! Thanks for sharing this beautiful idea.
Gorgeous as usual Lauren.
OH….Lauren this card is so pretty. The shear look of the flowers are so nice.
Beautiful card & thank you for your tutorial! One more week before my daughter’s wedding! Can’t believe its almost here! Happy fourth of July to you & your family!
Lauren – this set is BEAUTIFUL!! Thanks for sharing the tutorial with us all!
So delicate and very feminine!
oh my….this is lovely. “Classic Elegance”…. that is what I call it. Thank you!!!!
Kim
Really pretty cards! What are the black and tan mats you mention in the process for embossing the circle with the Cuttlebug? Also, are the pearlescent watercolors SU? Are liquid pearls a product by themselves or are they created using another product?
[…] Who would have thought my Papertrey Ink newsletter project would spark such a flurry of questions & emails! LOL! As I sit I have over 400 emails all asking […]
These are so elegant yet so simple to do. You did a wonderful job!
oh these are so soft and pretty, they looked great without the vellum too!
us florist shops…
[…] you and me CHASING PAPER we”re traveling through time, brutha! two of us Friday, June 20, 2008 Stand tall, little flower. I love my delphiniums this year. They”re above my hip- so much taller than they were last year. I didn”t like this …
[…] to present this I would make my Simple Card Wrap found HERE. I am tooting my own horn here, but I have to say its a really simple but AWESOME gift wrap! LOL! […]
[…] […]
[…] […]
[…] favors. ?I will share a simple technique, that takes the ???plain Jane??? single layer set, and makehttp://laurenm.blogs.splitcoaststampers.com/2008/07/03/simple-shimmer-card-wrap-set/BRETT HOFFMAN: Riding cutting horses family affair for Johnson Athens ReviewRiding cutting horses is […]
[…] from very talented Lauren Meader. Her card set is so delicate and elegant. Lauren wrote a very good tutorial. I really appreciate wonderful people like she is. She always has something new and always shares […]
Thank you Lauren for your beautiful blog and wonderful tutorial! Your cards are gorgeous. I tired your technique and that’s what I got. Not as beautiful as your cards, but I am still learning.
http://refinedfocus.com/redhairedgirl/?p=134
[…] […]
Simply beautiful….
i was really inspired
I have made only one simple rule for my own happiness: Every day above ground is a GOOD day.
A good book is a good friend.
*Gardens are in full bloom, the citrus crops ripen, and balmy weather invites outdoor recreation.
First come, first served.
will not be the only useful resource being preserved, since the transform may
even guide lessen the amount of power and water PUMA Footwear for Men getting
used by 60 %. McQueen starred in PUMA Sneakers for women the 1968 vehicle chase
movie Bullitt in which he performed a detective PUMA Sneakers for ladies that
Underground Catholics point out classic wedding invitations for years the Vatican seems to have put the underground faithful in brackets: many vacant sees have not had replacements and seminarians are asked to enter the official seminaries. Instead, they say, in order to strengthen the faith of the entire Church in China, the Holy See should go ahead on its own, without considering the opinion of the government, and in the name of the pastoral good of the faithful, ordain bishops and ordain priests even in the unofficial community. Perhaps the Catholic communities could learn from the underground Protestant communities that now, faced with the violence of the regime, appear in public to demand religious freedom. Some of them were arrested, but while they show the world that simple wedding invitations only desire is to see the religious freedom implemented that the Chinese constitution preaches (without practicing it).
Then to strengthen the relationship between the Church in China and the Universal Church it is important to enhance the great efforts of so-called bridge-churches: those of Taiwan, Hong Kong, Macao and Singapore. Through visits, reports, financial aid, sending teachers and religious personnel, they can comfort and help develop the life of the Chinese community, stifled by control or green wedding invitations
So fun article is! I agree the idea!
.I really enjoyed each and every bit of the post.Thanks a lot for sharing it
Thanks for, posting on this blog page man! I’ll email you soon.
This is a wonderful article,I like it very much.
Another great post.
The post are attracted me. It’s interesting. I like read it.
Good post. And thank you for your share. I learn many thing in this post.
I really enjoyed this. You can look your article comments.I really appreciate the way you have written about this.
baby come on!!
Many thanks for the article. I will have a link back to this information from our fresh blog. Thanks again. http://www.buyshoessupra.com http://www.adidaswatergrip.com
Content of the article you write so well, so I benefited from
Here I learned a lot, then I will pay more attention to you
Wow.Good post. And thank you for your share. I learn many thing in this post.
A lot of including unquestionably the female interviewees appear louis vuitton outlet
You most likely currently understand that cheap oakley sunglasses guard your vision in the sun’s damaging rays, but not all eyeglasses are developed equal. If you’re heading to glimpse wonderful whilst putting on Oakley Split Jacket Sunglasses (and really, would you put on a pair that make you glimpse horrible? it need to guard your vision towards max at identical time. With that in mind, do Oakley sunglasses obstruct ultraviolet rays? You bet! However, some do not entirely obstruct them, also it may not be associated to price.
It’s a nice post!Thanks for your good work,it helps me a lot!
looking forward to your update, support you forever !
i like you post
well done !Thanks for sharing. There are not much websites have helpful source of informations like this one ed hardy i learned more from here.
Nike Free 7.0 V2 barely enough to support your feet, let your toes naturally bend and grip, while off the exercise is often overlooked in the traditional footwear of the natural chain of muscles. Nike, active lifestyle provides a broad array of products.7.0 V2 specific enough to support your feet, and let your toes naturally bend and grip, campaigns, usually in the traditional footwear of the natural chain of neglected muscles. Our Nike Free 7.0 Men, non-sales tax, free delivery and quality of the authority, to maintain! Quality assurance, we will send shipment tracking, service.You can also refer to the Michael Jordan shoes and Nike running Nike Free 7.0 Men. NIKE FREE 7.0 II (V2), NIKE FREE 7.0 shoe.
almost in Shanghai streets everywhere, Louis Vuitton it serves to show to the brand of luxury lover dotes on degree. Many consumers
right of this brand value in addition Louis Vuitton Jeans to good quality, and often the big
brands power – spent big price always lets a person see and read. Therefore, the reporter Louis
Vuitton Scarves survey of key falls on the highest cost-effective bag on, the key lies in “a see that they were LV”.
http://www.discount-raybans.com/ray-ban-aviator-c-36.html Ray Ban Aviator
http://www.discount-raybans.com/ray-ban-wayfarer-c-38.html Ray Ban Wayfarer
Their knowledgeable staff works with each customer individually to find the best shoes with a perfect fit.
Mankind has always been in love with gold. Centuries have passed since gold was
Ralph Lauren Polo http://www.ralphlaurens-outlet.com/ralph-lauren-polos-c-4.html
Ralph Lauren Shoes http://www.ralphlaurens-outlet.com/ralph-lauren-shoes-c-22.html
Your blog is outstanding; do not a lot ofthings people are talking about intelligence. I am glad I have this chance in my relatingsome of the search.
Glad to find this information. I have been searching in Google for long time.
so beautiful
Air Jordan 1 fashion to wear rubber-soled shoes, one in 1930, a Cheap Jordan Shoes In the 1950s, young idols – James history. Dean – wearing rubber-soled shoes, jeans, Nike Air Max TN T-shirts and stills of the film. Since then, these shoes are cheap and durable as the world’s young people as part of formal wear The following schedule will present Wholesale Air Jordan Shoes rubber-soled shoes in the technical and cultural history. Basketball is a demanding sport, in order to meet its requirements for a pair of basketball shoes in terms of, you need to have Cheap Air Max Shoes good durability, support, stability, flex
funny articl.i love it very much.thanks
Thanks for taking the time to talk about this, I feel fervently about this and I take pleasure in learning about this topic. Please, as you gain information, please update this blog with more information. I have found it very useful.
I am very impressed, so it has been found that you haveso well with so much class, subject and more. A top-notch, buddy! Really great thingshere..I like it.
Our Ralph Lauren Outlet store offer huge collection of Polo Outlet those are fit to most occasions such as formal events, get-togethers, etc. Ralph Lauren Polo clothes are popular in most countries and hot sale online. Get your Ralph Lauren clothing and accessories online.
Welcome to our good reputation online store. Here Mens Nike Air Max 2009 Black Gray Gold is designer shoes,cheap nike air max,cheap nike shox mens and nike shox clearance market. Our company is a professional manufacturer and exporter,dealing brand shoes like nike dunks,Mens Nike Air Max 2009 Black Green Nike air max skyline,cheap mens nike air max 2012,new nike air max 2012 mens sale,cheap nike shox R4 mens,nike shox R4 mens sale,Mens Nike Air Max 2009 Gray Black mens nike shox R4 sale,nike shox R4 sale,cheap nike shox R4 and so on,nike air max 90,180,360,2011,2012 with high quality on cheapnikeairmaxs.org. Thank you for browsing and enjoy your shopping.
Cheap Ralph Lauren Polo Shirts On Sale in Ralph Lauren Outlet Online is Ralph Lauren Mens Long Sleeved Sweater Polo Blue Yellow Cotton special design and manufacture for the celebration of the official sponsorship of the Ralph Lauren Sale Ralph Lauren Mens Long Sleeved Polo Navy White team with star player Nacho. This limit edition polo shirt for women is available on Ralph Lauren Mens Long Sleeved Polo Gray Orange Ralph Lauren Outlet Online Store,Ralph Lauren Polo Shirts is really worth collecting.
Our good reputation online store offers a number of popular products calvin klein underwear. All products is wholesale price. We offered many brand of calvin klein boxers, mens calvin klein underwear, calvin klein underwear, oakley sunglasses on sale, ck underwear,adidas shoes, red bull caps, belts, our web would calvin klein underwear sale be the best choice. Everyone will love them. fast delivery,discount price and 100% top quality guarantee.
Your blog is outstanding; do not a lot ofthings people are talking about intelligence. I am glad I have this chance in my relatingsome of the search..I like it. take the article submission programs for a kind of really good article about this post.Thanks for you sharing.
Thank you very much for the information great post, found it on Yahoo.I am very lucky to get this tips from you.his is the best weblog for anyone who wants to know about this subject.
funny articl.i love it very much.thanks saw this page bookmarked and very much liked what I read. I will surely bookmark it as well and also go through your other posts tonight.
This is a nice site. grt post. Very informative and cvers almost everything for bloggers. This was the consolidation I was looking for. Thanks !!!!
Your blog is outstanding; do not a lot ofthings people are talking about intelligence. I am glad I have this chance in my relatingsome of the search..I like it. take the article submission programs for a kind of really good article about this post.Thanks for you sharing.df
Your blog site is excellent. Say thanks to you truly for providing plenty of both useful and interesting advise. I will bookmark bookmark your website and will be absolutely coming back.
Bowerman failed to truly do a lot working. He only began to jog just a
Your article was great, evident by his comments. I am also happy to read
I hope you have a nice day! Very good article, well written and very thought out.
I first came to visit your site, this article is worth people thinking about people watching, very pleased to meet you here! Thank you for sharing this with us win a good article..
Those parts of the system that you can hit with a hammer (not advised) are called hardware; those program instructions that you can only curse at are called software. Thanks for you sharing..
Best,I like it
OK,you have done well ,great you can write so beautiful ,thank you
I simply want to say I am new to blogging and seriously enjoyed your blog site. Likely I’m planning to bookmark your website . You really have amazing articles and reviews. Many thanks for sharing with us your webpage…
Wife talking to her husband(who reads newspaper all day): I wish I were a newspaper so I’ll be in your hands all day.
Husnband: I wish that too, so I could change you daily.
Teacher:Why are you late for school every morning?
Tom:Every time I come to the corner,a sign says,”School-Go slow”.
I recently came across your blog and have been reading along. I thought I would leave my first comment. Thank you! Thanks for you sharing..,,
Cheap Timberland boots shock! A long time why would like a son that like! From thinking any further can’t there any son can move me, have never thought to be in so to see the masterly thread
http://www.timberlandbootssales.com/
I am new to blogging and seriously enjoyed your blog site. Likely I’m planning to bookmark your website . You really have amazing articles and reviews. Many thanks for sharing with us your webpage..
I’m happy when reading through your site with up-to-date information! thanks alot and hope that you’ll publish more site that are based on this website.
Best,I like it
Pretty good post.i am very enjoy reading your article!
Thanks for you sharing..Those parts of the system that you can hit with a hammer (not advised) are called hardware; those program instructions that you can only curse at are called software
Thank you for sharing your content is very rich, contains a number of philosophical interpretation of the world views you, thank you very much for bringing us so full of deep meaning of the article. I learned a lot. Thanks again, look forward to your update!
What’s more, Powerbeats deliver awe-inspiring sound with separate subwoofer and midrange tweeter for thunderous bass, silky vocals and clean, undistorted highs. And advanced passive sound isolation keeps the music in with your surroundings audible so you stay on top of your game.
Thank you for the article, browse so many articles I’ve ever seen one of the most exciting articles, covered up, look forward to your updates.
Very proud to read such a good article, this is the best I’ve read, the most exciting, one of the most interesting articles. It is what I will be looking for sites, collecting it, and look forward to bloggers update. Thank you to share!
Very pleased to read your articles, your article is the most I’ve seen style, one humorous article. Not urgent and so is your article with many colors of life philosophy. Thank you for sharing.
of which the lowest price is LV louis vuitton handbags clearance by series. The same series bag if pattern different price will vary considerably, one of the most cheap to Louis Vuitton Men Handbags calculate the most common coffee interwoven letters pattern, commonly known as “LV aging”, but if Louis Vuitton Monogram Handbags pattern is white colour or black colored interweave.
Good article , your article rich in literary talent , technique and describe very unique style of humor , brings a joy and festivity. Not only that, your article is rich with a lot of useful knowledge and helpful information . Thank you for sharing .
Google search, very happy and fortunate can search for so called literary incomparable style unique good article . Not only the style of the article literary talent , its content is more exciting , but also contains a lot of knowledge and life , these are very helpful .
The Dear Lover Wholesale Sexy Swimwear using the very least quantity of stitch ought to be selected as this can ensure which they will final prolonged sufficient to the use.You should certainly generally differentiate in between the nightwear and also the swimwear. The China Lingerie Manufacturer can certainly offer the perfectly for any demands.
I very much enjoy your blog to share all those meaningful knowledge and information . In my opinion , an excellent blog is definitely for an outstanding author . Look forward to your next article , let us share more surprises .
mother of the bride dresses Mother-of-bride-dresses.com supply the perfect mother of the bride dress to wear.
mother of the bride outfits Mother-of-bride-dresses.com supply the perfect mother of the bride dress to wear.
mother of the groom dresses Mother-of-bride-dresses.com supply the perfect mother of the bride dress to wear.
In my opinion , your blog gives us all a lot of surprises , not only to understand a lot of useful knowledge , but also mutual exchange of views , more importantly, the mood is always filled with joy after reading the article . This is very rare . I am looking forward to more updates .
Thank you for sharing, I have recently been in the collection of information similar to the topic , I am glad from your collection to . Your blog is very unique article content is very rich and full of very strong colors of life . I like them very much the same like those points you raised .
The post is written in very a good manner and it entails much useful information for me. I like michael kors iPhone cases. Now you make it easy for me to understand and implement the concept. Thank you for the post.
Pork barrelful abdomen incorporates an to an more distinguished extent mouth-watering reciprocally boiled down to ham actor role player since Christmastime or Thanksgiving.
The content of your blog is very interesting, and very rich, and contains plenty of emotion . I like them very much , very much appreciate the personal views from those described in your article . Those are very meaningful. Thank you for sharing, I look forward to more of your wonderful update .
You make a very good analysis. I looked through theme, found that most of the people have the same opinions with you about blog, so your blog is really worth to collect.
I’m very pleased to find this website will should be. I want to thank you for this respect is very good article! ! I definitelyenjoyed every bit of it and I you to investigate your post bookmark the new things.
Very clear description of some of their own unique personal thoughts in your blog . I very much agree with these sentiments. I very much agree with your blog posts , its content is very rich and very good . The article contains a lot of valuable knowledge and information . Thank you for your wonderful sharing .
From my contact with your blog , my intuition told me that your blog will be extraordinary . Sure enough, by reading to understand your blog , its very good and exciting, the contents of the article is very prominent , contains a lot of valuable information . Thank you for your wonderful sharing, we are looking forward to more sharing .
But when people wear eye ytterbium Oakley sunglasses http://www.cheapoakleysunglassesdeal.org
read, it is difficult to maintain the correct posture.
This is because the lens and Cheap Oakley Sunglasses http://www.cheapoakleysunglassesdeal.org
mirror the angle between legs of the glasses box is fixed at 90 degrees. Wearing glasses, depending
on the material.
But be careful when reading the table fake oakley sunglasses http://www.justoakleysunglasses.org before the bottom of
the book or other objects, people would have bowed his head, cervical spine in flexion, which increased
the burden.
Even some people who wear ordinary glasses when reading and writing in order to achieve the best viewing
angle, the eyes from the book and considerate too close, when the lens and books are almost parallel, so
that cervical flexion, in the extreme song and more emphasis on the cervical spine strain.
I believe this is a very good blog . A lot of meaningful knowledge and valuable information is hidden in your blog post . I believe these are the majority of readers are very substantial help . Thank you for your wonderful sharing . Look forward to your more similar share .
Your blog is very popular with everyone welcomed and loved . I believe many people have told me as very much like your blog post content , from which we all learned a lot of very unique knowledge and theory . These are of great help to us . Thank you for your wonderful sharing, I am looking forward to your updates .
The great work! This type of information, should be in a network share. Shame on search engines do not positioning this post is higher! Come, my website access. thank you
Very good article. I learn completely new things and challenges every day in my blog stumbleupon. It always helps other authors reading material and use small something from their web site.
Pretty good post.i am very enjoy reading your article!
Read so many good blogs, blog, learn a lot of meaningful knowledge. However, your blog unique style, not only to share valuable and meaningful information, but also from sharing your happiness. Humorous content of your article, so read your articles, people relaxed and happy.Thank you for your wonderful sharing.
Excellent web site. Here a lot of useful information. I send it to some friends also share the delicious ans. Naturally, thank you for your sweat!
Hello! When I am working on your blog from my new computer. Just wanted to say I love reading your blog, and looking forward to all of your message! Maintain excellent work!
Thank you for your wonderful sharing . This is absolutely excellent and wonderful blog , I think this is a very noteworthy blog . The article content is very unique and special significance , containing a lot to learn from theories of knowledge . I will recommend to the concern of the Friends of Bo .
Not the same as the article style , not content . Share more in – depth , valuable information, which has a very significant meaning for our readers .
Owned by Shiying Sexy Lingerie Co., Ltd and specializes in the wholesale Dear-Lover Sexy Costumes Sexy Lingerie Accessories.
I really appreciate your blog , and from that can come into contact with a lot of like – minded readers . You can also learn a lot of useful knowledge and information .
Through the introduction of the Friends of Bo , come into contact with your blog . Many excellent knowledge as well as the wonderful information learned from your blog , I am very grateful , very grateful that you share with so many .
Find a variety of stylish and affordable club wear and dresses on Clubwear Manufacturer, wholesale fashion clubwear at cheap price from China.
This is a very good article, others may not think so, but it seems to me it really is a wonderful article.
Wonderful blog!This is steering to be the best weblog for anybody who desires to know about this subject.
This is I want to find articles. I appreciate you pay so much. Hope that more and more people will like your article!
At first regarded as not a difficult question, they sought rather to explain.
I’m going home tonight to take a pick, i’m very excited about this (clearly you see how sad and crazy i am about shoes.) Will post the picture lyj
varieties does not seem to me sufficient to overthrow the view which I have taken with respect to the very general, but not invariable, sterility of first crosses and of hybrids, namely, that it is not a special endowment
Buy CReader VI, the leading OBD car diagnostics tool direct
When the international trading model changes into small business sale, wholesale corsets are very popular and easy no matter on Europe or America. And most ladies like to match the fashion corset with wholesale stockings to build up slender shape.
Really great post, Thank you for sharing This knowledge.Excellently written article, if only all bloggers offered the same level of content as you, the internet would be a much better place. Please keep it up!
seo madrid…
get top quality que es el seo anywhere…
Document hasn’t been thinking about buying these eso gold, nevertheless recognised them all around the retain and only needed to purchase for them. They search awesome having other things That i convey when i get yourself a loads of comments. Cousin, they can fit clearly and can be basic access it. Excellent quantity of bother getting them to on a deserted legs, but. I really decreed these folks within my capacity plus they fit in, bootcamp seso goldest a variety of sizing and a minimal amount of significant. Some other (small to medium sized) claim is simply because chafed themsleves simply enough. You cleaned up all right, nonetheless need to fresh new the whole bunch quite often.
What’s up, I check your blogs like every week. Your writing style is witty, keep doing what you’re doing!
I really think that if there was any chance of this comet hitting the Earth , or doing any damage to us what so ever we would know ABSOLUTELY NOTHING about it ..Remember back in September I think it was , when an asteroid came between us and the moon and had a real chance at smashing into the Earth ..was there any advance notice or warning on that?? were there any postings on youtube? I think they are trying to Chicken little us to death , so when the really one comes , we wont believe it.
Thank you for writing this interesting and most of all inspiring article. You have really a gift for doing this job. Your other articles are also nice.I’m wondering how can I subscribe to you? Any suggestions.
Nieuwpoort Waisman posted a photo: She wouldn’t release her grip. – <a rel="nofollow"
Your article is usefull for me.It is a good article.
You received a definitely beneficial webpage nfl jerseys I have been right here reading for about an hour. I’m a newbie and your success is really much an inspiration for me.
私達はちょうど私は純粋にあなたがあなたの訪問者に提供した品質情報を享受していることを言って前に、あなたのサイトを残しcouldntの?あなたの人々はFBのファンページを持っています
Nice article. Totally relate to. Never see writing such article online…must be tough topic. Liked every bit, grammar good and precise, topics like this more and should be available online….enjoyed every bit…#nice to find such information. Length of article need improve.
Atelier typically refers to an artist’s studio or workshop, where creative work is produced. It serves as a space for artistic expression, experimentation, and the development of visual or craft-based projects. In a broader sense, it embodies a dedicated environment for fostering creativity and craftsmanship across various disciplines.
good,website designing company in Noida
Good Content, Sharing your time to give a good content.
lack of confidence Hindi meaning
good content bite the bullet meaning and example
Thank You For Sharing fantastic Content.
website development company in Delhi
Leave a reply