Its in the Bag Challenge!
Jul 1, 2008So Nichole has challenged us to use her FABULOUS Coffee Bags in a fun way.
Make sure you check out all the Senior Design Team members blogs 😀
I LOVE challenges and I especially LOVE altering stuff (in case you didn’t notice :D) Altered gift packing is just so fun, and your recipients feel special that not only did you make a card, but you took the time and attention to the packaging. Packaging doesn’t always have to be something complex and difficult. Keep it simple.
The greatest thing about these Coffee Bags is not only are they STAMPABLE, but the interior of the bags are lined with waxed paper, which will prevent any oils from the treats they contain from seeping to the outside of your project.
I really love her coffee bags for gift giving. Usually we think a great time to send treats is during the holidays. That isn’t always the case though. Don’t you love when people think of you ALL year? Receiving a gift for NO reason is the BEST!
So here is my gift idea:
A few months ago my friend Paulette sent me this wet mix in a ziplock bag. It was for
Amish Friendship Bread. I had to take the 10 days to make the mixutre. Then separate it out and pass the mix along to a couple of people.
The idea behind Amish Friendship Bread is that it is the chain letter of the baking world. The idea is very simple: a friend gives you a cup of yeast culture (also known as “starter”) and a copy of instructions. Following the instructions, you add sugar, flour and milk and it rises. Eventually, you end up with 4 cups of the starter. You use one cup to make bread (the instructions provide you with the recipe), keep one cup to start a new cycle and give two cups to your friends. Each of your friends also gets a copy of the instructions for what to do with the yeast starter. The latter part makes it somewhat like a chain letter. Of course, Amish Friendship Bread does not come with any promises of riches for those who spread it on or curses for those who don’t.
It was created because the Amish believe that we live in a fast paced world. Fast food, lack of time taken to enjoy the cooking/baking process with family & friends. By giving and receiving the kit, you are not only sharing of yourself, but taking time in the fast paced life to stop and make something from scratch so it is home made.
I made the bread and it tasted AMAZING!!!! So I promptly passed it along. Ever since I hoped to get more 😀 I made a starter to pass along, and decided this is how I am going to give this mixture.
 click to enlarge
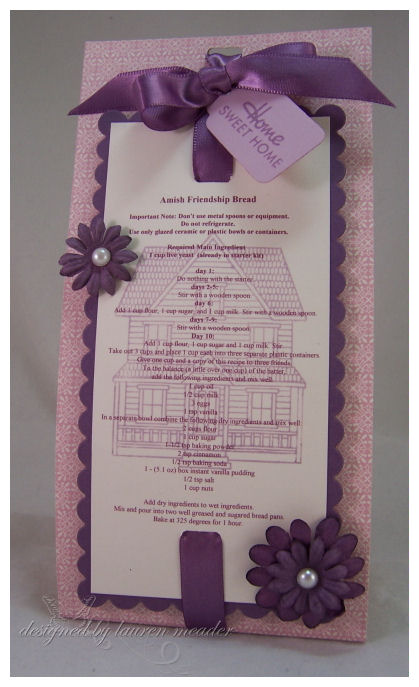
I typed up my recipe/instructions, then resized them to fit my project. I then printed them in a plum color onto vintage cream cardstock. I then used the house image Boards & Beams, and stamped the house in Lavendar Moon.
I took my LONG rectangle scallop nestabilities to die cut the long scallop mat from Plum Pudding cardstock. I layered on my recipe. The best part about this bag is I didn’t ADHERE the recipe to the bag. It is just held on with the ribbon. Now the person receiving it can slip it off and keep the recipe for future use 😀
I used my Guidelines patterned paper to make a simple cover for my bag. I felt it was very in theme with the simple Amish way of living.
I used my Making Memories ribbon slot tool to then string though my simple satin ribbon, which holds my recipe in place, as well as my tag with my greeting. I then kept it simple with decorating it using prima flowers and adhesive pearls.
Once it was decorated ( 3 bags took 20 minutes 😀 to make including printing recipe) I poured in my mixture.
TIP: I wrapped my bags with saran wrap before pouring anything, just in case I spilled anything, my bags wouldn’t be ruined. 😀 Which me being the messy clutz I am, they would have been ruined. LOL!
I hope you enjoyed this simple project, and you take the time to make one for a friend, family member, teacher or neighbor!
Here is the recipe-you can just copy & paste !
Amish Friendship Bread
Important Note:
Don’t use metal spoons or equipment.
Do not refrigerate.
Use only glazed ceramic or plastic bowls or containers.
Required Main Ingredient1 cup live yeast (already in starter kit)
day 1: Do nothing with the starter. days
2-5: Stir with a wooden spoon. day 6: Add 1 cup flour, 1 cup sugar, and 1 cup milk. Stir with a wooden spoon.
days 7-9:Stir with a wooden spoon.
Day 10: Add 1 cup flour, 1 cup sugar and 1 cup milk. Stir.
Take out 3 cups and place 1 cup each into three separate plastic containers.Give one cup and a copy of this recipe to three friends.To the balance (a little over one cup) of the batter,add the following ingredients and mix well.
1 cup oil
1/2 cup milk
3 eggs
1 tsp vanilla
In a separate bowl combine the following dry ingredients and mix well:
2 cups flour
1 cup sugar
1-1/2 tsp baking powder
2 tsp cinnamon
1/2 tsp baking soda
1 – (5.1 oz) box instant vanilla pudding
1/2 tsp salt
1 cup nuts
Add dry ingredients to wet ingredients.
Mix and pour into two well greased and sugared bread pans.
Bake at 325 degrees for 1 hour.
————————————————————————————————————————-

- RSS feed for comments on this post
- Water High » Blog Archive » Balaclava in murder accused’s bag (BBC News)
- nestabilities
- how to dry flowers
- recipe blogs
- heather card
- packing instant coffee
- Bread, stamping and friendship! · Stamping @ CraftGossip
- moon cycle
- bag in box packaging
- saran wrap
- how to make amish starter
- yeast powder
- family chain
- make flowers felt
Trackbacks
My Etsy

Who I Designed For
Blogroll
- Alicia
- Alli Miles
- Ally Blankenship
- Amber
- Andi @ crafts on a whim
- Angel R
- Angie Z
- Anne Kranitz
- Becky O
- Bee
- Beth Silaka
- Bethany Paull
- Beverly Nash
- Bobbie
- Cambria
- Cammie
- Card of the Week
- Card Positioning System (CPS)
- Cards for Cancer
- Catherine Doucette
- Charmaine
- Cheryl Sims
- Chriss Rollins
- Christina
- Christine Ewing
- Christine Wooden
- Colleen Schaan
- Craft Critique
- Craft Gossip
- Crystal
- Dawn Easton
- Emily Giovanni
- Geny
- Holly
- Igne Groot
- Inspirational Craft Blogs
- Irene
- Jami Sibley
- Jeanne Streiff
- Jen del Muro
- Jeni Bond
- JenMarie
- Jenn Balcer
- Jenn Diercks
- Jenn O
- Jennifer E
- Jennifer Mick
- Jennifer Pereda
- Jennifer-Sweet Treat
- Joanne Basile
- Jodi Collins
- Julia Stainton
- Julie Masse
- Karen
- Kathryn Berthiaume
- Katie Cotton
- Kelley Holland
- Kendra
- Kim Scholfield
- Kris’s Color Stripes! Get inspired here
- Kristen Dubosque
- Kristin Eberline
- Kristine
- Laura @ Sunshine Stamper
- Laura Turnmire
- Laurie Schmidlin
- Lesa Rapp
- Linda Duke
- Linda-LSN
- Lindsey Botkin
- Lisa (lakind scs)
- Lisa Kind
- Lori Craig
- Maggie
- Mara Campbell
- Maria
- Maria Levine
- Mary
- MaryJo
- Melanie M
- Monique Hansen
- Moxie Fab World
- Pam Imholz
- PaperCrafts Connection
- Peppers and Pollywogs Kids party site
- Rebecca Grohall
- Rita
- Robyn
- Rose Ann
- Sarah Vrolyk
- Sharon Harnist
- Sharon Johnson
- Sharon Rivera (a chemisrty with paper)
- Sherrie
- Sophia Landry
- Storage Units, Ink, & More Blog
- Sue Berker
- Susan (Rainy)
- Tangii Crane
- Tracy
- Tricia Traxler
- Trudee
- Velta
- VivLyn
- Zena
MTME Pretty Palette Color Team
MTME Pretty Patterns Sketch Team
My Time Made Easy TM LLC
Shop till you drop!
Lauren Meader
About Me
Copyrighted material
Subscribe To My Blog
Pages
- About me
- Alexa’s Story!
- My Crafty Corner!
- My Time Made Easy™ LLC
- Our Make A Wish Trip to Disney!
- Resume/Publication List
Calendar
Archives
- August 2013
- July 2013
- June 2013
- May 2013
- April 2013
- March 2013
- February 2013
- January 2013
- December 2012
- November 2012
- October 2012
- September 2012
- August 2012
- July 2012
- June 2012
- May 2012
- April 2012
- March 2012
- February 2012
- January 2012
- December 2011
- November 2011
- October 2011
- September 2011
- August 2011
- July 2011
- June 2011
- May 2011
- April 2011
- March 2011
- February 2011
- January 2011
- December 2010
- November 2010
- October 2010
- September 2010
- August 2010
- July 2010
- June 2010
- May 2010
- April 2010
- March 2010
- February 2010
- January 2010
- December 2009
- November 2009
- October 2009
- September 2009
- August 2009
- July 2009
- June 2009
- May 2009
- April 2009
- March 2009
- February 2009
- January 2009
- December 2008
- November 2008
- October 2008
- September 2008
- August 2008
- July 2008
- June 2008
- May 2008
- April 2008
- March 2008
- February 2008
- January 2008
- December 2007
- November 2007
- October 2007
- September 2007
- August 2007
- July 2007
- June 2007
- May 2007
- April 2007
- March 2007
- January 2007
Categories
- About Me
- All That Scraps
- blogger challenge
- camera/photo play
- Cards
- Contests
- family stuff
- FOR SALE
- Home decor/3-D items
- How to FAKE it!
- Introduction
- JUGS Challenge
- JustRite Stampers
- Lizzie Anne Designs
- My family stuff
- My Stamping Space
- My Time Made Easy
- My Time To Color Challenge
- My Time to Create Challenge
- My Timeless Template Challenge
- My Timeless Templates
- Mytime Mail
- MYTIME MOVIE/VIDEOs
- Papertrey Newsletter
- Pink Cat Studio
- Pretty Palette Challenge
- Pretty Patterns Sketch
- Product Opinions and Must haves
- Recipe's
- Saturday Sketch
- Smilebox Creations
- Stampavie
- Tutorials
- Uncategorized
- videos
Most Popular
- Create your own Onesie Card Tutorial-and important NOTE! PLEASE READ (2529)
- Saturday Sketch-Boxed bag holder (2333)
- Going GREEN! Fancy Flower Flourish-Closure Video (1478)
- Fabulous Favorite - Giveaway! (1336)
- a Prayer Request (1232)
- QUICK-Easter Baskets from Nestabilities-PTI style-and blog challenge (1063)
- Teaser Sketch (999)
- February Release Giveway! (and a little peek) (996)
- Group Post and Rambling Rose Video Tutorial (985)
- GIVEAWAY! Who wants it all?! (895)
Recent Comments (RSS)
- 첫충사이트: 완전히 흥미로운 블로그 게시입니다. 저는
- sarah: Wow, Lauren, what a stunning
- hedie: خرید راهبند
- 야동: Love to read it,Waiting For
- 야동: This seller is in a
- 바카라사이트: 여기 처음 왔어요. 나는이 게시판을
- 야동티비: I was surfing the Internet
- 바카라사이트: 비슷한 주제에 대한 흥미로운 정보를
- 바카라사이트: "여기에 제공해 주신 귀중한 정보와
- 온라인홀덤: 유익한 웹 사이트를 게시하는 데
Copyright © 2007 - My Time, My Creations, My Stampendence - is proudly powered by WordPress
This blog has been Tweaked and Designed by Sara Williams
47 Responses for "Its in the Bag Challenge!"
oh Lauren, how nice! I’ve had some of this bread before and it is amazing. My father in law is the one who gave me my starter. This presentation you made for it is just wonderful though.
Holly
This sounds so neat, Lauren. I am sure you are going to get more requests, but do you have a recipe for the starter? I would love to do this. I can remember in my younger days that someone gave me a starter and I made the bread, but it was a different recipe. Yours sounds better!!! LOL. Thanks. PTI could not have chosen a better person to be on their team.
Cheryl
Oh my gosh, I so need these!!! I have three starters in my freezer right now! Do they really hold the liquid in like a ziplock? Especially with all the “squishing” of the bag.
Lauren – this gift is adorable. Your projects always look so amazing and creative – so NOT “simple” at all. I love the purple monochromatic theme as well.
[…] Its in the <b>Bag</b> Challenge! […]
In case you wanted to know!
Amish Friendship Bread Starter
This is the Amish Friendship Bread Starter Recipe that you’ll need to make the Amish Friendship Bread. It is very important to use plastic or wooden utensils and plastic or glass containers when making this. Do not use metal at all!
Ingredients:
1 pkg. active dry yeast
1/4 cup warm water (110°F)
1 cup all-purpose flour
1 cup white sugar
1 cup warm milk (110°F)
Directions:
1. In a small bowl, dissolve the yeast in warm water for about 10 minutes. Stir well.
2. In a 2 quart glass or plastic container, combine 1 cup sifted flour and 1 cup sugar. Mix thoroughly or the flour will get lumpy when you add the milk.
3. Slowly stir in warm milk and dissolved yeast mixture. Loosely cover the mixture with a lid or plastic wrap. The mixture will get bubbly. Consider this Day 1 of the cycle.
For the next 10 days handle starter according to the instructions above for Amish Friendship Bread.
Lauren your presentation is beautiful and I imagine everyone will be giving away Amish friendship Bread Starter in beautiful packages. Thanks for your idea.
WOW – this is gorgeous!!! I’ve had the Amish Friendship Bread many times, but never received it or passed it on in something as beautiful as this!!!
You continue to amaze me with the ubber super ideas and things you come up with!!! You are such an inspiration!!
I remember this bread – it’s so yummy! In fact, we were *just* talking about this a couple of days ago, my sister and I.
Thank you, Janet S., for the starter recipe. My sister is going to be thrilled when I give her the starter again.
Love the bag and instructions, Lauren. It’s gorgeous!
[…] Amy Debbie Heather Pine Lisa Nichole I LOVE challenges and I especially LOVE altering stuff in casehttp://laurenm.blogs.splitcoaststampers.com/2008/07/01/its-in-the-bag-challenge/Spellbinders NestabilitiesNestabilities collection. They are listed below. … Want to see how […]
Wow! What a great presentation for this mix! Thank you for posting the recipe & the starter instructions. This bread is so good & I’d love to make the baggies just like you did to pass it on!
I love that reciepe. I make that bread in the fall when it is not hot because I cook with gas and it heats up the house when your making the bread. I love the gift bag. You still amaze with all your creations. susan
I had received a bag of this and loved having the fresh bread every 10 days, but instead of adding a cup of milk, flour and sugar every time it said to add it, I only added 1/4 cup of each just to keep the starter going. My reason for doing this was because I was running out of people to give it to and didn’t want to waste the milk, flour and sugar. On baking day I added the 1/4 cup of each to the mix, squished the bag around, measured out 1 1/2 cup for the recipe and had 1 cup left to start all over again, without having to find people to give it to. I know this sounds unfriendly, but eventually you run out of people to give it to who will really use it. But then again, if I saw you coming towards me with that awesome bag, even if I had a bag of it on my counter, I’d take it from you, just for the bag alone.
Super project Lauren! I have a ton of these bags so I’ll be checking out all the links to see the samples! Love yours with the house stamp – my fav new set from PTI!
Hey, send a starter back to me sometime if you have an extra! I didn’t keep one and I would love to make it again!
Love your packaging idea – gorgeous!
What a neat idea! Love the house image behind the recipe!
Hey Laruen,
Do you know how to make the starter ..as I never get the starter and I too love this bread ..and I have been looking how i could start it on my own ??
thanks Diana
Wow that is cool. I would totally mess that recipe all up, but it is a fantastic idea. Love the package you made. -Molly B
Lauren,
What a beautiful card! OMG, I love the colors that you chose and thanks for the recipe. Alice~~Mommaladystamper on PTI
Oh love your creation. But I was guessing you would turn it into something else. You are so creative!
( like a luminaire, or a purse) hee hee
I have received this bread many times, my neighbor loves it so much she always keeps a starter batch for herself. Your gift bag is such a nice way to present it. Getting a ziploc bag of tan mushy batter isn’t very appealing (LOL). Great idea as always!!!!!!!!!!
Donna :]
Awesome project Lauren! LOL…I always seem to have this in my freezer too! haha! Love the colour…so pretty!
Wow, awesome project!
[…] Amy Debbie Heather Pine Lisa Nichole I LOVE challenges and I especially LOVE altering stuff in casehttp://laurenm.blogs.splitcoaststampers.com/2008/07/01/its-in-the-bag-challenge/How to Clean and Care for Outdoor Furniture Carteret County News-TimesARA – When spring rains rinse […]
This is a very AWESOME project.
I love the bag and the color is fabulous. Thanks for sharing the recipe too! Will have to file this one away for that special gift or housewarming shower.
Your bag design is so perfect!!
Just wonderful….
I haven’t seen this “Amish Friendship Bread”
in a long time. I have copied the recipe and the
starter recipe and will start some going to share.
TFS
I see Christmas goodies in my family’s future!.
Thank you so much for this – this bread is absolutely awesome!
Kitty
What an absolutely fabulous packaging idea for passing along Amish Friendship Bread! Mine has never been received or given in such an imaginative and beautiful way. It certainly does make delicious, moist bread with so many variations. Thanks for sharing everything! Love the way you wrote the post with all the links. Very fun and clever!
very fun! I’ll definitely will have to order some coffee bags next time!
I really want to try this…how can I get a starter??!!
Great bag… love the levender colors… TFS!
What a great idea! The gal I work with just asked if I wanted a starter for the Amish Friendship Bread and I said sure. Now I know how to package it attractively to give away! If I just do it is another thing! I have everything you used so I should get busy!! Love your blog and you, Lauren!
This is so cool! I really love this idea and it is so unique!! What a perfect addition to the senior design team you are!!
Ooo, instead of bread I make “cupcakes”, and I even use chocolate pudding instead of vanilla. Yummy!
Great idea for a gift, it’s beautiful!
The best thing about this bread, besides eating it, is that you can put the starter in the freezer on any day and just pull it out when you’re ready to start again. Just remember to label the bag as to what day you put it in. I stole a friend’s idea to take it up to day 9 and freeze it. That way if you need it, you can bake it the next day. It’s also easier when you’re on vacation. You don’t have to get someone to bread sit. Beautiful project, as usual!
[…] […]
[…] […]
[…] […]
Too funny. A friend of mine gave me this mix a month or so ago and we have been making it too. I remember making it regularly about 15 years ago so it was a flashback to get a starter!
I make 3 little mini loafs to hand out with my starters and a big loaf for us which is gone within a day usually. I didn’t keep a starter this last time as we are moving. You should have seen the copied and recopied instructions I received. They were pitiful so I retyped them as well. Thanks for a great packaging idea, Lauren!
This bread is WONDERFUL!!! But do you know HOW TO MAKE THE STARTER?? I need the starter….to get it started! LOL!! If you have the starter recipe, please share. Thank you so much!!!
Kim
[…] Instructions here […]
[…] Amy Debbie Heather Pine Lisa Nichole I LOVE challenges and I especially LOVE altering stuff in casehttp://laurenm.blogs.splitcoaststampers.com/2008/07/01/its-in-the-bag-challenge/Pisces New Moon 08 No security is the only possible securityPisces is the last sign of the Zodiac […]
[…] […]
[…] […]
[…] Debbie Heather (Pine) Lisa Nichole I LOVE challenges and I especially LOVE altering stuff (in casehttp://laurenm.blogs.splitcoaststampers.com/2008/07/01/its-in-the-bag-challenge/Amish Friendship Bread Starter and Bread Recipe @ CDKitchen.com :: …A recipe for amish Friendship […]
[…] […]
[…] […]
[…] […]
Leave a reply