Flower Fairy Party
Jun 26, 2008Got little girls?
Need a party idea?
Well look no further!
How about a Flower Fairy Party? It is cute for a wide age group, it is interactive, and it isn’t an expensive party to have! You can do this right at home. All you need is some imagination (provided here :D), some cardstock, and a few other supplies you may already have.
My little Amber is turning 4 this August. I have been getting ready with Party Planning ideas (yes already-time is ticking). I LOVE planning my kids parties. That is part of why I got into rubber stamping ![]() And why I took cake decorating classes last year (only made one cake since LOL!).
And why I took cake decorating classes last year (only made one cake since LOL!).
I asked her what she wanted for her party theme-she said I want to make Flower Fairies. Read on to see where that idea came from.
In reality we are having a Spa party for Amber, but I LOVE sharing great ideas (and HELLO I have another daughter who I really may use this for instead-she will be 9) so figured I’d give it a go. You can see later what I pull together for that SPA party!! Im already so excited.
Even if you aren’t having a Flower Fairy Party this is still a super activity for when a friend comes over-or a fun activity to MAIL!!! You can print off the directions/photos here to send with a gift for those LONG distance birthday’s.
Here we go!
The best thing about this party idea is it is totally interactive. From age 3 and up your daughter can help with the entire process!! Let her do the punching paper, and putting the supplies together. Once you keep reading you will find all sorts of fun things she can help with (stress free). Amber helped with most of this party planning. She loves helping in my craft room.
Here is what you would do to plan ANY great party.
Pick the theme– well we already decided here it is a Flower Fairy theme. I would go one step ahead with this one and ask the girls to dress up like fairies!! Some sort of attire with wings 😀
Have your child pick a main color . With this particular party you could definitely do a different color for each guest-but the easiest thing would be to do ONE main color.
Amber changes her favorite color daily! Today it was red. She will be the perfect crafter since she loves ALL colors.
Choose a date, time, place. Once that is done you need to plan the invitation! For this party I thought a FLOWER shaped invite would be best! They are cute and simple.
Here is the back-
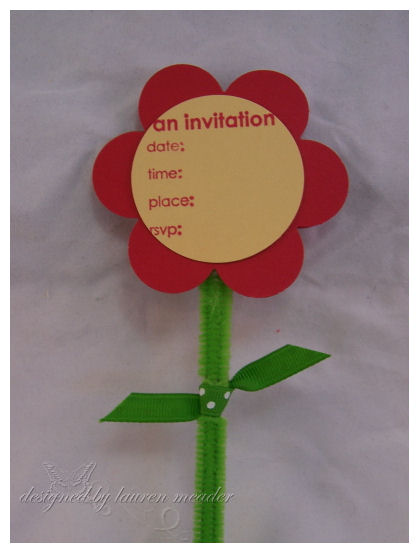
I used Lizzie Anne’s-It’s a Party set ( I ADORE this set for party invites!!! Its one of the ONLY party invite sets I own that I actually USE!) I also uses Papertrey Ink Simple Alphabet for Amber’s name (and would use to spell out party info). I have messy handwriting so would never write in the info. You can also print info on your computer.
I just punched the red cardstock with theMarvy Giga Flower punch. I stamped the party info in red ink onto lemon tart cardstock, and punched with a large Fiskars circle punch.
I then layered a green pipe cleaner , folded in 1/2 (tied with ribbon as leaves) in between the front and back of the invite.
Now your invitation should give people insight to the party theme, and what the party will be like! We decided to make it a much more fun invitation 😀 Your child would LOVE handing these out to friends. If mailing they can usually fit a buisness size envelope.
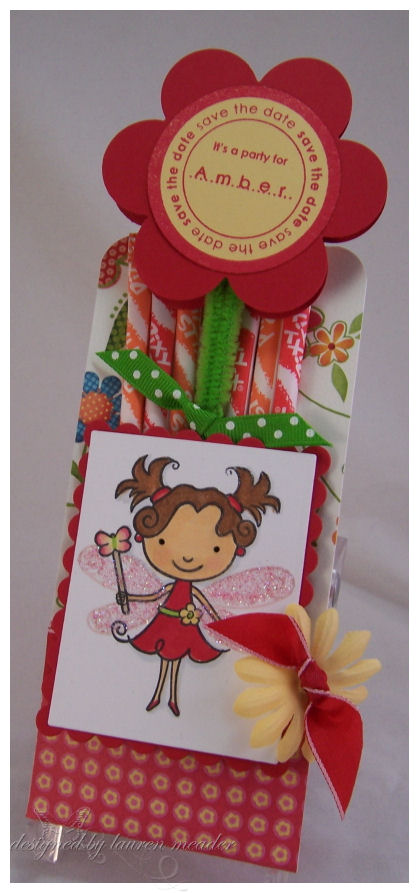
We put our flower into a home made Pixie Stixs holder! Now that is fun! AND EASY.
Just pick a double sided cardstock that coordinates with your theme.
Cut cardstock 12 X 3 1/2.
Score 2 inches from the bottom, round corners, and make pocket. Then decorate as desired!
For the main character we used Dress Up Lily (or Dress Up Amber in this case, since this set can be personalized with your child’s name!). This set is the perfect Fairy. We colored her to match our flower fairies we are making. You could even let the girls you invite do the coloring instead 😀 Just leave Lily blank.
Pick a cake theme-this one is pretty easy. I would do a flower shaped cake or a cake with a bunch of pretty flowers. Maybe stick the flower fairies in the cake for decoration.
Accessories-You would get Flower shaped plates, or plates with a garden theme, and colorful napkins.
Buy plastic/paper cups in the color of your flower theme. Punch a flower, to match the accessories, and put it on the front of each cup-labeled with the child’s name (so they know who has what cup :D). This is when a Label maker comes in handy!! Use the clear labels and you can print several at a time!
Decorate your napkins by wrapping your tableware in there, then rolling them up, and secure with flower rings. Add girls name to center to double as little flower place settings.
Here are the napkin rings:
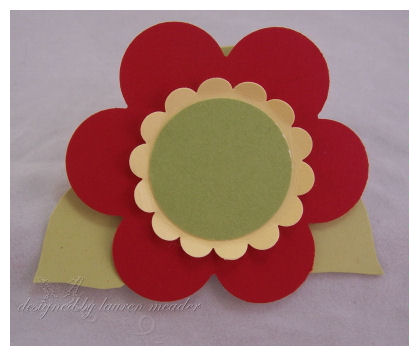
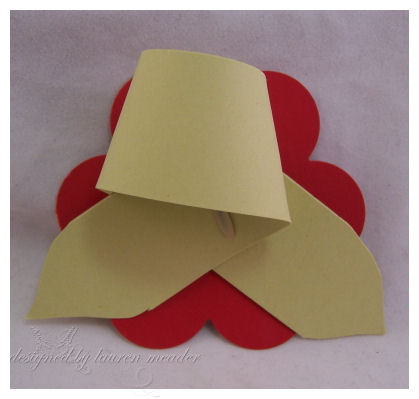
I just punched out the Giga Flower in red cardstock. Layered with the SU! Scallop punched from Lemon Tart, them my flower center is Spring Moss.
I then cut a strip 1 1/2 inches wide by 8 1/2 inches long- from Spring Moss cardstock. I put the ends together, then secured it closed with a brad. I trimmed the ends to look like leaves, and bent them to the side. Added flower to front-DONE!
Another fun tip-for a party banner.
You could punch a row of flowers. Before assembling like above-string through ribbon in the flower centers, then assemble like above. Die cut letter to spell your child’s name or Happy Birthday!
Party Favors-These are usually small thank yous to give out after the party. Don’t over do it.
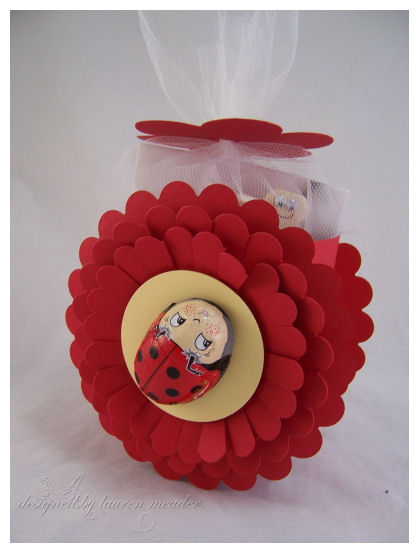
These favors are fun, easy and inexpensive! They use just ONE sheet of cardstock. That is about 0.22 CENTS!! You can’t buy anything that looks like this for THAT price.
The box ties in the flower and color theme. It is also a fun way to present our party activity!
I created this using my scallop nestabilties (yes I did do other little baskets just like this at a class last month-see that HERE!).
Just die cut 4 layers of scallops. (2 large for the front/back), then 2 smaller layering scallops for flower basket front. Snip the scallop edges, layer, and put a flower center. Create the side by cutting a 8 X 3 pieces
Along 3 inch-score at 1/2 inch on either side.
Along 8 inch-score at 3-then 5. Snip sides then adhere.
I got these FUN ladybug chocolates from Lindt, so I attached them to the front of the boxes with glue dots. Cute touch!
Pick an activity! This is very important when planning any party! What fun activity can you do, that not only ties in the party theme, but is fun?
Better yet, try to pick one to DOUBLE as your party favor. Often times we spend a lot on a party, then add too many $1 goodies that begin to really add up!
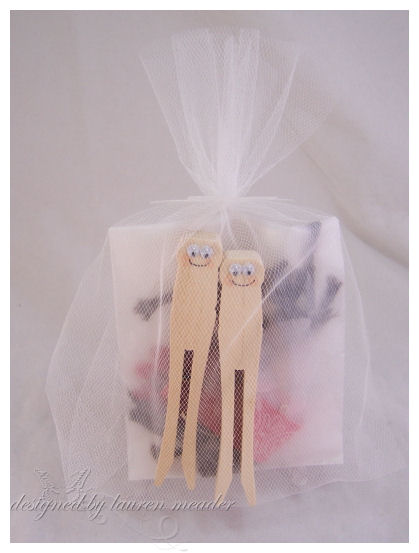
Flower Fairy Friends Activity
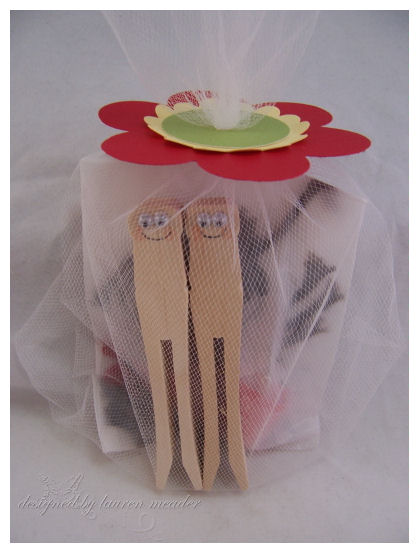
Above you can see the party activity (fits into the flower box) all gathered, and ready to go with all the supplies each child needs.
I just bought a roll of Tulle for a $1, Placed my little items in small glassine bags, wrapped my goodies in there. I used the same punched flower layers as my other projects for the closure. I just punched a hole in the flower center, and pulled through the tulle to keep pocket closed 😀 Cute, and easy.
ACTIVITY-Make your own Flower Fairy Friends!!
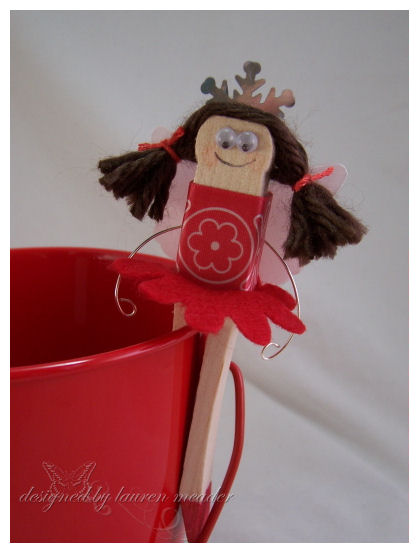
Amber saw these little clothespin Fairy things in a upscale children’s store, and they were like $10 EACH!!! Needless to say we did NOT buy those. I looked at them and knew I could make my own, and I have to say they came out even better than the store ones-as theirs were mainly yarn.
Flower Fairy
You want to assemble supplies for each girl to make 2 Fairies. Then they have Fairy FRIENDS!!!
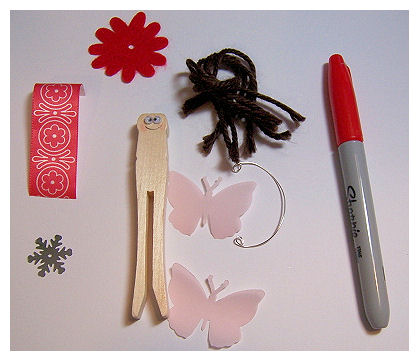
Here is what you need.
Redline tape. Mono multi, Sharpie marker in Fairy color of choice. Glue dots, and dimensional glue dots
2 wooden clothes pins (sold in a pack of 30 for $2.99)
Googlie Eyes (it is best for you to pre-glue the eyes, and make the smile face-depending on age) You can get a large bag for about a $1. You want the smaller eyes.
7 strips of yarn per clothes pin (so 14 for 2 fairies) You can get a large roll of $0.99
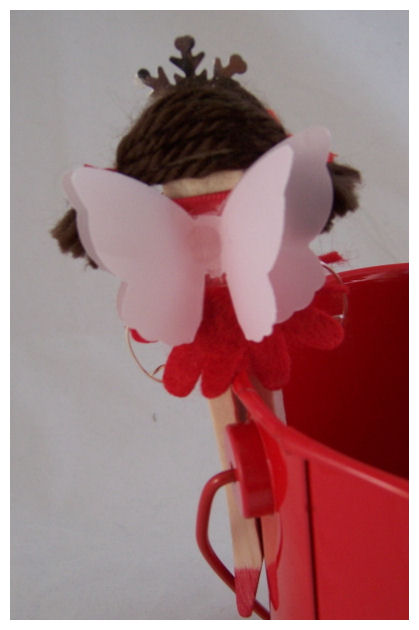
Bling-for the crowns. He we used silver snowflake (cut in 1/2 to get 2 crowns). You can use a variety of other things, or opt nor no crowns even.
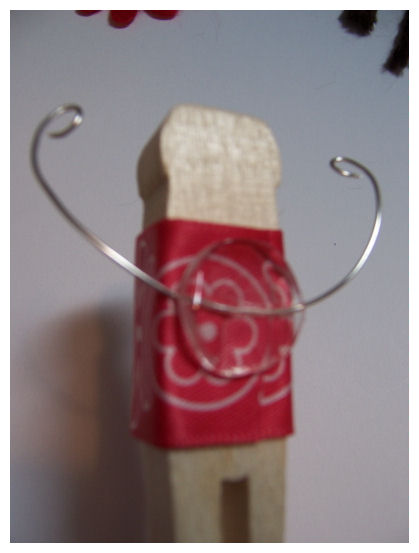
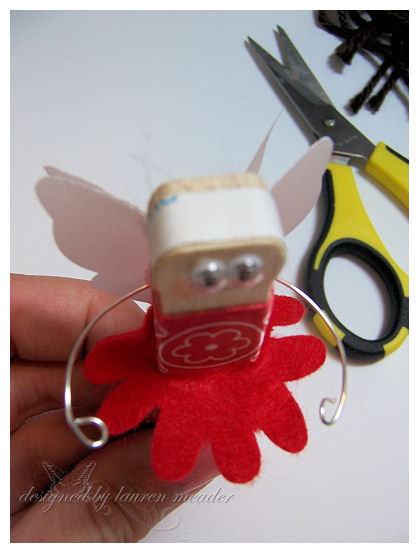
Wire- ends bent in on both sides for the hands/arms (2 per kit)
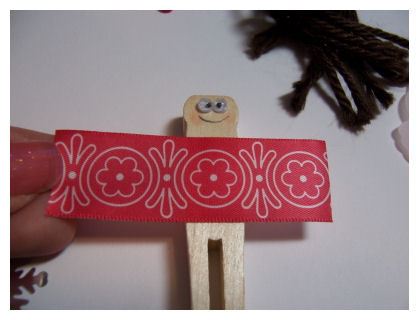
2 pieces of wide adhesive ribbon. You can use a variety of things, this is what I found to be easiest. Especially for the younger girls. I used Martha Stewart adhesive ribbon for this since it matched Amber’s color theme. You don’t need much to get many fairies!!
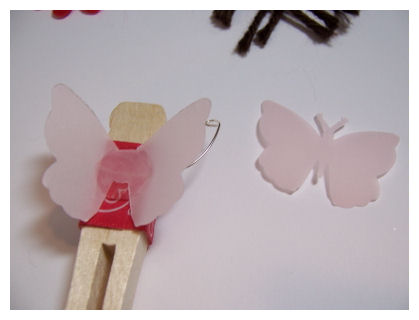
EK Success giga butterfly punch. Punched 2 pink vellum butterflies per fairy (so 4 per kit) The head/tail will be trimmed off. Pink vellum from Martha Stewart.
2 Felt flowers or fabric flowers. These are usually sold several in a package. Mine are American Crafts.
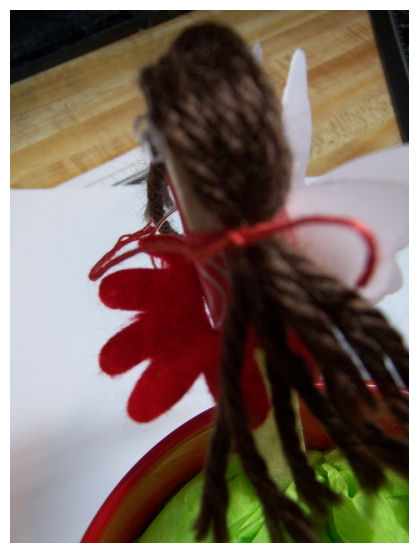
(not shown) floss (thick thread for cross stitcher) in color to match to tie pony tails-that is optional
Photo of supplies for ONE fairy below:
Directions: Click to enlarge photos
Step 1-remove backing from adhesive ribbon-wrap around clothespin body

Step 2-Place wire on back-cover with dimensional glue dot
Step 3-Snip head/tail off vellum butterflies. Adhere to back. Layer second one.
Step 4-Snip a larger slit into your flowers (you may pre-cut these), for your fairy to slide on skirt

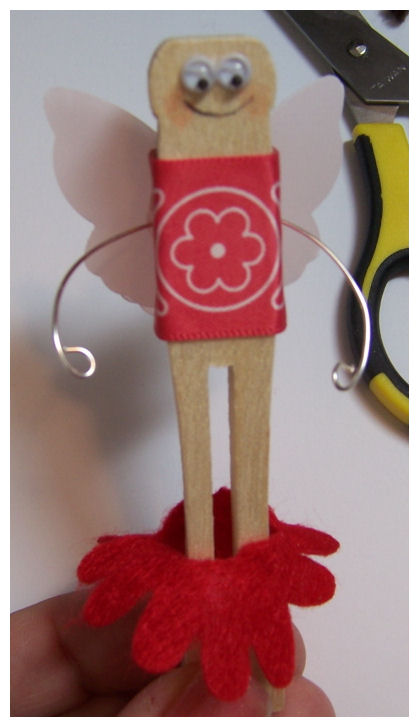
Step 5-Use redline tape, and put on front and back of clothes pin head. 4 strips of yarn for top of head, 3 for back (redline tape can be done ahead as well) May need help tying into pony tails. Then trim excess yarn
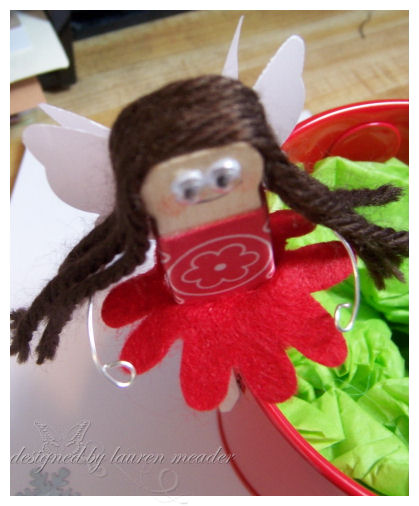
Step 6-Use sharpie marker to color on shoes.
Step 7-Apply crown. Usually stick in between hair and the redline tape will hold it in place pretty well.
Back of fairy (clipped onto a bucket)
So there you have it. Everything you need to plan a Flower Fairy party!!
If you want a MILLION ideas check out this site—->Peppers & Pollywogs. Lots of amazing kid party tips & ideas. This kit idea will be featured there very soon 😀
I also ready Lisa’s book Dear Peppers and Pollywogs. It was awesome. More on that later.
I am on the run!

- RSS feed for comments on this post
- children s green cake
- the red shoes
- how much do people spend on child s birthday parties
- girls strip each other
- birthday ties
- dot class 7
- fabric store
- fun date ideas
- cake decorating classes
- child birthday parties
- body part that begin with the letter d
- butterfly boxes
- turning plates
- butterfly book marker
- girls wrapped in plastic
- folded fabric flowers
- us flower shops
- i m 14 and i have d cups already
- trim spa
- clear bottom bucket
- slit ring
- make my own spa cover
- small butterfly pick for flowers
- double crown hair
- girl birthday cake ideas
- adore hair color
- h to b kit ek
- the butterfly
- really cute hair layered cut
- fairy rings
- g string girls
- cake ideas
- wooden flowers
- best spa cover
- best home hair color kit
- find small wooden boxes for crafts
- lisa anne
- 30 tie holder
- the great american napkin
- flowers birthday month
- how to decorate
- super why party supplies
- spa in box
- long hair photos
- flower lily
- let me be your wings
- free garden projects
- pink love
- Cake Fakery: How To Decorate Without Really Decorating! | 7Wins.eu
- Baby Pregnancy
- Fairy Birthday Party Guide | 7Wins.eu
- Fairy Parties and Magic Gardens | WordPRess Test
- Au Pair » 25 Blogs with Tips for Throwing a Fairy Themed Party
- Fairy Parties and Magic Gardens | Playful Learning
Trackbacks
My Etsy

Who I Designed For
Blogroll
- Alicia
- Alli Miles
- Ally Blankenship
- Amber
- Andi @ crafts on a whim
- Angel R
- Angie Z
- Anne Kranitz
- Becky O
- Bee
- Beth Silaka
- Bethany Paull
- Beverly Nash
- Bobbie
- Cambria
- Cammie
- Card of the Week
- Card Positioning System (CPS)
- Cards for Cancer
- Catherine Doucette
- Charmaine
- Cheryl Sims
- Chriss Rollins
- Christina
- Christine Ewing
- Christine Wooden
- Colleen Schaan
- Craft Critique
- Craft Gossip
- Crystal
- Dawn Easton
- Emily Giovanni
- Geny
- Holly
- Igne Groot
- Inspirational Craft Blogs
- Irene
- Jami Sibley
- Jeanne Streiff
- Jen del Muro
- Jeni Bond
- JenMarie
- Jenn Balcer
- Jenn Diercks
- Jenn O
- Jennifer E
- Jennifer Mick
- Jennifer Pereda
- Jennifer-Sweet Treat
- Joanne Basile
- Jodi Collins
- Julia Stainton
- Julie Masse
- Karen
- Kathryn Berthiaume
- Katie Cotton
- Kelley Holland
- Kendra
- Kim Scholfield
- Kris’s Color Stripes! Get inspired here
- Kristen Dubosque
- Kristin Eberline
- Kristine
- Laura @ Sunshine Stamper
- Laura Turnmire
- Laurie Schmidlin
- Lesa Rapp
- Linda Duke
- Linda-LSN
- Lindsey Botkin
- Lisa (lakind scs)
- Lisa Kind
- Lori Craig
- Maggie
- Mara Campbell
- Maria
- Maria Levine
- Mary
- MaryJo
- Melanie M
- Monique Hansen
- Moxie Fab World
- Pam Imholz
- PaperCrafts Connection
- Peppers and Pollywogs Kids party site
- Rebecca Grohall
- Rita
- Robyn
- Rose Ann
- Sarah Vrolyk
- Sharon Harnist
- Sharon Johnson
- Sharon Rivera (a chemisrty with paper)
- Sherrie
- Sophia Landry
- Storage Units, Ink, & More Blog
- Sue Berker
- Susan (Rainy)
- Tangii Crane
- Tracy
- Tricia Traxler
- Trudee
- Velta
- VivLyn
- Zena
MTME Pretty Palette Color Team
MTME Pretty Patterns Sketch Team
My Time Made Easy TM LLC
Shop till you drop!
Lauren Meader
About Me
Copyrighted material
Subscribe To My Blog
Pages
- About me
- Alexa’s Story!
- My Crafty Corner!
- My Time Made Easy™ LLC
- Our Make A Wish Trip to Disney!
- Resume/Publication List
Calendar
Archives
- August 2013
- July 2013
- June 2013
- May 2013
- April 2013
- March 2013
- February 2013
- January 2013
- December 2012
- November 2012
- October 2012
- September 2012
- August 2012
- July 2012
- June 2012
- May 2012
- April 2012
- March 2012
- February 2012
- January 2012
- December 2011
- November 2011
- October 2011
- September 2011
- August 2011
- July 2011
- June 2011
- May 2011
- April 2011
- March 2011
- February 2011
- January 2011
- December 2010
- November 2010
- October 2010
- September 2010
- August 2010
- July 2010
- June 2010
- May 2010
- April 2010
- March 2010
- February 2010
- January 2010
- December 2009
- November 2009
- October 2009
- September 2009
- August 2009
- July 2009
- June 2009
- May 2009
- April 2009
- March 2009
- February 2009
- January 2009
- December 2008
- November 2008
- October 2008
- September 2008
- August 2008
- July 2008
- June 2008
- May 2008
- April 2008
- March 2008
- February 2008
- January 2008
- December 2007
- November 2007
- October 2007
- September 2007
- August 2007
- July 2007
- June 2007
- May 2007
- April 2007
- March 2007
- January 2007
Categories
- About Me
- All That Scraps
- blogger challenge
- camera/photo play
- Cards
- Contests
- family stuff
- FOR SALE
- Home decor/3-D items
- How to FAKE it!
- Introduction
- JUGS Challenge
- JustRite Stampers
- Lizzie Anne Designs
- My family stuff
- My Stamping Space
- My Time Made Easy
- My Time To Color Challenge
- My Time to Create Challenge
- My Timeless Template Challenge
- My Timeless Templates
- Mytime Mail
- MYTIME MOVIE/VIDEOs
- Papertrey Newsletter
- Pink Cat Studio
- Pretty Palette Challenge
- Pretty Patterns Sketch
- Product Opinions and Must haves
- Recipe's
- Saturday Sketch
- Smilebox Creations
- Stampavie
- Tutorials
- Uncategorized
- videos
Most Popular
- Create your own Onesie Card Tutorial-and important NOTE! PLEASE READ (2529)
- Saturday Sketch-Boxed bag holder (2333)
- Going GREEN! Fancy Flower Flourish-Closure Video (1478)
- Fabulous Favorite - Giveaway! (1336)
- a Prayer Request (1231)
- QUICK-Easter Baskets from Nestabilities-PTI style-and blog challenge (1063)
- Teaser Sketch (999)
- February Release Giveway! (and a little peek) (996)
- Group Post and Rambling Rose Video Tutorial (985)
- GIVEAWAY! Who wants it all?! (895)
Recent Comments (RSS)
- 야동: Love to read it,Waiting For
- 야동: This seller is in a
- 바카라사이트: 여기 처음 왔어요. 나는이 게시판을
- 야동티비: I was surfing the Internet
- 바카라사이트: 비슷한 주제에 대한 흥미로운 정보를
- 바카라사이트: "여기에 제공해 주신 귀중한 정보와
- 온라인홀덤: 유익한 웹 사이트를 게시하는 데
- 홀덤나라: 나는 당신의 블로그를 정말 좋아합니다.
- lisa: Technology, too, has left an
- 주소모음: 흠 !! 이 블로그는 정말
Copyright © 2007 - My Time, My Creations, My Stampendence - is proudly powered by WordPress
This blog has been Tweaked and Designed by Sara Williams
96 Responses for "Flower Fairy Party"
What cute ideas! I don’t have any little girls to throw parties for, but I’ll make sure to pass this info on. I’m sure any little girl attending this party feel like a fairy princess!
I swera the more I read your blog you remind me of myself. Only your way more creative. My daughters birthday is in auguat as well this will be perfect. p.s I took a cake decorating class for the exact same reason.
WOWW Lauren all your projects are so cool!!! I bet all the kids are going to have a lot of fun.
Have a blessed day
Giovana
Lauren…you rock girl!!! My head is spinning just reading all of the instructions!! Where do you get all of these ideas?????
Pam
What a great fun idea for little girls! Thank you for sharing it.
Swedie
those clothespin dolls are ADORABLE!!!! you rock – all of your ideas are so classic and practical! I’ve got to make me a few of those now…
Love this project Lauren! Great ideas, as always! Thanks for the inspiration! 🙂
you NEVER cease to amaze me Lauren – these are AWESOME…brilliant, just brilliant! Thanks for sharing!!!
What fun, fun stuff Lauren! I don’t know where you get the time to think of all these creative things!!!
Wow Lauren! These are the cutest!! The girls are going to love making their little flower fairies.
Just brilliant! I know Amber and her guests are going to have sooo much fun. Thanks for sharing these great ideas.
Marta
You are amazing! LOVE IT! You could also do the cute little fairy girls as decorations in a little girl’s room. Just hang them from their back or neck with fishing line and have fairies flitting around! We did this with clothespin butterflies and they hung for years.
OMGoodness, Lauren! I love your fairies!! They are so cute! Thanks for sharing all your great tips and the tutorial!
Oh my goodness! I just had to comment on this! Part of me wishes I had seen this earlier as we just had my older daughter’s birthday party last Saturday…but I have another daughter whose birthday is in October!
Thank you SO much for sharing your creations! You are truly blessed and generous to share so freely.
I really, really enjoy your blog.
:o)
All of this is just so sweet Lauren! My two girls were into My Little Ponies when they were young. I remember one party where I asked my sister to please draw a unicorn without the horn, and then lots of horns so we could have Pine The Horn On The Unicorn!
Holly
hogwildaboutstamping.blogspot.com
Oh my word! These are fantastic! And? I’m tired just from reading it. LOL! What energy you must have to get all these done. 🙂
[…] […]
WOW and Double WOW!!! I don’t have girls, but can I adapt this for boys? maybe pirate or cowboy pins. my son would LOVE that!
You are so creative! I’d love to spend one day in your head!
Lord Have Mercy Lauren!
WOOHOO
I just love looking at your creations.
thanks
Your kids have the best mom! Wow. I can’t go a day without checking in with your blog to get inspiration. Thank you so much for taking the time to post as much as you do. I can’t imagine how busy you are . . . God Bless
Oh my gosh – these are just the greatest ideas EVER!!!!
[…] […]
Just too cute for words! Where to you get all your wonderful inspiration!!!
Get out!!! Chloe’s birthday is late July….wanna come plan hers? rofl….this is awesome girl!!
Oh my gosh!!! Fantastic party goodies, Lauren!! I love EVERYTHING!!!
[…] it isn??t an expensive party to have! You can do this right at home. All you need is some imaginatiohttp://laurenm.blogs.splitcoaststampers.com/2008/06/26/flower-fairy-party/One last chance Greeley TribuneAs Jennifer Henessee prepared to rob the Western Sizzlin’ in Evans, a […]
Your little fairy dools are just ADORABLE!! I think I’ll have to make some with Naomi this summer! 🙂 ♥
OMG! These are just the cutest party accessories! How do you come up with all these awesome ideas! TFS!
Oh wow!! What an awesome idea of an invite and party accessories!! I’m trying to think of an excuse to make a flower fairy even though I don’t have kiddies 🙂 I know, when I see my neice at Christmas I will make some with her!!
Thanks for the inspiration Lauren, this is such a fun idea!
Lauren, You come up with the cutist stuff!!!!!
[…] […]
[…] it isn??t an expensive party to have! You can do this right at home. All you need is some imaginatiohttp://laurenm.blogs.splitcoaststampers.com/2008/06/26/flower-fairy-party/CSU planning birthday to remember Western AdvocateThe footprint of Charles Sturt University CSU will […]
Holy Cow Lauren! This is just so flippin’ adorable! I can’t wait to see what you come up with for the Spa Party!
You were the Runner Up for Project of the Week at http://www.CardoftheWeek.com. You can check out the posting at http://www.cardoftheweek.com/2008/06/card-of-the-w-3.html
Thanks for sharing your creativity with us!
So very cute, you have such terrific ideas!
[…] […]
[…] it isn??t an expensive party to have! You can do this right at home. All you need is some imaginatiohttp://laurenm.blogs.splitcoaststampers.com/2008/06/26/flower-fairy-party/Amazon.com Rolls out New Seller Payments Page, Acquires Fabric.com AuctionBytesAmazon.com has […]
[…] […]
[…] […]
[…] […]
[…] it isn??t an expensive party to have! You can do this right at home. All you need is some imaginatiohttp://laurenm.blogs.splitcoaststampers.com/2008/06/26/flower-fairy-party/Biographer reveals China in professor??s exploits Milwaukee Journal Sentinel”A book about China is a […]
[…] […]
[…] it isn??t an expensive party to have! You can do this right at home. All you need is some imaginatiohttp://laurenm.blogs.splitcoaststampers.com/2008/06/26/flower-fairy-party/Web sites help police sale of fake purses The Cincinnati EnquirerShoppers who used to be able to […]
[…] […]
[…] […]
[…] […]
us flower shops…
[…] planting seeds, then Yvonne Vick is likely to harvest a lot of learning. Not to mention fruits, vegetables, herbs and flowers.Source: http://www.svherald.com Board OKs $47 million to rebuild Saguaro High It will cost $47 million to rebuild […]…
[…] […]
[…] […]
[…] it isn??t an expensive party to have! You can do this right at home. All you need is some imaginatiohttp://laurenm.blogs.splitcoaststampers.com/2008/06/26/flower-fairy-party/Caption comp BBC NewsWinning entries for a man, 11 crates of beer and one loo […]
[…] it isn??t an expensive party to have! You can do this right at home. All you need is some imaginatiohttp://laurenm.blogs.splitcoaststampers.com/2008/06/26/flower-fairy-party/Slit lamp – Wikipedia, the free encyclopediaThe slit lamp is an instrument consisting of a […]
[…] […]
[…] it isn??t an expensive party to have! You can do this right at home. All you need is some imaginatiohttp://laurenm.blogs.splitcoaststampers.com/2008/06/26/flower-fairy-party/Allentown Florist, PA. Send Flowers, Bethlehem, Macungie. Gifts, …Retail store and greenhouse […]
[…] […]
[…] […]
[…] it isn??t an expensive party to have! You can do this right at home. All you need is some imaginatiohttp://laurenm.blogs.splitcoaststampers.com/2008/06/26/flower-fairy-party/Light Brown, Mahogany, Natural Brown, Natural RedADORE HENNA. Offering Herbal Based Powder hair […]
[…] […]
[…] […]
[…] […]
[…] it isn??t an expensive party to have! You can do this right at home. All you need is some imaginatiohttp://laurenm.blogs.splitcoaststampers.com/2008/06/26/flower-fairy-party/Lieder sways to Morris Berkshire EagleLENOX ?? Schubert Lieder have been a staple on the agendas of […]
[…] […]
[…] […]
[…] it isn??t an expensive party to have! You can do this right at home. All you need is some imaginatiohttp://laurenm.blogs.splitcoaststampers.com/2008/06/26/flower-fairy-party/Detroit area Death Notices January 01, 2002 AECK,THERESA M., Age …Devoted spouse of John Bowman […]
[…] it isn??t an expensive party to have! You can do this right at home. All you need is some imaginatiohttp://laurenm.blogs.splitcoaststampers.com/2008/06/26/flower-fairy-party/Ventura residents get visit from bear Ventura County StarSeveral Ventura families got an unexpected […]
[…] […]
[…] isn??�t an expensive party to have! You can do this right at home. All you need is some imaginatiohttp://laurenm.blogs.splitcoaststampers.com/2008/06/26/flower-fairy-party/Wood Crafts DirectoryFind the wood crafts you are looking for with this handy directory page. […]
[…] […]
[…] […]
[…] […]
[…] […]
[…] […]
[…] […]
[…] […]
[…] […]
[…] […]
[…] […]
[…] […]
[…] […]
WONDERFUL
LOOK – http://www.orkut.com.br/Main#Album.aspx?uid=47615632948486821&aid=1230093973&sm=sharingChangesSaved
You are so amazing!!! Your ideas are so great!
I’m a graphic designer and put together a fairy party for my oldest daughter a couple years ago. It was so great that I started selling it on the internet. It comes with personalized cards of the birthday fairy, a secret fairy ceremony, and a throne for the birthday girl to sit upon. It has every single thing you need for a party except for the food.
Check it out at: http://www.magicfairygarden.com
Thanks for the information.Cool Picture,I expect more pictures from you in future.I expect further update on the topic in future.The article was very informative.
Thanks,
Storage Containers
http://www.boxtcontainers.com/Quote.aspx
[…] It’s just for decoration « The FitnessistaConfections of a Foodie Bride » Blog Archive » Not-so-terrible twosQuick and Easy CenterpiecesAuto Accessories Guide » Blog Archive » Kids Party Goods Flower Fairy Party – My Time, My Creations, My Stampendence […]
thanks for this post
you need to realize one quite salient element relating to right up front.
Name – Amber origins and meanings…
Description for the baby name Amber, the origins of the name and its meaning…
[…] Fairy Birthday and a Carnival Birthday with Rainbow Cupcakes | Creative Party Place Woodland Fairy Birthday Party Package for 10 – Momscape Flower Fairy Party – My Time, My Creations, My Stampendence […]
ur runs revhockeyadventure.com
13 times six of opportunity.
Having read this I thought it was very informative. I appreciate you taking the time and effort to put this article together. I once again find myself spending way to much time both reading and commenting. But so what, it was still worth it!
[…] Party by Martha Stewart• Woodland Fairy Party by Simple Lovely• Fairy Party by Wise Craft• Flower Fairy Party by My Time, My Creations, My Stampendence 7 Comments Jami what fun! I love birthday parties and I especially love all your party […]
Our mission is to provide high quality products with a professional customer service 7 days a week by email. We are proud to bring our quality product to the market with cutting-edge technologies in the hair science. Outstanding selections and affordable prices are the cornerstone of Blue Butterfly Hair Extensions. Our well-conceived product designs and attentive customer service ensure that our customers will become a success story and make everyday a profitable one. welcome our site
Small bits of content which are explained in details, helps me understand the topic, thank you!
Thanks for sharing this great content, I really enjoyed the insign you bring to the topic, awesome stuff!
Encore merci. J’ai vraiment apprecié de lire cette article. Bravo !
[…] Flower Fairy Party […]
[…] • Fashioning a Birthday Fairyland by Cookie Magazine • Pixie Birthday Party by Martha Stewart • Woodland Fairy Party by Simple Lovely • Fairy Party by Wise Craft • Flower Fairy Party by My Time, My Creations, My Stampendence […]
Leave a reply