Archive for April, 2008
Well, if you read my blog, you most likely know how BAD I am about getting things out in the mail. I swear I am trying to get better. It really is an awful thing I have going on with that. I have a stack of mail, sitting here, waiting to go postal (TODAY! I SWEAR!).
The problem is most of it is always to heavy to just slap on a stamp or sometimes even two, so I can’t just stick it IN the mailbox-KWIM? I have to GO IN.
Anyway, I made a super long to-do list, since I have been UBER busy, and I have gotten several things, crossed off! YEAH!!
This next project was one, of the many, that I wanted to get done, before a year had past! LOL! It also made me realize how many I have NOT got done. Oh boy!
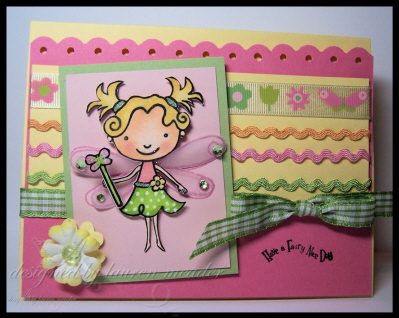
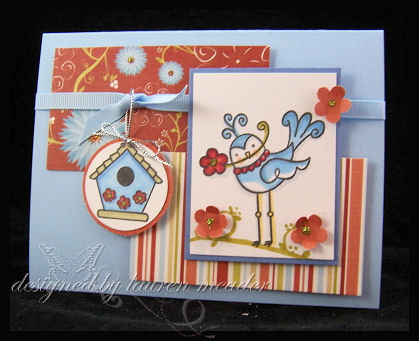
Especially For You Juanita
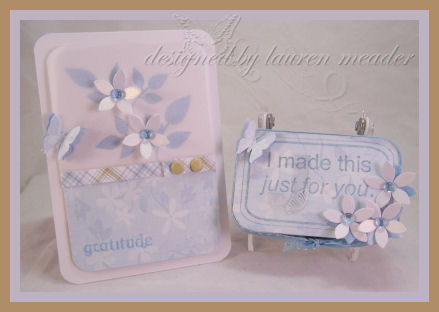
I wrote a few weeks ago (wow time flies) that Juanita sent me What’s in your tin 1, after reading I was kicking myself for only getting set 2! I was so touched by her sweet gesture. I knew I had to make her, her very own tin! So away I went with this tin, and notecard for her.
Now not knowing people, and their favorite things, can make creating something for them difficult. I decided I would go with whatever I thought was pretty! LOL! So I turned to some of my favorite things!
I LOVE altering things, so that was of course so FUN for me! The set she sent me-What’s in your tin 1, Chatterboxpaper, Bridal Confetti flowers (LOVIN those in case you have not noticed), my Martha Stewart butterfly punches, Faux Dew Drops :D, acetate, my Cuttlebug Red Tag alphabet, White StazOn, Vellum cardstock, brads by SEI, and one of my all time FAVORTIE floral sets Beautiful Blooms
EDITED TO ADD: HERE is my link for the dew drops. I color mine with my Copic markers to change the color!
The Close-ups
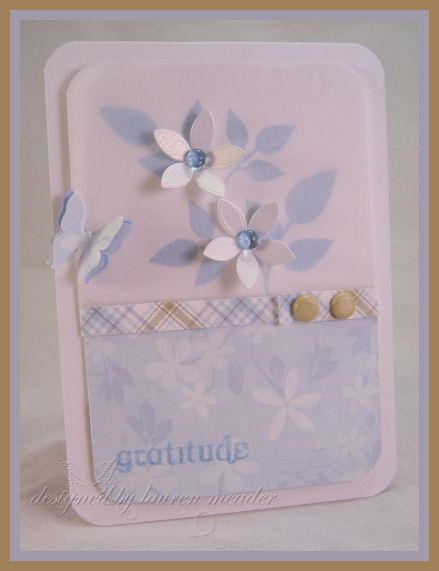
I so LOVED the softness this card portrayed. I stamped the leaf from Beautiful Blooms, in bashful blue ink. It was a bit harsh, so I layered Vellum cardstock OVER it, to soften the look! Pretty NIFTY huh? It will immediately soften any color you layer it over. Sometimes if your ink is a bit too harsh, just give this a try. It HAS to be the cardstock, not vellum paper! Vellum paper is very thin, and to me useless. I LOVE vellum cardstock. You can get it at some stamp store or through Stampin’Up!
I then layered on my bridal confetti flowers, and my hand made dew drops for the centers!
My butterfly is punched 3 times-bashful blue on bottom, vellum cardstock in the middle, then the patterned paper on top 😀
The rounded corners were done to match the tin! Plus I love the floating, and soft look it offers to this design. No HARSH edges.
 The tin
Not sure WHAT to put in there? Open to suggestions 😀
Well I used the same papers, and the set she sent me. Same flowers/butterfly as above. Maybe overboard with the flowers? Oh well. I colored the “leaves” blue. I tried to keep it balanced. One wasn’t enough, two was an even number and looked odd. Scattering them across the tin didn’t work either. I did need “something” and this was the end result. Has that “home-made” imperfect appeal I guess.
What I LOVE on this is the “J”. Can you see it? I just die cut my acetate with my Cuttlebug, and stamped just the corner of the “J” with white StazOn, using the floral image from the Simple Little Things set from Papertrey Ink (note: set was earned and not for sale). I also did this because “J” is the first initial in her name, and the “just” is at a slant, so I like that too. The letter is attached under the stamped white corner with a glue dot. LOVE those things!!
So that is it for today!
I am definitely off to Michaels today! I haven’t been in like 2 weeks. I hear they have new Martha Stewart stuff-so I’m all over it.
I hope I find some neat little thing to put in here for her, before I go to the post office!
As always, thanks for checkin in today.
Tomorrow is going to be a 2 poster day! I have my blogger’s challenge, and later in the day is the Papertrey Ink Blog Hop!! So hope you come back then. I can’t wait to see what everyone has up their sleeve’s for that.
Till then
Lauren
It’s Thirsty Thursday! OK Kidding!!
I cannot believe how S-L-O-W this week is going by. I took the kids to the park for 3 hours yesterday. It was a perfect 86 degrees here. We got there at 10 am and the playground was all shaded. By the time we left at 1pm, it was getting a bit HOT. I called in Pizza Hut’s new Tuscan Pasta meals for lunch, and grabbed one for dinner ( they have 2 choices)-GO LAUREN!! with the fabulous, no cooking ideas! If you are wondering if the new Pasta dishes are good and worth it, yes the kids LOVED them. They mostly loved the cheesy garlic bread though. Each one fed all 5 of us (hubby included) with leftovers for him. Its not a HUGE amount you get, but for $11.99, worth not cooking in the heat 😀 Heck anytime I dont have to cook is great!
I got some fabulous recipe’s that have saved me many night’s last time I asked! I printed them out, and used many of them a couple times! HERE is that thread if YOU want to print them out. I aslo added a Recipe’s category! So for future reference, you can check them out.
Now that the weather is getting HOTTER (not complaining) I know I hate cooking, so figured this is a great time to share those summer recipe’s for NO COOKING, or perfect BBQ or grill/summer types of foods, pasta salad’s, salad’s, and whatever other yummy summer favorite’s, and even party dishes!
You can even shoot us a LINK to a place with the recipe so you don’t have to type it! LOL!
I do have a re-vamped 7 layer dip recipe that I thought the kids would NOT eat, but scoffed down!!
Now my kids HATE taco’s, and Nacho’s with the “fixings”-salsa & melted cheese-yadayadayada. But THIS NO COOK 7 layer dip was a HUGE hit.
So you layer in this order:
refried beans
Guacamole (I made mine with the new Tastefully Simple Giddy Up Guacamole-OMG! let me tell you, it was really good!!!!! if you make it you need 2 Avocado’s) (you can buy it pre-made from the store too to save time)
add the Sour cream -but BEFORE you do-mix in 1/2 ot 3/4 of a packet of Taco seasoning mix (wow did that make a difference)
then add salsa, lettuce, tomato’s, cheese then the black olives! (OK I counted and its an 8 layer dip! LOL!)
DONE! Scoop some into a plate with Naco’s (even Doritio’s work) and you have a QUICK, no cook meal!!
I have a TON of Pampered Chef stuff I love too! I highly reccommend buying the Season’s Best books they sell for like a $1!! Those end up being my favorite!
I LOVED this one, and am always asked to make it for every function we attend! I buy a pre-made Bread Boule for it-and its good ALL year!!
————————————————————————————————————- |
||||||||||||||||||||||||||||||||||||
I will be right back with some eye candy! I just wanted to keep this seperate 😀 That and I need to edit my photo’s! LOL! I know this was so NOT stamp related, but you know what, we ALL have to eat, and have busy lives right? So why not share. Plus if these tips, can save us TIME, that MAY allow us more “MYTIME” to stamp right?
Be right back. I’m waiting to read these yummy recipe’s!
Oh yeah, and feel free to ASK for a certain one, if you are looking, in the comment’s section. Maybe someone know’s of one you are looking for.
Many of you asked just HOW to make—> THIS <—Seeds of Love packet I had done.
I told you it was VERY simple, and now you will all get to see for yourself. These would be AWESOME Wedding or Shower favors! Easy to whip out, and they can be very inexpensive!
Now I seriously don’t have a day that goes by that I don’t use my Scor-Pal! No lie! If you read my blog you will see it is invaluable to me-that and my ATG Gun! LOL! Anyway let’s get to the template tutorial shall we?
 Pretty Poppies seed packet coverlet
Supplies-Scor-Pal, terrific tape, Garden of Life, lemon tart cardstock, black cardstock, acetate, bazzill cardstock (flower), wasabi (leaf), black cardstock, butterfly punch by Martha Stewart, circle nestabilites, summer sunrise polka dot ribbon by PTI, various punches, The Paper Garden book.
Step 1
Cut cardstock to 4 X 11. Using your Scor-Pal Score at 1 and 6 (see how seed packet will easily fit)
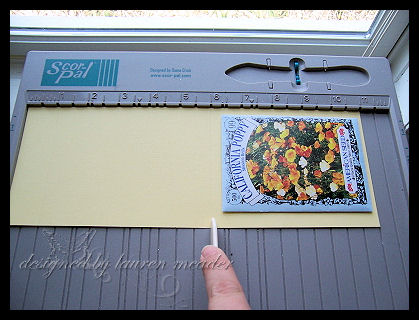
Step 2
Choose die cut, and cut out, mid, lower portion of FRONT panel. See above photo. It is the panel the seeds are laying on.
(SEE NEXT PHOTO)
Step 3 OPTIONAL
OPTIONAL-then take larger nestability die, and JUST emboss border around cut out panel.
To JUST emboss-in your Cuttlebug-you take A plate, B plate, tan mats, cardstock, nestabilitily and then B plate.
Then it won’t cut.

This is what your panel will look like
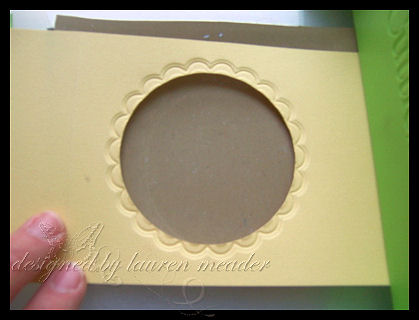
Now you can choose which side you want to use on the front of your packet holder. I chose the opposite side to use as my front design.
Then use Scor-tool to bend score marks.
Step 4
Cut aceate layer 4 X 4, and adhere behind cut out, using terrific tape or redline tape (clear tape). Stamp if desired. I used Garden of Life for this sample. I bent the friends sentiment, to fit in the top half of the circle.
Apply a adhesive strip to the back panel, and place seed packet

Step 5
Fold closed. Secure with band of ribbon to tie shut. Then decorate as desired.
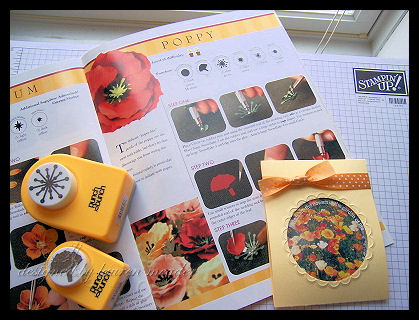 See finished packet at top
Since I used a Poppy Seed packet I am using my book The Paper Garden ( that and ALL the punches used in the book will soon be at All That Scraps!) to decorate the front of mine with Paper Poppy’s! If I don’t have an exact punch I try to improvise with what I do have. It’s all about creative liberty!
And that my friends is all there is to it! Just a very simple seed coverlet.
Hope you liked it. If you get to try it, send me a link! I’d love to see your version.
Till tomorrow.

Today I am running late for several reasons #1 my kids keep killing each other #2 my camera batteries died, and #3 I was putting together a post, jam packed with FUN ideas for you to try!
So grab your coffee and get ready for a FULL post of fun!
In this post you will learn to make a Moving Mermaid card, be reminded how to make your own cloud template and use fantasy film, make simple “starfish” and how to MAIL these interactive, or more 3D cards, in style!!!
MOVING MERMAID
Last August I made a Hula Kitty. You can find that —>here! I got many requests on “how to” do it. I did answer many of you privately. Well, now is the time to share it here.
When I saw this Mermaid from Lizzie Anne’s set By the Sea (FYI this is the “sister” set to Shore Thoughts which is where the Sun image is from on this card), I knew I had to make the Mermaid “swim”. That took me back to the Hula Kitty idea.
So here are two photos for you to view, the motion this Mermaid has!
Swimming to the right
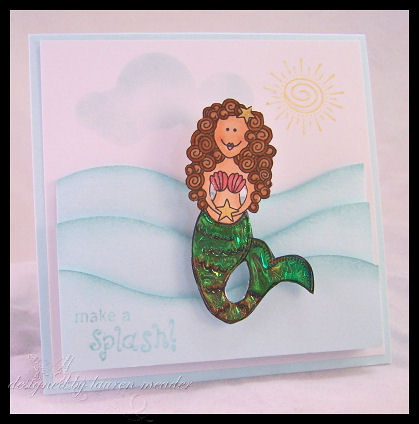
Now swimming the the left
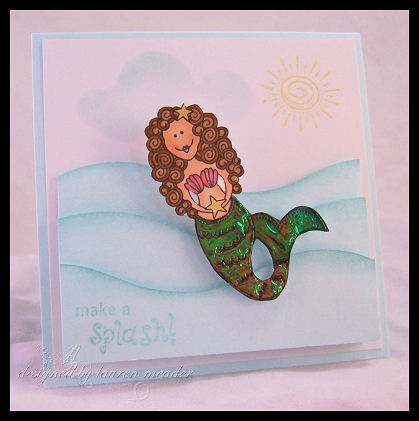
All you have to do is tilt the card from one side, to the other, and she is swimming side to side! Isn’t she so cute?
Moving Card-You need- one or two pennies, 1/2 inch Circle punch and Dimensional’s
QUICK DIRECTIONS-Punch 1/2 inch hole in cardstock. Layer 2 dimensionals stacked onto each-other on back of image, and place through hole in cardstock. Adhere penny to back of cardstock layer. It is important that is layer is on dimensionals so that the penny can rotate around!
I have another Make It Move <—-tutorial . If you like this one, but want a slider idea 😀
Here is a photo once the layer is complete-from side view

See 2 dimensionals-penny is behind wave layer. My waves were done using my Creative Memories Wavy cutter. I LOVE that tool!!! I sponged the wave edges, each on dimensionals for depth.
Now for the Mermaid! I colored her with Copic markers, and used a clear Atyou glitter pen for her seashells, star fish, and the sun!
I made her tail using Fantasy Film, in waterfall. You can see a tutorial on Fantasy Film–>HERE. I thought it was just PERFECT for the tail. Shimmery, and fin-like!
NOTE:If you “Google” Fantasy Film you will come up with some X Rated material! LOL! I was informed by one of my reader’s when she tried to hunt some down. You can purchase it at most Stamp stores, or online venue’s. I am going to be asking Christine at All That Scraps to get some in. Since it has a variety of colors, feel free to give some input on your faves, so I can “make a list” for her to place an order!
Now I made the cloud, making my own homemade template. It is my most favortie way to create them! And CHEAP!!
Tutorial for that can be seen ->here
Lastly the Starfish! I loved the Starfish from the Shore Thoughts set, but by this card’s end I was TOO lazy to stamp/color/cut out the one’s in the set! LOL!
I used my SU! Star punch, and used the little elements from the stamp set (the swirl, and sand stamp) to create my own EASY starfish! I stamped ALL the edges with the sand image (on this I only did 1/2 so you get the “idea”), then I rounded the tips with my paper snips, and curled the ends under.

Now this is for the LAST idea.
I get so many emails asking me HOW to mail interactive cards, of bulky cards without ruining them, or how to go about sending them”in style”.
SEE TOP PHOTO!!! My Mermaid card in a box.
I put mine in the Clearly Creative Card boxes! Just secure the ends with tape, and put the mailing and postage labels on the back! Isn’t this the cutest way to send a special card? I wanted to add a few more things to pretty it up, so that is where the starfish and filler come in.
Now it will cost a little more to mail, but can you imagine how cool this would be to see when you open your mailbox? AND you can bet the women at the PO will take extra care not to squish it-unless they keep it (YIKES! LOL!)
This is going to my friend Jenn in Canada who made me the most BEAUTIFUL address book with all my PSF’s info! It was just the sweetest thing to do for us. I wanted to send her a special TY note, and I think this should do it! Her gift was so amazing and thoughtful. I am going to send her a GC via email , to an online store. I dont want to send one IN this card package-just in case.
So that is all for today! I hope you enjoyed it.
Tomorrow I will FINALLY have my seed packet tutorial for you.
Till then-
Lauren
I have 2 posts for today-so don’t miss the other one 😀
Well today is the first day of the kids being on school vacation.
Um, yeah!! LOL! Not sure how I feel about that! I know that sounds awful. I LOVE my kids, but I also love my 6 hours a week of “mytime”.
Vacations often equal “Stop looking at me! She isn’t being nice. He won’t share. Get out of my room. Don’t hit me. He is spitting. She isn’t letting me take a turn. I want to go here, no I want to go there. I need another snack. OOPS! I didn’t mean to break that, or I got playdough stuck in the carpet for the 100th time. Ha! Ha! I got it first. No! you didn’t!” kind of banter, endlessly from 6:3o am to 8:00 pm.
In all seriousness, I know I will miss these times. I will right?
The weather is awesome, and I can take them to some fun outdoor activities this week. The only thing is getting stamp time in. I can’t keep them in the house when they are home all week, so I will be on the go, everyday.
This weekend I was able to get a sample done for the Pink Cat challenge. It looks like weekly the team posts a challenge for each other.
I’m very excited to be a full time member of the team Especially seeing what is to come. WOW!
Here is the source of inspiration Tammy posted for us.
Feel free to participate by making your own interpretation of this. You can send a link here or at the Pink Cat blog–>HERE.
I know each of the DT members for Pink Cat (see my side bar for member blogs), will be posting there vision of it as well.
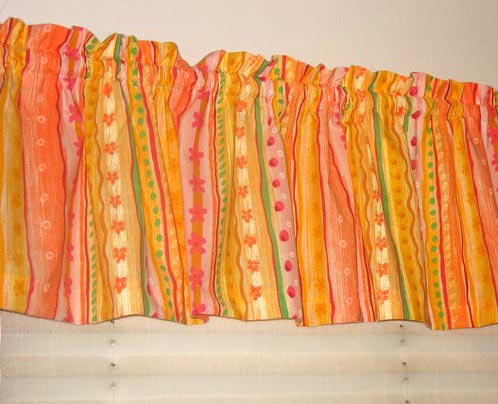
When I looked at this I saw various colors that I chose to interpret as ribbon!!!
Lily The Butterfly Fairy
Now that I have this uploaded, the colors aren’t like the curtain as much as I thought they were. I used various ribbon for a panel, to match the curtain. I thought it was a cute idea.
I LOVE my Lily set, and having her as a Butterfly Fairy. By the emails and responses I received YOU love Lily too!!
I colored her with my Copic marker’s. Many of you asked about skin tone’s. Well Deborah Kapsiotis-one of my blog reader’s, found this and decided to share this info with me, and OK’ed me to forward it on over to YOU! So I hope it helps.
What are the best skin colors?
> The color of skin is wide and varied. For an orange/peach skin it is
> recommended that you use YR00 and YR20. For a pinker skin, try R00 for a
> base color, R000 for highlights and R02 for shadows. For a neutral skin,
> E00 or E01 for midtones, E000 for highlights and E02 for shadows. E21 and
> E51 are also popular for skin midtones.
I honestly pay NO attention to which one’s I use. I just color and go. I always have scrap cardstock to test the colors, and make sure I am getting a good match before I color my stamped image.
The sentiment is from MFT- Princess Birthday it reads-Have a Fairy Nice Day!
Close-Up view
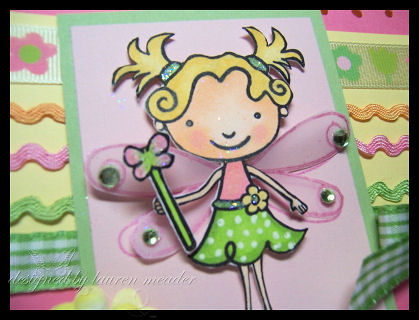
I stamped the wings twice, once on the blush layer in brilliance pink ink, then again on vellum cardstock, then cut them out. I added adhesive rhinestone’s.
She is just so pretty, and cute!!! Love these summery/ happy colors. Thanks for the inspiration Tammy!
Well that is all for today! We are off to lunch soon, and a trip to the park. Maybe the kids will let me sneak in a trip to Target! LOL!
Enjoy the day!
Lauren
I am going to have 2 posts to share today! Lots going on over the next 2 weeks in the design team world! I better get my butt in gear. The good thing for reader’s is you will most likely get MORE to view here than usual some days. Lot’s of amazing releases too. I feel bad for your wallet’s!
Today is like a mini-design team reveal.
If you want to see the PTI Design Team samples, with Nichole’s ROCKIN Anniversary set-Simple Little Things, then just click on this ——>LINK<—-. I find browsing the gallery confusing at times, so just be sure to click on EACH design team member’s folder, and you can view their creations with the set.
I will always post my samples to my blog as well. I am sure the other designer’s will do the same. You can find links to their blogs, on my sidebar underPapertrey Ink.I recently added design team member’s under team categories, that way when I post peeks of releases, you can quickly be linked to other team member’s if you need a little push of enable-ment (is that a word?).
Now BEFORE I share these samples, I have to tell you this set is NOT available for purchase! It is an exclusive set, that customer’s earned. It was one of the rewards, offered by Papertrey Ink, when you purchased 12 or more sets, during that last year Feb 07-Feb 08.
FROM NICHOLE’S BLOG:
If you didn’t earn this set, do not worry! We are presenting this promotion again this year! You have from February 15. 2008 through February 15th, 2009 to purchase 12 sets and earn the 2008 Limited Edition Anniversary set! If you have any questions about any of this, just contact Customer Service!
Make sure you visit her today-HERE. Her samples are KILLER!
Now for my 2 samples. I will definitely be using this set MORE! But I had so many other obligations, including my 16 samples for the PTI release, that I only got 2 done :C
I have to say I was SHOCKED with how many awesome images there were, and the plethora of sentiments! WOW! It was a FREE set! I would have purchased it, in a heartbeat!
Anyway-here we go.
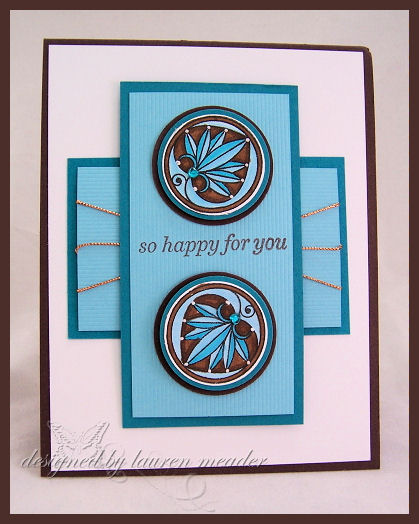
Oriental Inspiration
 I have no idea what it is, but anytime I see this image, I feel it has an Oriental feel with the pink & brown. Sort of like a Chinese cherry blossom. Anyway-that is just my thought here.
I made this to be like a panel at the bottom. The left half is paper pierced. I just loved the circles! LOL! My pink layer, had the edges around it, dry embossed. Looks better in person. You know how much I love popping out circles. I couldn’t help myself.
The scallop border, at the top of the card, to me was like the flowers in the image. It is a new border punch, by Fiskars. I purchased mine at Target.
This card uses the sweet blush from PTI, and chocolate chip from SU! Lots of circle punches. I got a larger punch from Fiskars, which mats the largest SU! circle punch, which is awesome, because I have been looking for one forever! Sometimes you need a bigger circle.
I colored in the flower’s with my singlo gel pen.
The ribbon is the sweet blush twill. The twill is my favorite!!!
Java Blue
Now for those you you familar with Vera Bradley, you may recognize my source of inspiration! Those of you who are not, I figured I would share the pattern with you. You can see I used the colors, and was also inspired by the pattern. I even added some white dots, like in the bag fabric.
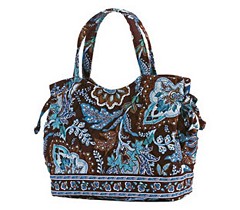 This is a handbag, from Very Bradley, using the Java Blue. This bag is the Sherry style, and I bought it for a friends daughter, for her birthday! I love the pattern and colors, so to me, this image from Papertrey Ink, was very similar. See you really can get inspired ANYWHERE!
Now to wrap this gift I went on toe create a bag with matching card. It was also inspired by the gift.
Here is the bag I made to hole the handbag.
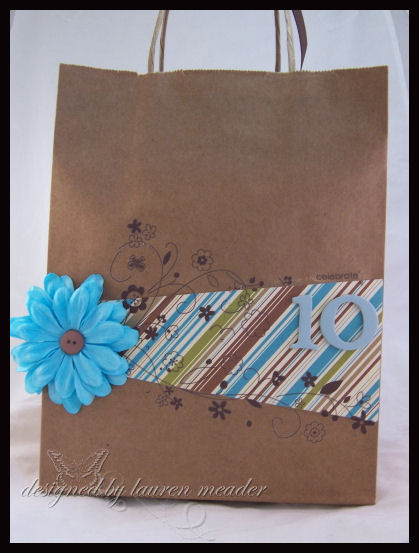 Sorry that it was difficult to get a good photo.
As you can see the colors are very similar. I just covered a portion of a simple brown, handled bag. I used some Scenic Route paper, some Rub-On’s by Stampin Up!, and a large Prima Flower. The chipboard number is also by Scenic Route. Since she was turning the BIG 10 I felt it should be highlighted. That is a big birthday! DOUBLE DIGITS!!
Here is the card, that went with the gift.
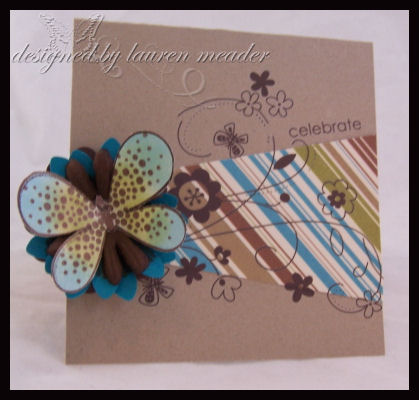 I used Kraft cardstock, and the same rub-on’s and layout as the bag. I had to add a butterfly (Butterfly Kisses), since it represented to me, a little girl morphing into a young lady!
The butterfly was stamped on glossy white, then color was sponged on. I love that effect with this image.
I used paper punches, to create my flower.
Now I did not realize my rub-on’s got rubbed off till I edited this photo! I am SOOO bummed. So here is a FYI-Make sure you rub, those rub-on really well, and be careful when handling items with them! GEESH! I obviously rubbed some off. That is so embarrassing.
Oh well. Too late now! I think its neat you can gain so much from ONE piece of inspiration. I can’t tell you how stressed I was about making a 10 yo b-day card/bag! I wanted it to be geared towards an older girl, so nothing “little girl”, yet still be fun and funky. I think I achieved it in the end.
So I hope you enjoyed today’s post, as well as the samples from the DT.
I’ll be right back with ANOTHER post, so stay tuned!
Lauren
Little Ballerina
Apr 20, 2008 Author: mytime | Filed under: CardsLittle Ballerina!
Yes another card with my pretty Ballerina stamp. Can you tell I love her? Plus it is the end of Dance season, so I it is a great time to ink her up.
You may remember the Ballerina frame, I made for Amber’s dance teacher. Well, this is the card that will accompany the frame when I give it to her, along with the stamp and sentiment.
Toe Shoes
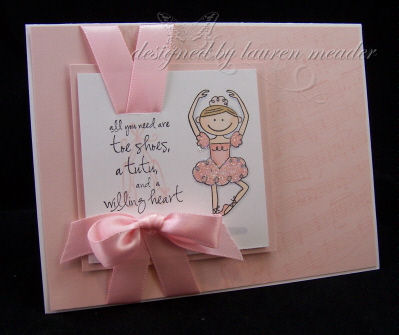 I really fell in love with this card! I know it seems fairly simple, but so sweet, to me at the same time.
I was inspired by toe shoes, with that perfect satin ribbon, and how it laces, then ties. I wanted to re-create that here.
The pink is sweet blush cardstock from PTI, as is the satin ribbon. It is the PERFECT pink for a ballerina. I didn’t want a contrasting color for my ballerina layer, so I just used the same cardstock-and of course, popped it up with dimensionals.
I love the music note’s bkgd (not sure who makes that-sorry :C it is the same one in my Elvis card from yesterday) stamped lightly on the blush cardstock. Its so soft and subtle, stamped at an angle on 3/4 of the pink layer. I’m on a kick with bkgd stamps at an angle I guess.
Her little tutu just sparkles with glitter. She is just perfect!
There is a pair of ballet shoes lightly stamped behind the sentiment. They are from a Girly Girl tin from Paper Salon.
I get many questions on what I use to color-I ALWAYS use my Copic marker’s! It is RARE that I don’t! Sorry I never keep track of what I use either-I own them all, and sort them by color groups, not the sets they came in-Skin tones, pinks, reds and so on.
My best advice is start with Set A and move on from there. I really would wait till you can afford some sort of “set” and start with the skin tones and colorless blender.
Well that is all for today. Tomorrow I have a challenge card to post 😀 using Pink Cat stuff 😀 So stay tuned.
Noah’s Super Boy party gift using the Billy set was a HUGE hit 😀 I have to say I had a HARD time handing it over! LOL! I don’t know why I have a hard time giving that stuff away! That is the entire POINT isn’t it? It would just collect dust here anyway. Maybe it the thought it will get trashed?!! I really hope they re-gift the bag 😀
Alrighty-I’m off. I really hope to stamp today! I got my new LAD sets in the mail! YEAH!!! Loving the new flower set-Le Jardin-it is a “sister set” to my favorite Jolies Fleurs. I know many of you emailed me your requests to see certain sets, so I will do my best to get some eye candy for you.
Lets cross our fingers I get to stamp. You too!!
Lauren
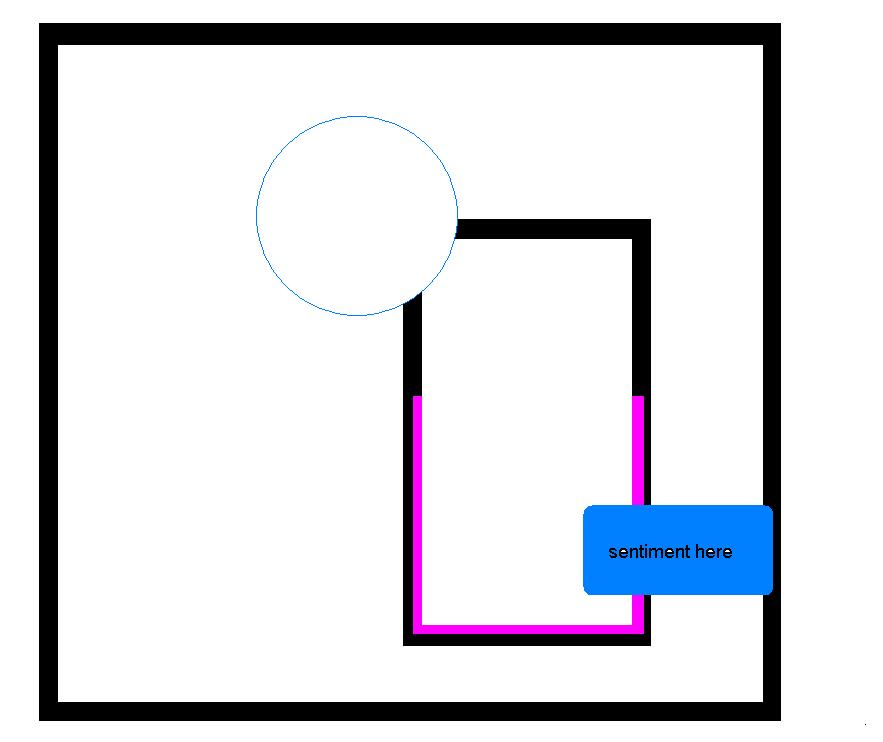
Well peep’s this week you will get 2 sketch’s to play with from me 😀
I forgot all about being asked to do a sketch for the Sisterhood of Scrap! I did this sketch month’s ago. I was excited to be invited to play along, but I had NO idea what to do since Im am NOT a scrapper. So I made a square card 5 1/2 around, and did a sketch that I thought may also be doubled as a scrapbook page! So if you scrap and have been waiting for me to do a page this is as close as you are going to get from me! LOL!
I hope you check it out HERE!!
I had to use Alexa’s set. I am not sure what is going on but I don’t think she isn’t resuming order’s till June :C. She is expecting a new baby, and is on bed-rest. I hope all is well with her. I did email her since there is an article in June Craft’s n’Things, and have not heard back. I will keep you posted.
Those who have read Alexa’s story and shared comments and well wishes/stories-thank you!! So sweet of you all to be concerned. Many asked how this last round went, and Alexa did fabulous! She is at her father’s this weekend.
Its the spinal chemo (last one next month) that gets me worried. I have had some bad dreams over it since treatment began! I think its just my underlying anxiety playing out. I wont say what the dreams entail, just know it feels so real, and upsets me for days afterwards.
UGH! Shakin it off.
Anyway here is the sample for the sketch.
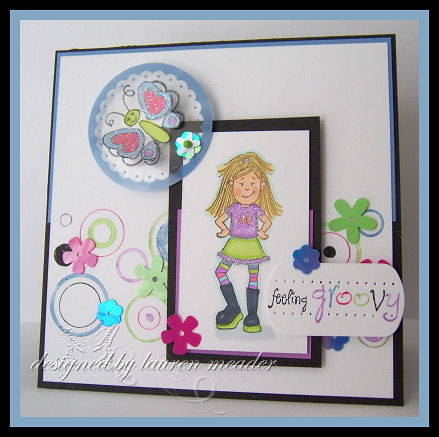 Feelin Groovy
The circle bkgd, and sentiment is by Stamping Bella (and no my over 50 count did not include bkgds, and sentiments. So many of you are SO BAD!! I got emails asking just how many I REALLY had! That is confidential info! LOL!). I used my SU! markers to color the circles various colors. I then added these little sequins I got from Queen & Co. Love the funky colors.
I had this acetate tag, so I stamped the butterfly from Alexa’s set on there, and cut, color, and pasted it on the top.
This is definitely a groovy card! I love it. Alexa has a friend who seriously dresses just like a Groovy Girl. Its so cute. She’s a modern day Punky Brewster!
Anyway, hope you enjoy this gorgeous weather! I have a feeling NO ONE will be doing this weekend’s sketches anytime soon! With weather like this, who can blame you?
Also if you have emailed me with something in the past and I didn’t get back to you, there is a great chance it got lost in the shuffle!! I feel like I was suppose to do something and I forgot! LOL! I get back to every single email I receive, I just often may forget, of have it get lost in the shuffle. So in the future-if you email me and don’t hear back in 2 days (unless you read something is up) then feel free to re-send it. I’m not ignoring you! LOL!
Have a supah day!
Lauren
Happy EARLY Saturday! I know its Friday, but I wanted to post this now 😀
The weather has been GORGEOUS here in New Hampshire.
I am suffering from NO motivation the last few days. Since the weather has been fabulous I have been out and about with my kids. They are really enjoying the weather. We walked Daisy for so long the other day, that she passed out for 6 hours! I had to check and make sure she was still alive! I let Noah take the leash and he RAN the entire way around 3 large blocks of our neighborhood, while Amber and I pushed our “dolls” in the carriage. Alexa was at school.
Point to my blabbering is, this week’s sketch is being kept very simple. I like simple.
 click to enalrge. Feel free to mix it up. Put something fun in that upper corner!
The first card is done using an Elvis Profile stamp. Um,YEAH! I actually went “there”. I just had too. I was placing an order and was haunted by the new line. This was the ONLY one I bought though. I did want a few other’s but know I won’t really use them. I will say that CHF ROCKED my shipping! I ordered Fri night and it was on my door Mon morning! WOW! AND it was a new release day. That deserves a round of applause.
The only reason I went all on the “KING” is because Elvis reminds me of my dad. Now I have to fill you in on this for you to appreciate my vision’s of Elvis. My dad was “the guy” who if we were at a restaurant, and someone popped an Elvis song on the Jukebox (remember those-they use to have them at like every restaurant when I was a kid), he would get up ON THE TABLE-yes ON the table-yes AT the restaurant, and start singing along (loudly)and dancing. He would get the entire place going-no lie. Talk about wanting to die right there!
This is only the tip of some of my most embarrassing times as a kid. You think YOUR parents were embarrassing! I’m am certain I have you beat. Those times are funny now, but back then, not so much. Anyway, I haven’t seen my dad in over 2 years. We have talked here and there, very briefly, but I thought I should send this his way. Let him know Im thinking of him.
So here is my card for my dad
 Blue Suede Shoes
5 1/2 square
I will say Elvis had some great songs!! I don’t care who you are, you can’t not love some of his classic songs.
Speaking of music-I love that music bkgd. I just stamped it at an angle, then added some Elvis stickers I had to buy after getting the stamp! LOL! You can’t tell, but the card is layered onto black cardstock as well.
Now to help you really “visualize” the possibilities I made another sample! Let me be honest-these cards took like under 10 minutes TOPS!!!! That is how rockin fast and easy this layout is! Plus it may get you using those neglected backgrounders!! You can of course substitute with paper or whatever-but TRY to use some sort of stamp if you can-its a challenge 😀
Here is the next one-same colors and layout.
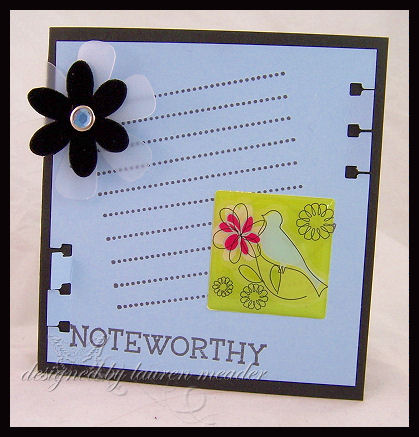 This is 4 1/4 square.
This was like a 2 minute card! I just stamped the lined paper image from Green Grass-Noteworthy set. I popped a sticker by Autumn Leaves Mod collection. Added a Velvet and clear flower from Maya Road, and punched the edges-DONE!!! I like it. Its sorta fun and funky. You could write a little something on the lines. Not me. I have the WORST handwriting-awful! I hate writing. I envy people with nice penmanship.
So that is it for today
We have a weekend full of errands, and kids parties. Fun stuff. Im HOPING my new stamps arrive today! YEAH!!
Stay tuned!!! If you get a chance to play send me a link here in the comments section, so we can all see your take on the sketch!
Oh yeah-I forgot to tell you to check this out—->HERE! YEAH!! I did have to cut back on some other obligations. I’m very excited to be part of that though. Should be fun.
Till tomorrow.
Lauren
Lauren
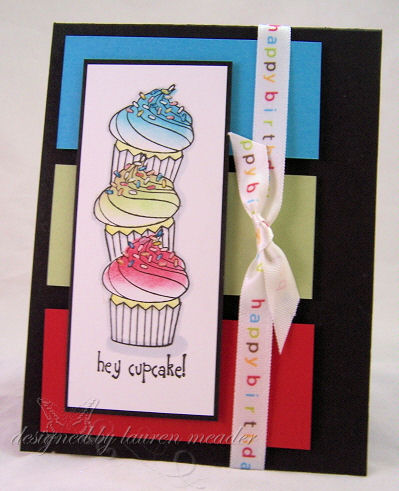 Stacks of Cupcake Wishes
This card uses : Cupcake single, and ribbon from American Crafts (which inspired by colors). You can never have enough birthday cards, and I feel this is very gender/age neutral.
OK I know some of you may yawn at this post (SORRY), but many people have yet to try one the the best, and simplest techniques of all time-MASKING and REVERSE MASKING!!!
I know I personally love the technique, and the first time I tried it, I was floored. Yeah I know, so not revolutionary but I was excited just the same. We have all been “there”. Remember the first time you tried embossing powder? LOL! I know I do! LOL!
OK, well I thought to put together this little tutorial because many people wanted to know how I made—-> this <—- cupcake card. Many of you seem to be visual learners, and I am not the best at just explaining things. I’m hands on and can look at something and just figure it out. So when I have to “break it down” I’m just not that great at it. Its better to show you, for me anyway 😀
Any questions-just ask. Ill answer them for you.
DIRECTIONS for masking-click to enlarge photos please
Step 1
Stamp your image on a sticky note or eclipse tape (making sure the sticky strip has part of the image stamped!). Carefully cut out the image.
Step 2
Stamp image on cardstock.

Step 3
Place cut out sticky note image, over stamped image-like photo. Then stamp another image over it. I repeated this process for a third cupcake.
 For this one I did NOT ink the sentiment for the next layer of cupcake.
THIS is what it will look like. I made a trio stack of cupcakes.
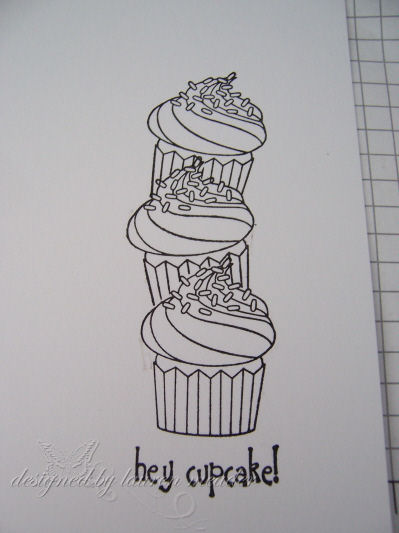 cool huh? Now its like you bought a whole other stamp isn’t it?
Now this lets you make things look like they are layered behind each other with out stamping through the image and looking messy!
Next up-many people had no idea how I sponged on my color so neatly! Here you go-
REVERSE MASKING-another fun concept, often neglected. Not one you will use often, but fun all the same.
Step 1
Take the paper, that you had cut the main image out from, and place it around the stamped image you cut.
Step 2
Take a sponge dauber and rub into ink pad of choice. Now lightly pounce desired color, in area of choice.
 See that the mask prevents it from going outside the stamped edges.
Here is the stack all inked. Now you can also see how I began to color in the sprinkles with my Singlo white gel pen, which I then use my markers to color over, so the sprinkles have color that can be seen.

Then color and design card as desired!
That simple.
CRAFTY TIP -if I take the time to create a mask, I always out it in with the stamp so I remember I have it, and it is there if I want/need it again!!! No need to cut out a new one every time.
So that is it for today! Tomorrow is my Saturday Sketch! I hope you will come back to give it a try. I hope to get some stamp time in today. I haven’t gotten much done the last few days. Least not that I can share yet.
Till tomorrow-
Lauren
My Etsy

Who I Designed For
Blogroll
- Alicia
- Alli Miles
- Ally Blankenship
- Amber
- Andi @ crafts on a whim
- Angel R
- Angie Z
- Anne Kranitz
- Becky O
- Bee
- Beth Silaka
- Bethany Paull
- Beverly Nash
- Bobbie
- Cambria
- Cammie
- Card of the Week
- Card Positioning System (CPS)
- Cards for Cancer
- Catherine Doucette
- Charmaine
- Cheryl Sims
- Chriss Rollins
- Christina
- Christine Ewing
- Christine Wooden
- Colleen Schaan
- Craft Critique
- Craft Gossip
- Crystal
- Dawn Easton
- Emily Giovanni
- Geny
- Holly
- Igne Groot
- Inspirational Craft Blogs
- Irene
- Jami Sibley
- Jeanne Streiff
- Jen del Muro
- Jeni Bond
- JenMarie
- Jenn Balcer
- Jenn Diercks
- Jenn O
- Jennifer E
- Jennifer Mick
- Jennifer Pereda
- Jennifer-Sweet Treat
- Joanne Basile
- Jodi Collins
- Julia Stainton
- Julie Masse
- Karen
- Kathryn Berthiaume
- Katie Cotton
- Kelley Holland
- Kendra
- Kim Scholfield
- Kris’s Color Stripes! Get inspired here
- Kristen Dubosque
- Kristin Eberline
- Kristine
- Laura @ Sunshine Stamper
- Laura Turnmire
- Laurie Schmidlin
- Lesa Rapp
- Linda Duke
- Linda-LSN
- Lindsey Botkin
- Lisa (lakind scs)
- Lisa Kind
- Lori Craig
- Maggie
- Mara Campbell
- Maria
- Maria Levine
- Mary
- MaryJo
- Melanie M
- Monique Hansen
- Moxie Fab World
- Pam Imholz
- PaperCrafts Connection
- Peppers and Pollywogs Kids party site
- Rebecca Grohall
- Rita
- Robyn
- Rose Ann
- Sarah Vrolyk
- Sharon Harnist
- Sharon Johnson
- Sharon Rivera (a chemisrty with paper)
- Sherrie
- Sophia Landry
- Storage Units, Ink, & More Blog
- Sue Berker
- Susan (Rainy)
- Tangii Crane
- Tracy
- Tricia Traxler
- Trudee
- Velta
- VivLyn
- Zena
MTME Pretty Palette Color Team
MTME Pretty Patterns Sketch Team
My Time Made Easy TM LLC
Shop till you drop!
Lauren Meader
About Me
Copyrighted material
Subscribe To My Blog
Pages
- About me
- Alexa’s Story!
- My Crafty Corner!
- My Time Made Easy™ LLC
- Our Make A Wish Trip to Disney!
- Resume/Publication List
Calendar
Archives
- August 2013
- July 2013
- June 2013
- May 2013
- April 2013
- March 2013
- February 2013
- January 2013
- December 2012
- November 2012
- October 2012
- September 2012
- August 2012
- July 2012
- June 2012
- May 2012
- April 2012
- March 2012
- February 2012
- January 2012
- December 2011
- November 2011
- October 2011
- September 2011
- August 2011
- July 2011
- June 2011
- May 2011
- April 2011
- March 2011
- February 2011
- January 2011
- December 2010
- November 2010
- October 2010
- September 2010
- August 2010
- July 2010
- June 2010
- May 2010
- April 2010
- March 2010
- February 2010
- January 2010
- December 2009
- November 2009
- October 2009
- September 2009
- August 2009
- July 2009
- June 2009
- May 2009
- April 2009
- March 2009
- February 2009
- January 2009
- December 2008
- November 2008
- October 2008
- September 2008
- August 2008
- July 2008
- June 2008
- May 2008
- April 2008
- March 2008
- February 2008
- January 2008
- December 2007
- November 2007
- October 2007
- September 2007
- August 2007
- July 2007
- June 2007
- May 2007
- April 2007
- March 2007
- January 2007
Categories
- About Me
- All That Scraps
- blogger challenge
- camera/photo play
- Cards
- Contests
- family stuff
- FOR SALE
- Home decor/3-D items
- How to FAKE it!
- Introduction
- JUGS Challenge
- JustRite Stampers
- Lizzie Anne Designs
- My family stuff
- My Stamping Space
- My Time Made Easy
- My Time To Color Challenge
- My Time to Create Challenge
- My Timeless Template Challenge
- My Timeless Templates
- Mytime Mail
- MYTIME MOVIE/VIDEOs
- Papertrey Newsletter
- Pink Cat Studio
- Pretty Palette Challenge
- Pretty Patterns Sketch
- Product Opinions and Must haves
- Recipe's
- Saturday Sketch
- Smilebox Creations
- Stampavie
- Tutorials
- Uncategorized
- videos
Most Popular
- Create your own Onesie Card Tutorial-and important NOTE! PLEASE READ (2529)
- Saturday Sketch-Boxed bag holder (2333)
- Going GREEN! Fancy Flower Flourish-Closure Video (1478)
- Fabulous Favorite - Giveaway! (1336)
- a Prayer Request (1231)
- QUICK-Easter Baskets from Nestabilities-PTI style-and blog challenge (1063)
- Teaser Sketch (999)
- February Release Giveway! (and a little peek) (996)
- Group Post and Rambling Rose Video Tutorial (985)
- GIVEAWAY! Who wants it all?! (895)
Recent Comments (RSS)
- 야동: Love to read it,Waiting For
- 야동: This seller is in a
- 바카라사이트: 여기 처음 왔어요. 나는이 게시판을
- 야동티비: I was surfing the Internet
- 바카라사이트: 비슷한 주제에 대한 흥미로운 정보를
- 바카라사이트: "여기에 제공해 주신 귀중한 정보와
- 온라인홀덤: 유익한 웹 사이트를 게시하는 데
- 홀덤나라: 나는 당신의 블로그를 정말 좋아합니다.
- lisa: Technology, too, has left an
- 주소모음: 흠 !! 이 블로그는 정말
Copyright © 2007 - My Time, My Creations, My Stampendence - is proudly powered by WordPress
This blog has been Tweaked and Designed by Sara Williams