Archive for April 8th, 2008
Its the little details that make it
Apr 8, 2008 Author: mytime | Filed under: CardsCheckin in late tonight. Quick post I wanted to share.
I have heard so many people say-what makes a card from go OK to WOW!?
Well it can be the littlest of things.
I decided to show you how adding sometimes the simpliest of details, can really help step-up your creation.
Here is the first card-which I made using C.C. Designs It’s my birthday.
Paper is by K & co.
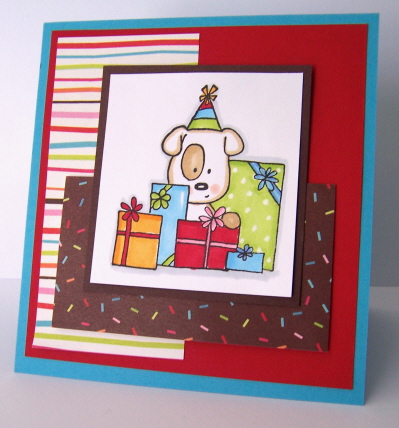
It’s cute right? But something is MISSING!
I am a big advocate for DIMENSIONALS!!! NO FLAT CARDS!! Unless they are one layer. I use them on about every card I make. Look how “flat” this looks.
This most likely would have ended up scrapped, or never shared. But I re-vamped it a bit. So it is now a keeper.
Here is the stepped up version:

Ah! Now that is better! All I did is add some ribbon-pop up my sprinkles layer, and my main image. Added some ribbon. Then I put a cute sentiment going around the corner!
This is the same card as above-I just pulled the top layer up, and added the touches I told you.
See the difference?
Don’t get me wrong-sometimes simple is best-but there is such a thing as perfectly embellished too.
I hope you try this out. Mess around and take your card up to a WOW! By practicing this you will get better and better at embellishing your creations.
Try to keep it balanced, and DONT over do it OK!
I say take a photo of the “PRE” stepped up one first, then take one of the finished product like I did here.
Well Im off. I have a ton of stamping I want to get done. I challenged my self to use some new goodies, so I will be back to post later 😀
I really need to get my butt in gear, and get my tutorials that I want to share done too. Plus some other tid bits of stuff here and there. You know how it is.
OK, till then-and thanks for stopping by and saying HI 😀
Lauren
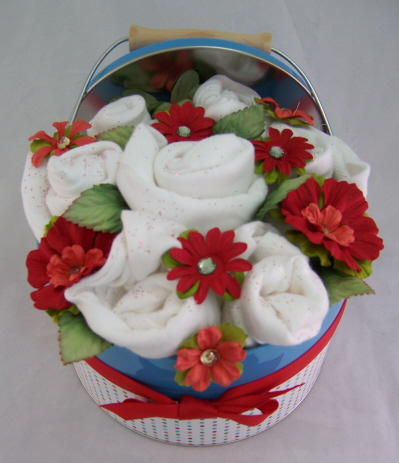
After making THIS Onesie Bouquet, I got hundreds (no joking) of emails/request’s asking me to share HOW I got the baby onesie’s to look like flower buds. Many people wanted to order them. It would be rather pricey for me to sell them, if you count the cost of the items, and MY TIME 😀
I was so overwhelmed, and flattered that SO many people liked it that much 😀 THANK YOU!
As I am going to share, it is actually REALLY EASY to make. It is however, somewhat time consuming if you are a little anal-like myself 😀 I need my onesie “buds” to be perfect. I do think I will make this for every new mom. It’s just a really FUN gift idea 😀
Let’s get to it!
My fellow PTI design team member Geny, is due to have a bouncin baby boy this June! So I promised her I would make her one for her son 😀 Now the “tin” part isn’t done being decorated yet, because I ordered THIS SET, the other day, and am waiting for delivery 😀 Then if she does see this here on my blog she will still be a bit surprised by the decoration on the tin itself.
NOTE: This is not for contest or publication
If you decide to create one-send me a link! I would love to see it 😀
 Bouncin Baby Boy Blue
So I decided that white onesie’s would be best for the boy project, since I wasn’t sure if I were going with yellow, blue or red accent flowers. I think I should always have a pack on hand now! You just never know. make one in yellow and you are golden for a last minute gift for any sex child 😀
You should get the 0-3 month size. a 5 pack is best!
I found this bucket at Michaels for $1.99, and it was just the PERFECT size! To me it screamed BOY! BUY ME! It has a cute handle, and I secured the top under the handle with a large glue dot.
In the girl tin I used the large heart tin from Papertrey Ink-I didnt want a heart for a boy though-needed to be more “rugged”.
I used some designer paper from SU! called the East Coast Prep collection (again-perfect!). I simply covered the bottom portion of the tin. Kept it simple. I plan on cutting out particular animals in the set I linked above, and adding them around the tin. I think it is pretty cute as is though.
WHAT YOU NEED
*Tin/container of choice* 5 pack of white onesies-size 0-3 months* White floral tape* Glue Dots* Leaves* Paper/Prima Flowers* Tin filler*
Decorate your container as desired FIRST! This will help determine what your flower theme will be.
Make sure your work surface is CLEAN!
If you want to see the photos closer-please click to enlarge!
DIRECTIONS
Step one
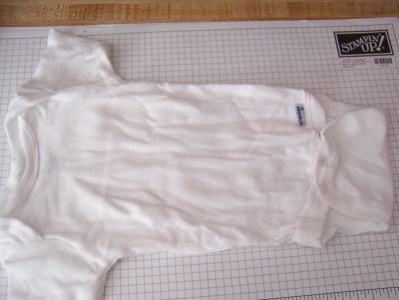
 Snap onesie bottom. Fold in either side.
Step two
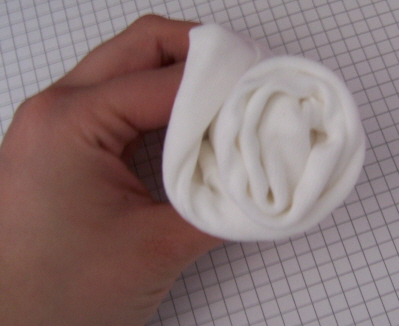
 From top end, roll neatly into a snug ball. Wrap mid-bottom oprtion tightly with floral tape. You do not want to use any other type of tape because should the mom-to-be decide to USE the onesie’s, it would get gooey and stick to the shirts-ick!
Step three
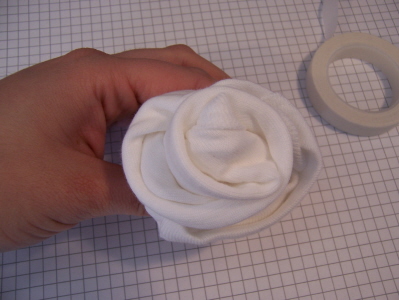 Now you want to fold back one of the edges, like a rose petal unfolding. It is also good to try to fold over the seam where the folded shirt ends to hide it.
Mini Dual Buds-Now if you look at my bouquet-I bought a 5 pk of onesie’s, but have 7 flowers. I did not do this with my last bouquet, but decided in order to fill this larger bucket I would make 2 of the onesies have double buds! So instead of 5-I have 7 buds!
Step one
 Fold in sides like above. Then fold up bottom.
Step two
 Now roll from the side, in.
Step three
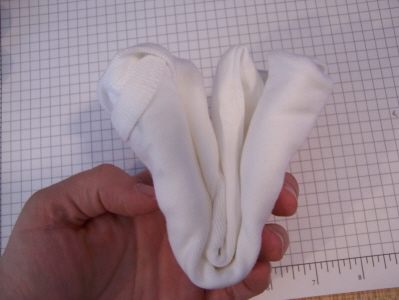 Now fold the “jelly roll” in half. So ends come together. Tape like in Step Two above. Unfold the edges a little as above in step three above.
Last but not least
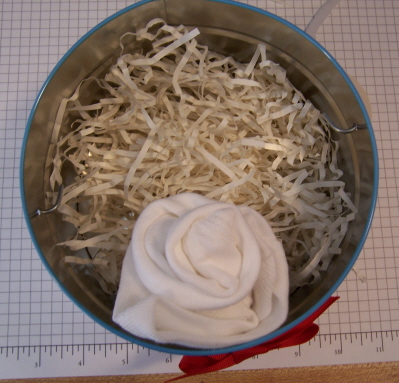 Now it is time to arrange the onesie’s in your tin! make sure you put some sort of filler in the bottom. Try not to get a tin that is too deep. You may want to arrange the set up of your bouquet. Place larger/taller onesie flowers in center.
After they are all set, now for the fun! I like to choose a variety of flowers ot add in between, and on top of my “bouquet” I place them first-then, if I am happy I use glue dots to secure them all in place.
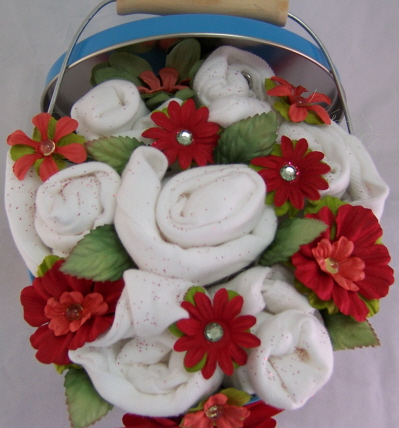 Close up view.
For this one (since I know the mom is NOT going to use the onesie’s) I sprinkled some red glitter to finish it off.
I will shrink wrap this, tie it all nice with ribbon, and send if off in the mail!
Now this beats the $60 bucks you’d spend on a bouquet of flower’s that will die in 5 days.
I really hope you enjoyed seeing HOW it comes together! Now for a perfect card to accompany a Onesie Bouquet , can be found ->HERE.
So that is it for today! Thanks for stopping by.
My Etsy

Who I Designed For
Blogroll
- Alicia
- Alli Miles
- Ally Blankenship
- Amber
- Andi @ crafts on a whim
- Angel R
- Angie Z
- Anne Kranitz
- Becky O
- Bee
- Beth Silaka
- Bethany Paull
- Beverly Nash
- Bobbie
- Cambria
- Cammie
- Card of the Week
- Card Positioning System (CPS)
- Cards for Cancer
- Catherine Doucette
- Charmaine
- Cheryl Sims
- Chriss Rollins
- Christina
- Christine Ewing
- Christine Wooden
- Colleen Schaan
- Craft Critique
- Craft Gossip
- Crystal
- Dawn Easton
- Emily Giovanni
- Geny
- Holly
- Igne Groot
- Inspirational Craft Blogs
- Irene
- Jami Sibley
- Jeanne Streiff
- Jen del Muro
- Jeni Bond
- JenMarie
- Jenn Balcer
- Jenn Diercks
- Jenn O
- Jennifer E
- Jennifer Mick
- Jennifer Pereda
- Jennifer-Sweet Treat
- Joanne Basile
- Jodi Collins
- Julia Stainton
- Julie Masse
- Karen
- Kathryn Berthiaume
- Katie Cotton
- Kelley Holland
- Kendra
- Kim Scholfield
- Kris’s Color Stripes! Get inspired here
- Kristen Dubosque
- Kristin Eberline
- Kristine
- Laura @ Sunshine Stamper
- Laura Turnmire
- Laurie Schmidlin
- Lesa Rapp
- Linda Duke
- Linda-LSN
- Lindsey Botkin
- Lisa (lakind scs)
- Lisa Kind
- Lori Craig
- Maggie
- Mara Campbell
- Maria
- Maria Levine
- Mary
- MaryJo
- Melanie M
- Monique Hansen
- Moxie Fab World
- Pam Imholz
- PaperCrafts Connection
- Peppers and Pollywogs Kids party site
- Rebecca Grohall
- Rita
- Robyn
- Rose Ann
- Sarah Vrolyk
- Sharon Harnist
- Sharon Johnson
- Sharon Rivera (a chemisrty with paper)
- Sherrie
- Sophia Landry
- Storage Units, Ink, & More Blog
- Sue Berker
- Susan (Rainy)
- Tangii Crane
- Tracy
- Tricia Traxler
- Trudee
- Velta
- VivLyn
- Zena
MTME Pretty Palette Color Team
MTME Pretty Patterns Sketch Team
My Time Made Easy TM LLC
Shop till you drop!
Lauren Meader
About Me
Copyrighted material
Subscribe To My Blog
Pages
- About me
- Alexa’s Story!
- My Crafty Corner!
- My Time Made Easy™ LLC
- Our Make A Wish Trip to Disney!
- Resume/Publication List
Calendar
Archives
- August 2013
- July 2013
- June 2013
- May 2013
- April 2013
- March 2013
- February 2013
- January 2013
- December 2012
- November 2012
- October 2012
- September 2012
- August 2012
- July 2012
- June 2012
- May 2012
- April 2012
- March 2012
- February 2012
- January 2012
- December 2011
- November 2011
- October 2011
- September 2011
- August 2011
- July 2011
- June 2011
- May 2011
- April 2011
- March 2011
- February 2011
- January 2011
- December 2010
- November 2010
- October 2010
- September 2010
- August 2010
- July 2010
- June 2010
- May 2010
- April 2010
- March 2010
- February 2010
- January 2010
- December 2009
- November 2009
- October 2009
- September 2009
- August 2009
- July 2009
- June 2009
- May 2009
- April 2009
- March 2009
- February 2009
- January 2009
- December 2008
- November 2008
- October 2008
- September 2008
- August 2008
- July 2008
- June 2008
- May 2008
- April 2008
- March 2008
- February 2008
- January 2008
- December 2007
- November 2007
- October 2007
- September 2007
- August 2007
- July 2007
- June 2007
- May 2007
- April 2007
- March 2007
- January 2007
Categories
- About Me
- All That Scraps
- blogger challenge
- camera/photo play
- Cards
- Contests
- family stuff
- FOR SALE
- Home decor/3-D items
- How to FAKE it!
- Introduction
- JUGS Challenge
- JustRite Stampers
- Lizzie Anne Designs
- My family stuff
- My Stamping Space
- My Time Made Easy
- My Time To Color Challenge
- My Time to Create Challenge
- My Timeless Template Challenge
- My Timeless Templates
- Mytime Mail
- MYTIME MOVIE/VIDEOs
- Papertrey Newsletter
- Pink Cat Studio
- Pretty Palette Challenge
- Pretty Patterns Sketch
- Product Opinions and Must haves
- Recipe's
- Saturday Sketch
- Smilebox Creations
- Stampavie
- Tutorials
- Uncategorized
- videos
Most Popular
- Create your own Onesie Card Tutorial-and important NOTE! PLEASE READ (2529)
- Saturday Sketch-Boxed bag holder (2333)
- Going GREEN! Fancy Flower Flourish-Closure Video (1478)
- Fabulous Favorite - Giveaway! (1336)
- a Prayer Request (1232)
- QUICK-Easter Baskets from Nestabilities-PTI style-and blog challenge (1063)
- Teaser Sketch (999)
- February Release Giveway! (and a little peek) (996)
- Group Post and Rambling Rose Video Tutorial (985)
- GIVEAWAY! Who wants it all?! (895)
Recent Comments (RSS)
- 첫충사이트: 완전히 흥미로운 블로그 게시입니다. 저는
- sarah: Wow, Lauren, what a stunning
- hedie: خرید راهبند
- 야동: Love to read it,Waiting For
- 야동: This seller is in a
- 바카라사이트: 여기 처음 왔어요. 나는이 게시판을
- 야동티비: I was surfing the Internet
- 바카라사이트: 비슷한 주제에 대한 흥미로운 정보를
- 바카라사이트: "여기에 제공해 주신 귀중한 정보와
- 온라인홀덤: 유익한 웹 사이트를 게시하는 데
Copyright © 2007 - My Time, My Creations, My Stampendence - is proudly powered by WordPress
This blog has been Tweaked and Designed by Sara Williams