Archive for March, 2008
My Papertrey Projects for March-
Mar 17, 2008 Author: mytime | Filed under: Cards, Home decor/3-D itemsWell I thought instead of spreading it out, I would just post my PTI projects here together. I also provided some “commentary” on my thoughts for each project.
I hope you enjoyed the projects I had created.
I’ll be back later today to announce MYTIME MAIL winners-so till then there is still time.
Some were shared in previous posts. Other’s I will include tutorials for are-the Paper Flower favor, and Pop up-two hearts card! Lot’s of emails about those! Just have patience with me, I WILL get it done.
If you like any of the creations used, and want MORE details- you can see my complete supply list in MY gallery at PTI.
Just click ——>HERE<—–and browse my gallery, by stamp set!
All the desinger’s really created a great assortment of projects! So check it all out, if you have not done so already.
All the stamps used in these projects can be purchased at Papertrey Ink.
Here we go! I’d love to hear if you had a favorite too!
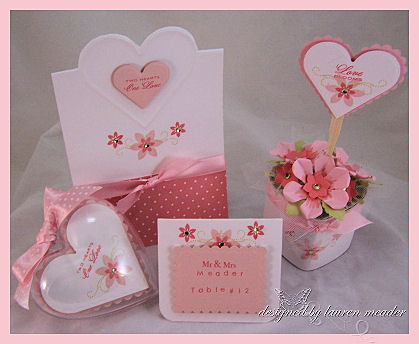
I had so much fun, combining the stamping, with the patterned paper for this project. The the upper left-we have our -Pop up-two hearts, one love Wedding invitation.
To the far right we have the “centerpiece” or a favor, made with ALL paper! I utilized the PTI heart tins for this one. This continue’s with the heart and love theme.
Then, we have our table cards. Pretty straight forward. I like that everything matched so well.
To the bottom left, is a favor idea. Behind the front panel inside the heart ornament-is a heart shaped packet that holds Sweet Peas. Another fun way to package seeds. Print the planting info, and put it inside as well!
This project was just too fun for me.
Next up-
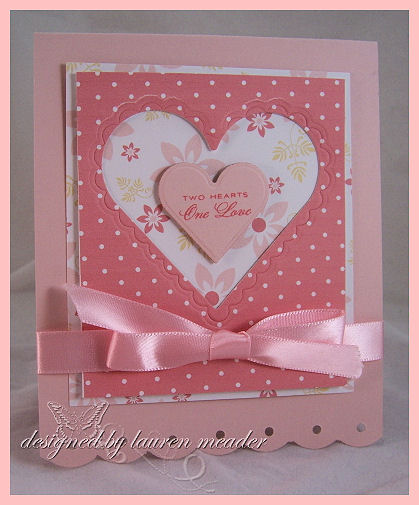
I loved the patterned paper peeking through the larger heart. The idea for this was to be a wedding card to present to the happy couple. It co-ordinated with their wedding theme (above). Also a great Valentines or anytime kind of card!
Oh I so loved this one for many reasons. SIMPLE, SOFT and PRETTY!!!
It show’s off the paper!
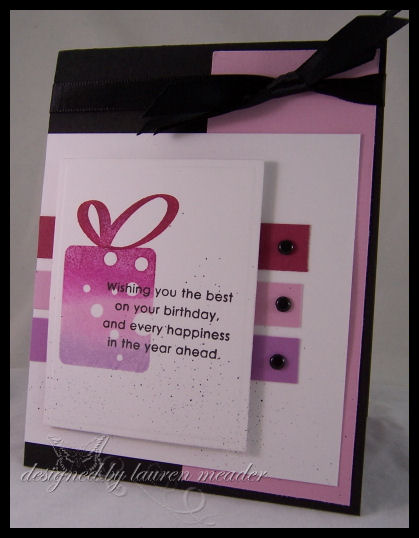
Used the boxes, bags, and tags set, in the un-intended way, and I LOVE using my “inside” card sentiments as the FRONT FOCUS of my card! When you do this its much more for your money! Just because its a sentiment that you THINK should go on the inside, doesn’t mean it HAS to! Put it on the FRONT!!!!! Don’t you agree?
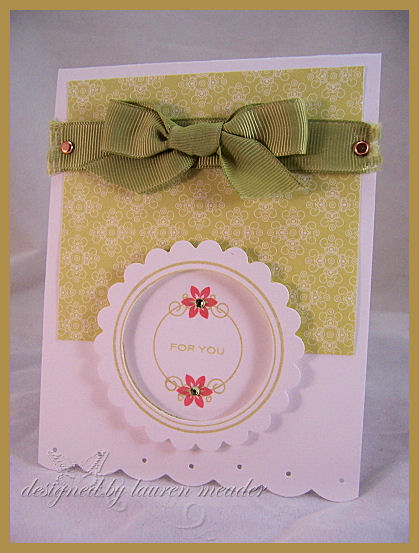
I loved using the Boxes, bags & tags as the main focus of this creation. The circle layer is up in dimensionals, for some POP! I love being able to use a set for more than it is intended to be used for. That set is a MUST OWN!!! I seriously fell in love with it. The flowers in the set were my absolute favorite! I had to STOP myself from using them. This card can be for ANY ONE, ANY TIME!
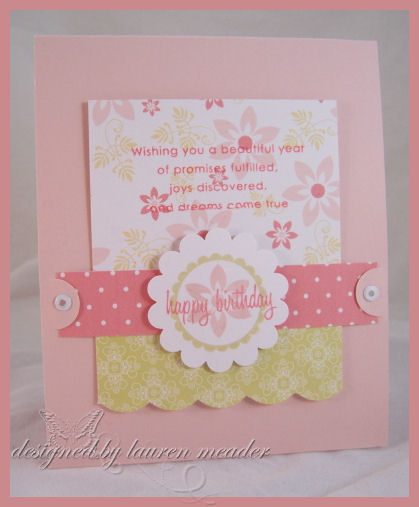
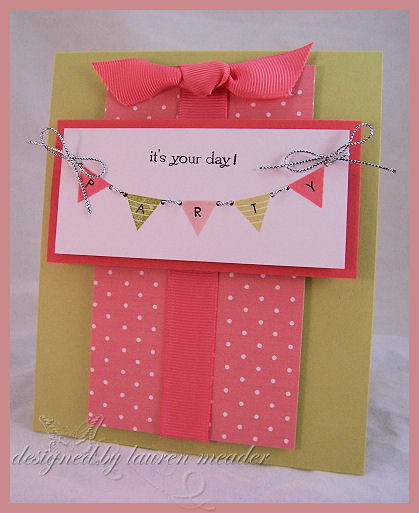
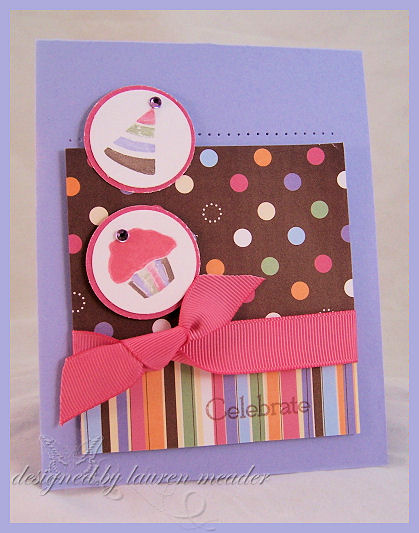 Pretty Party
I loved using purple! Oh and I LOVE adding circle elements to my projects. This paper by Making Memories created the perfect party palette! I loved the striped and dots.
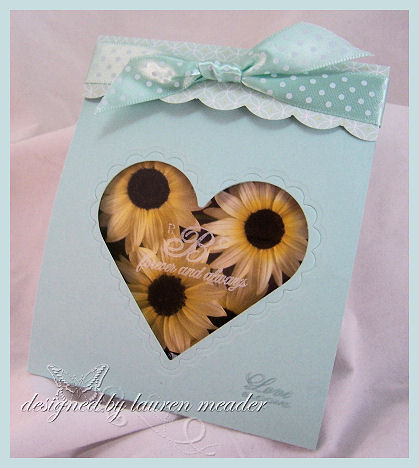 Seeds of Love
I think seed packets are a great wedding favor. Unfortunately they aren’t all that pretty, in their entirely! So I covered it! I let the flower’s show through, and loved how this turned out. Just give seeds with your “theme” flower, and they are PERFECT! Plus seed packets make a elegant, yet cheap favor, that in the end, is a gift the recipient WON’T chuck in the trash! Every-time they look at their beautiful blooms, they will remember your happy day!
This also doens’t JUST have to be for weddings! Think TEACHER’s or other wondeful people that you need to get gifts for.
I believe this seed packet was a whopping 0.32 CENTS at Walmart!
I loved this as the favor idea, because not only is it pretty, but I PERSONALIZED it! I added a layer of acetate, then using the Ambassador alphabet, I stamped the LAST initial. I them used the simple alphabet and did the groom & brides first initials!
This says:
R B C
forever & always (my uncle and aunt to be’s initials)
Then in the corner-Love Blooms!!! How perfect is that? They take NO time to make too!!
OK we talked about favors for the guests, how about YOUR gift to them?
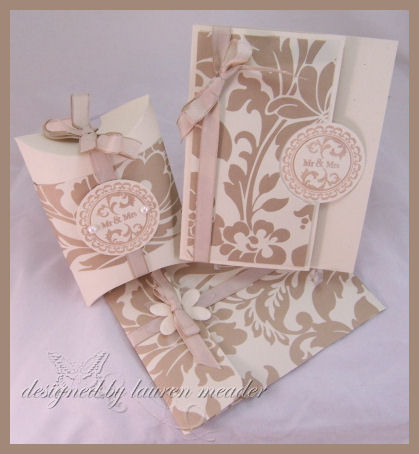
Now isn’t this such an elegant presentation for your card for the new happy couple?
Once ANYONE gets married, one of the first things they think is “Oh Mr & Mrs. X”. So this is perfect!
PRESENTATION is everything!!! I think this would be one of the first things opened. It looks like it would have something grand inside, and shows how much you care.
I am actually giving this to my Uncle and his new wife when they get married in August. Her colors are ivory and teal. I am in charge of favors, and Wedding invites! (Don’t ask me WHEN I am fitting this in-I have no idea-but I NEED to get the invites done ASAP!!!) I am going to take a Sunday and just DO IT!
There is an envelope, I made to match, and a pillow box for your gift! I think its a great way to present a gift card, or check, in place of putting it in the card. Or a small gift. But lets be honest-they want and need the cash 😀 LOL!
Well that is that! I hope you enjoyed the release.
I do have MORE of my “rejects’ to share. Those are creations I make, but didn’t include in the reveal. So sometime soon I will post those.
Once again-thanks for looking. I had SO much fun with this stuff, in case you couldn’t tell! LOL!
Till tomorrow!
WHEN did “I” get old?
Mar 16, 2008 Author: mytime | Filed under: Cards  Party Elements
(the samples in this post use Its a Celebration and Birthday Basics)
Ok I think I missed something! Maybe when I was sleeping the past 10 or 12 years.
I am going to share some birthday stuff today since it relates to my post. Each time we have a birthday, we get older, right?
But at WHAT point did “I” get “old”? Seems like yesterday “I” was the one getting the big girl bed, now its my youngest baby :C
You know you are getting old when the “kid” at the grocery store calls you Ma’am, instead of checking you out.
You know you are old when a guy holds the door open JUST because you have 3 kids you are trying to wrangle, along with your grocery cart, and he gives you the “look” You know the “look” the “Oh thank god that isn’t me-poor woman” look. Not the “oh she is HOT” look! LOL!
You know you are old when you don’t get carded for ANYTHING!!!
You know you are old when you DO have a sitter, and the mere thought of getting home even near mid-night makes you think “Oh no! I’m going to be so tired tomorrow”, when you use to stay up till 2 am dancing!! Then pop awake at 6am to go to work, without feeling like you needed a nap, or would die! OR needed to drink 4 cups of coffee to stay up.
You know you are old when you mention a character to a show, maybe even a song from your childhood, and someone says “WHAT”? “Who” is that????
Maybe Im being sensitive-Im going to turn 30 VERY soon-in May! Then THIS incident happened and it really did me in! It made me think when did “I” get “old”?
Jason and I were at a gathering, and while we were there one of the teen girls (like 17) was pouting. Her mom say’s “Honey what is the matter with you?” “Why are you sulking?” ” Knock it off”
Her response ” Cause, Im like totally bored to death” “Everyone here is so old” “Its boring”
I GASPED! I said “What!” Im not old! I’m not BORING!!! When did I get added in to the Old population, Im only 29. I remember 17 like yesterday.”
The girl says ” Yeah, 29 is definitely OLD”
OMG!!!!!!!!!!!!!!!!!!!!! SERIOUSLY!!!!!!!!!!!!!!!!!!!!!!!!!!!!!! I remember my mom’s 30th birthday like yesterday!
I feel like Im at LEAST 22!!! No way do I feel I look like the “old” soccer mom’s. WHEN did I become them? HOW did I miss that?
Now Im REALLY dreading turning 30-BLECH!!!!!!!!!!!!!!!!!!!!!!
Im sure some of you may relate. I guess we all get there. If you haven’t YET, Im so happy for you! LOL!
So here are some cards. I’d love to hear if you had a moment, when you realized YOU were older than YOU thought! LOL!
Here is another one-just to end this post an a HAPPY note-
Till tomorrow!

This little light of mine…………….. Im gonna let it shine, let it shine, let it shine, let it shine.
Not sure WHERE I remember that song from. Maybe church? Its one of those, that you know it but you don’t really know it, cause that is the ONLY part I remember! LOL!
That was what went through my head for an hour and half, over and over, as I created these projects 😀
Before I go forward-dont miss your chance to win some MYTIME MAIL——>HERE<—–. All this talk about “lights”, made me remember to remind you. I have read EVERY comment, and each one has made my face “light up”! Literally! Thank you SOOOOO much!
I am also going to pick a random winner tomorrow, for THIS post, and that person will receive ALL 5 items made by me in this post. So don’t forget to comment if you would like to have them.
OK, now I want to take the time to introduce you to the BRAND SPANKIN NEW!!! company I am guest designing for called Our Daily Bread Designs. Please read through her site for stamp sets/prices/shipping and other info. This set will be availablele soon. I believe she will slowly add to her collection.
The owner/designer is named Kelley Holland, and you can view her blog–>HERE. She has been so sweet to work for.
Kelley contacted me a few months ago, and told me her vision, for her company. I liked what she represented!
I was so excited to be able to try and help her out, but cannot commit to another Design Team full time, so I am going to guest design for her. All this design work for me is PURE fun, joy and play!! I love it and enjoy it, and do my best to KEEP it that way. I don’t want it to become “work” and stress over it, even though I take it all very seriously. Does that make sense???
Anyway……………..
She already has a team of AMAZING girls, that I’m sure will really rock out these sets! So check them out HERE
When I saw this first set Light of the World, I went crazy! I knew she would be onto something here! It also takes me back to being a child, and our family trips to the beach in Maine. GREAT memories. I still take my own children there every year.
I hope you enjoy what I made during my “break in” of the set.
You know I don’t own ANY lighthouse images? I had an old SU! one YEARS ago, but sold it. I missed it, after it was gone!
Anyway here is what I did with it-
The top card of this post, was done using twinkling H2O’s, so this really shimmers!! Its very simple, and you may not see, the lighthouse was cut out, and placed on dimensionals. Simple yet striking in person. I wanted simple black and white so the soft/shimmery colors would just POP!
Next up is my FAVORITE
 Sandy Beach set
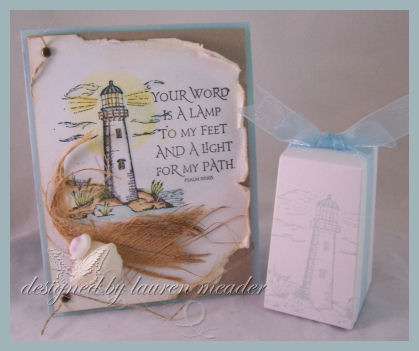
I so love this because it has real seashells in the corner (from my honey moon in Hawaii, and the husk from a coconut tree on the beach). Its just got a very earthy, beachy feel to it, with like colors.
The box was from a set of Wedding Favor boxes at Target-40 pieces on SALE for $6!!!!! Now that ROCKS! All I did was stamp the light house with my soft sky ink, and pop the box together-seriously too longer to clean the stamp, then to create the box! LOL!
My next card also uses the same beachy colors.
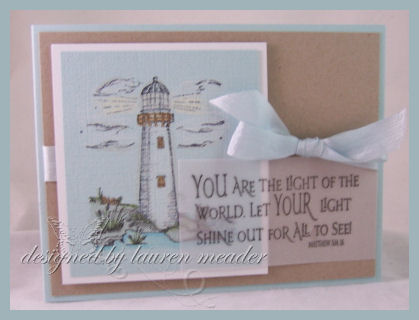 Shining light
This one the main image was done on textured sky cardstock, and colored with some Copic’s but mainly watercolor crayons-left unblended. So a very different look for all 3 card creations here. I love the POP of color this has. You can see the lighthouse is white in person.
Very clean and simple, yet soothing. I like the softness of the vellum layer, as oppose to the heaviness of an additional layer for my sentiment.I feel it would have overpowered my softness of my main image.
Lastly- I HAD to do a candle!!!! It smells amazing too! Just stamped the lighthouse in Bordering Blue, then the words in Brocade Blue.

Thats it for today!
Hope you are inspired by this set, and it finds a place in your collection! It can really make some nice things to “brighten” someone’s day, or give them the lift they need.
I’d love to hear your thoughts on it.
I still have some MFT and a bunch of other stuff to share so stay tuned OK!
Till tomorrow!!!

Happy Blog-aversary to me! GIVEAWAY!Sketch, and a tutorial! WOW
Mar 15, 2008 Author: mytime | Filed under: Cards, Mytime Mail, Saturday Sketch, TutorialsWOW! It is so hard to believe I have been blogging a year! TIME FLEW BY!
I never thought “I” would have a blog, let alone one people would actually VISIT!!!
I have come to get to know SO MANY of you, and you have read my babble on who knows what, for however long. You share with me and make me laugh and sometimes cry. Its just an amazing craft to be a part of, and stamper’s are the most amazing and giving/friendly people. You are all also so very supportive-so I thank you!
I want to celebrate my time here with you by giving back. Why? Because of of you totally make my day by checking in and even sometimes commenting, and sharing 😀
That means MYTIME MAIL!!!!!

In this package the Random.org winner will be drawn on Monday. Its a value of over $50!
This will make Monday a happy day for someone ( I hate Monday’s). I put together a package of some of my favorite things.
The winner will receive the following-
My Papertrey Party Pocket set filled with 6 different Studio G stamp sets.
Current issue of Paper Crafts April/May 08. I have a project using Beautiful Blooms on page 68!!!
A acrylic set by Inkadinkadoo-has sentiments, flourishes and butterflies!!! SO ME!!!
A Stampin’Up! Accent’s and Elements kit
AND an SEI complete card kit! (I love SEI!!!)
All you have to do is leave me a comment. Tell me why you visit ME here. What you like or take away, if anything. OR what you want me to do in the future! Make it a better place to come to visit.
If you do the sketch that lets you enter AGAIN!!!!!
Remember you have till Monday!
——————————————————————————————————–
Now it’s Saturday Sketch time-and a tutorial! WOW! A lot in ONE day huh?
What did you think of the PTI release? WOW! Huh?
Did you check out all the gallery of amazing ideas put together by the Design Team? Check in the March 08 Release!
In case you missed this one:
Here is the Sketch-Since Im doing a tutorial on the umbrella-it would be really cool if you could try it. If not just use the sketch. It still qualifies for ANOTHER entry, if done by Monday morning

If you try it please leave another link in the comments section.
I wanted to share with you how I made this card, for the Papertrey Ink release today!
NOTE: I will share a different project each day till they are done, along with whatever else I have to share.
 Shower of LOVE
I was inspired to create this by the sentiment, and the top decoration of the label! Plus I LOVED that patterned paper, and needed to showcase how nice it is!
SUPPLIES:
This is a cute shower card or invitation for baby or bride, using our pretty patterned paper as your umbrella!Stamps- Boxes, Bags & Tags, Favor It Weddingscardstock- PTI select white, Berry Sorbet, Sweet Blush
Patterned Paper-Pink Pattern Collection
Ink-PTI Palette in Berry Sorbet, Sweet Blush
Ribbon-PTI blush twill
other- wire, oval coluzzel, sm. oval punch, 1 3/8 circle punch, scallop punch, swiss dots embossing folder by provocraft
DIRECTIONS! Click to enlarge photos
You want to choose your paper first. Then decide if you want to use a round cutting template, or an oval. Either will work. The sample card at the top uses the circle, the sample card at the bottom uses the oval. I used a Coluzzel cutting template for these.
Follow same directions for either shape.
1) Cut three 1/2 circles or ovals
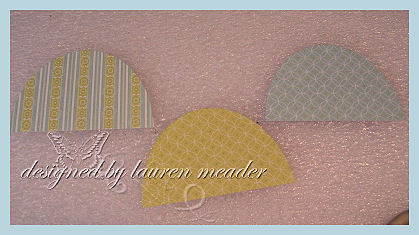
2) Take the 2 paper’s which will be your sides, and place them patterns facing together. You have to trim them together so the side panels of the umbrella will be EVEN!
Trim into a crescent shape, leaving points in the middle
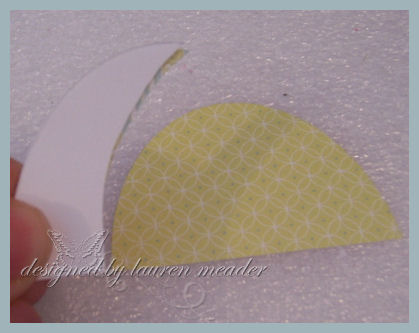
3) Adhere the panels to the main umbrella base. Now use your SMALL oval punch, and slide bottom middle into punch.
You will hardly see the end corner’s of the side pieces. PUNCH.

4) Now the edge pieces. Put your side in. You will put the piece in until you see the corner of the center piece. PUNCH.
Do this for both sides
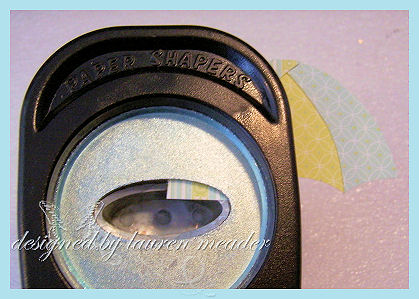
This is what it will look like-after punching

Now here is the finished card!
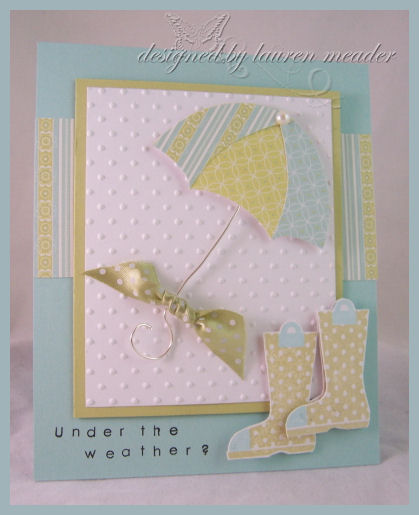
I used the new Simple Alphabet to create my sentiment.
This used Papertrey Ink Green Thumb, Simple alphabet, Everyday Blessings Patterned paper, Polka Dot ribbon in Spring Moss, PTI Select white, Spring Moss & Aquamist ink/cardstock, Polka Dot embossing folder, wire, coluzzel.
Well that is ALL!! I hope you enjoyed the tutorial and find time to give it a try.
I still have my guest designer stuff to show you-I SWEAR that will be tomorrow!!! I want to give it the proper attention!!!
It’s been a insane week here. I have so much still to do. I forgot this week is EASTER party stuff for the kids!! Now I gotta get cracking on some deadlines and get that stuff done too!
WHERE is March going? WOW! Time is whipping past me.
Once again, thank you so much for the support and checking in here.
Till tomorrow!
5-4-3-2-1 Blast OFF! Boy themed birthday
Mar 14, 2008 Author: mytime | Filed under: blogger challenge, CardsYEAH! Its Friday!!! I feel this card I am sharing today-BELOW- represents my week! In a good way. Im on another MISSION today 😀 And tomorrow is my Blog Giveaway!!!! Check back 😀 1 year of blogging!
I have SO much I have to share in the next few days I could be here ALL day uploading-but I have to wait. Things to do here first.
I have had quite the BUSY week! Bursts of energy. Which when I really want to do something, I pull it from the bottoms of my toes and RUN!!! THEN at some point I CRASH AND BURN!
Not only have I re-done the girls room this week, had a million errands, appointments, and creations pumped out (more to come!) yesterday I started Noah’s room. I have to finish that today, so we can get the items we need to finish it all up (including Amber’s bed and blah, blah, blah)
Noah is BEYOND excited we are changing up his room. Both he & Amber helped move everything out, and wash baseboards and all that fun stuff. They did a excellent job too-Mommy Approved!
He made me move his carbed 3 times-before he was “set” with where it is now. He is JUST like me in SO many ways its almost hilarious. Now I know what its like to deal with ME! LOL!
Unfortunately I didn’t get it all done since it was started late, after my shopping trip to Target, where I only went in to get a couple items for a care package for my nephew, and turned into a $262.22 trip!
Jason was like “How do you go to Target for some coloring books, and manage to spend almost $300?!”
Me-“Um, we needed “stuff, and there was sale!” (Thank God I didnt get the CARS themed carpet pieces at $50 a box (half off!!! and I still want them), he would have had a STROKE!) Keep in mind too this is all MY spending money 😀 Not house money-so he really can’t complain TOO much……….right?
Now ALSO keep in mind, I got some ROCKIN sales! I got decorative items to finish the girls room, and Noahs room.
HERE is where I go into a rant about stores-so feel free to skip it!
Now here is the FUNNY thing-you go to the KIDS section for a bookshelf. There is one that I wanted for ONLY $60!!!
OMG! are you kidding?
So, I stroll on over to the FURNITURE section-bigger, better bookshelf-actually looks like a nice piece of furniture for ONLY $30!!
Now WHAT is up with that???? And fabric lined baskets for $24-when I can go to M’s and get them 1/2 off for like $6-$9!!
Anyway, I was really annoyed with that find. I felt it was like “Oh if you want your kids room to be perfect we need to double the price. ”
I also almost bought this wooden cube holder ($40)-you know its a cube shelf, that holds those fabric soft boxes, to prettily store your crap. I decided to go with the wire cube holder (only $12 and I have the same in my stamp room) and perfect for a boys room! Will make just as nice of an addition.
The cost of things that KILLS me is CURTAINS!! OMG! SIMPLE curtains-ONE panel (what is up with that $24!) and thats cheapie curtains. Not the nice ones you REALLY want!
Noah’s colors are like a Navy blue and a real red. Nice boy colors-that can run into teen-hood.
OK my tangent is over-I just wanted to open your eyes to SHOP around!! Similar item, if not better item, in a different section-different price!
———————————————————————————————————
WHEW! Sorry about that. I had to just get it all out! I feel so much better 😀
Now about the card-this weeks blogger’s challenge was to create a birthday card. Everyone seems to get stumped for BOY cards-so here you go!!! (I will also post the get well boy card soon)
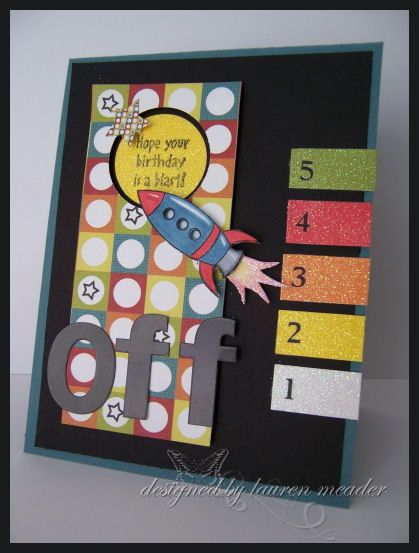 5-4-3-2-1 Blast OFF!
I LOVE this set Out of This World. Makes GREAT boy cards.
I immediately had this idea for a countdown! SO I got my DCWV glitter stack, and rub-on’s and away I went!! (WHERE was Nichole’s Simple Alpha when I made this????)
The paper is by Polar Bear Press, as are the sticker letter’s used for the OFF
The rocket was stamped, colored and cut twice-holes punched out of the windows-glitter on the FIRE!!
Its just a really cute card-that was actually REALLY easy! Again I so wish I had this or Noah’s Birthday invites when we had it at the Space Center.
Alright I really got to run!
SPEAKING OF COUNTDOWN- Dont’ miss the Papertrey Party tonight—HERE! 10pm EST.
Debbie has a pretty project using some peeks—-> here, and Amy has 2 projects on her blog (LOVE the tin AMY!!!)—-> HERE
Well thanks for checking in here today! Check out the other blog challenge players if you can!
Remember tonight-PTI release, tomorrow Blog giveaway, AND Saturday Sketch (which will include a tutorial for one of my PTI projects!!!)
Back here tonight-I hope to be able to post a few projects with a NEW! Company I am guest designing for. I think you will LOVE what I have to share.
Till then!
Can’t smile without you-
Mar 13, 2008 Author: mytime | Filed under: CardsI have a bunch of friends, going through a bunch of bad times :C
That makes me a bit sad.
When I was a little girl I would always sing this song, and I still LOVE it! So this is to anyone who needs a little something today, or hurts for someone in their life.
LISTEN TO IT —–> HERE! Open it in another window, and read along ![]() I hope it cheers you up!
I hope it cheers you up!
Here are the words:
Can’t Smile Without You-by Barry Manilow
You know I Can’t Smile Without You,
I Can’t Smile Without You,
I can’t laugh
and I can’t sing,
I’m findin’ it hard to do anything.
You see, I feel sad when you’re sad,
I feel glad when you’re glad,
If You only knew what I’m go ing through,
I just Can’t Smile Without You.
You came along just like a song
and brightened my day,
Who’d’ve believe that you were part of a dream
Now it all seems light years away.
And now you know I Can’t Smile Without You,
I Can’t Smile Without You,
I can’t laugh and I can’t sing,
I’m finding it hard to do anything.
You see, I feel sad when you’re sad,
I feel glad when you’re glad,
If you only knew what I”m going through,
I just can’t smile.
Now some people say happiness takes so very long to find.
Well I’m finding it hard leaving your love behind me.
And you see,
I Can’t Smile Without You,
I Can’t Smile Without You,
I can’t laugh
and I can’t sing,
I’m findin’ it hard to do anything.
Y ou see, I feel sad when you’re sad,
I feel glad when you’re glad,
If You only knew what I’m going through,
I just Can’t Smile Without You
—————————————————————————————–
Now doesn’t that make your day?
Here are the cards I had to send to some of these special people!
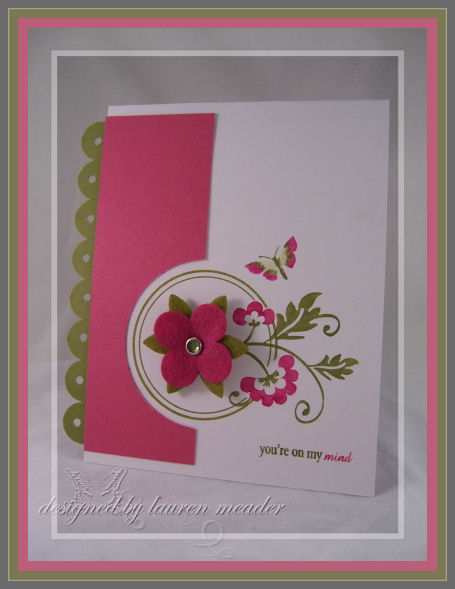 On my mind
This sentiment speaks volumes! Its called Heartfelt Phrases, and I LOVE IT! I used it for both my creation’s today.
You could give this anytime. But for my special friend, it says it all!
I went with the “out of the box” theme again, and found this to be a very cheery card, when all was said and done. The felt flower from SU! added so much texture. I love the circle cut-out, and the scallop border!
The flower flourish is the same from yesterday-HERE
Jason informed me that is card was GROSS! He hates the green. What does he know?
This was done using the circle from Border’s and Corner’s set. I love how elegant and clean this is. SIMPLE POP!
Next up, another card for a friend
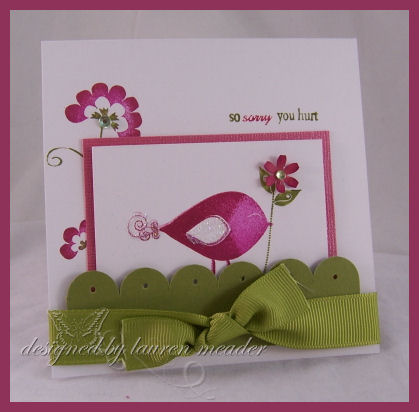 So Sorry
This card uses Anniversary Birds. I just inked it up with some various pinks by Colorbox. The flower in the back is Elegant Flourish by Hero Arts. I liked it popping out from the back.
In stead of grass, I let my bird sit on the scallop ground 😀
Just a simple card to cheer up a friend.
Told you Ive been on a spender bender! YIKES!
Well thats it for today. As always LOTS to do. Hope you enjoyed today’s post!
Id love to hear a song that cheer’s you up, or you sang as a child.
I use to always sing -You are my sunshine too.
Well have a sunny happy day!
Till tomorrow-
3-Papertrey Party Package PEEK!
Mar 12, 2008 Author: mytime | Filed under: Cards, Home decor/3-D items, TutorialsAre you enjoying the peeks of the upcoming Papertrey Ink Release?
I cannot tell you how excited I am to be able to share in Day 3 of the PARTY!!!
As you may have read, this month is a Celebration theme for the release. What better way to celebrate than an all occasion party themed card and matching gift bag!
You know how much I love co-ordinating cards/gifts. I especially love one’s that can be easily created.
Papertrey Party Package

When I saw the set’s to be released this month I was absolutely ecstatic! (OK I know that is every month, but seriously!)
I fell in love with It’s a Celebration by Candice Agulair.
The adorable pennants just screamed PERSONALIZE ME!
Then, when I saw the Simple Alphabet- I screeched! YEAH! This is just perfect. I have been dying for a quality mini clear alphabet set. This has upper & lower case letter’s, as well as number’s and punctuations. It will retail for only $15! A MUST have. It stamps like a DREAM! No squishy unclear letters. FINALLY!
Throw in the New! Color’s Sweet Blush & Berry Sorbet, and I can’t get any happier! Well I can ,once I saw the patterned paper………………..:D
OK enough rambling! Let’s get to the details!
Party Pocket
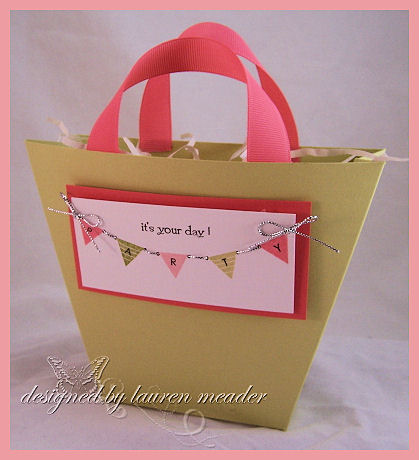
Now this one is FUN!!
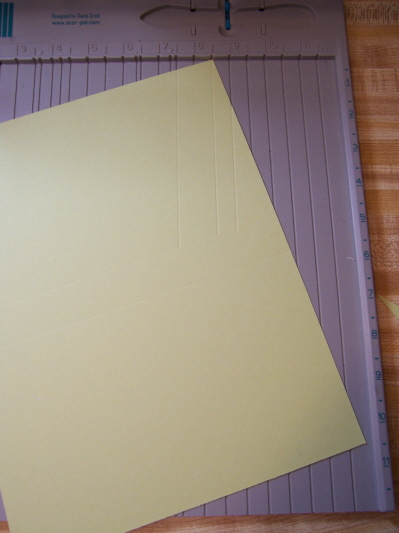
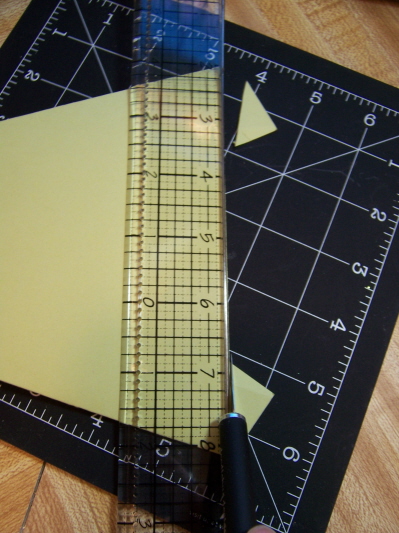
Supplies for Pocket
Scor-Pal, 8 1/2 X 11 piece of Spring Moss card-stock, ruler, hobby blade, redline tape, and Berry Sorbet grosgrain.
Directions for Pocket-click photos to enlarge
1) Take Spring Moss card-stock, and along the 11 inch side-score at 5, and 6 inches.

2) Turn paper to 8 1/2 inch side, and put top corner at the 8 1/2 inc mark, while bottom corner is at an angle, against the edge of the Scor-Pal (or 101/2 inch mark if you don’t have a Scor-Pal). Score at 7 1/2, 8 1/2, then 9 to the center score line for bottom. Turn card-stock and repeat step for all 4 corners.
3) Cut excess cardstock away. Score bag edges. The wide end, folds in, and the little fold, folds out. Trim excess at bottom panel as well.
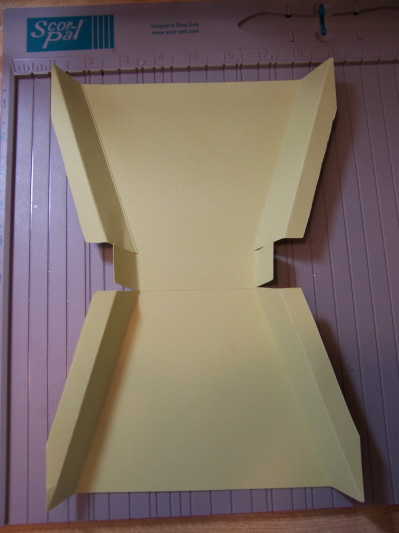
NOTE: PrintableTemplate below for quick reference-click and print.
 If you are unsure what to cut off get rid of the dark gray!
4) Fold the ends, into the center. Take a ruler, and hobby blade. Trim excess card-stock. This is so you get even sides.
5) Apply adhesive to sides. Tuck in bottom folds first. Then fold pocket in half to adhere end pieces evenly.


6) Cut 2 even pieces of wide Berry Sorbet Grosgrain, and apply red-line tape to bottoms. Adhere inside bag. Then attach your pennant to the front.
Supplies for Pennant
Banner stamp in plain and stripped, ink of choice (spring moss, berry sorbet, sweet blush, old olive, and black), 1/16 hole punch or paper piecer, Needle, silver cord (or color of choice)and glue dots.
Directions for Pennant-click to enlarge
Figure out how many pennants you want for your banner. Choose your colors/and or word to be spelled.
1) Stamp the MIDDLE pennant FIRST! Then work your way from there out. This will ensure an even banner.
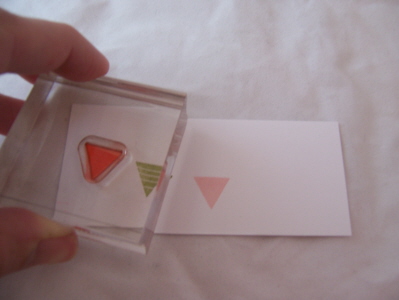
2) Use your Simple Alphabet, then stamp desired word. In our case P A R T Y.
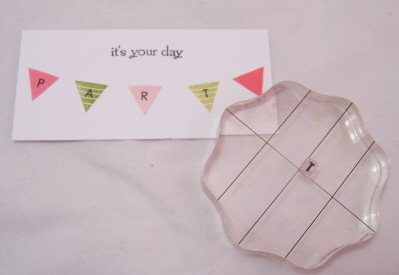
3) Use a 1/16 hole punch, and punch holes on either side on the pennant corners. You may also use a paper piercer. You want your holes to remain small, so it appears that your pennants are hanging from the cord!
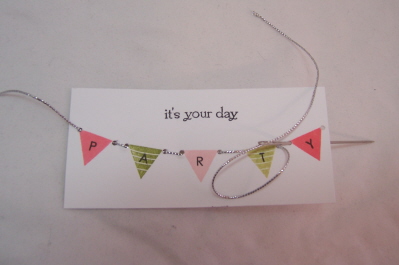
4) Thread your cord through the holes. Adhere to back.
5) Tie 2 separate bows using silver cord, then adhere to banner ends with glue dots.
6) Layer onto Berry Sorbet card-stock with dimensionals, then attach to the bag! DONE!
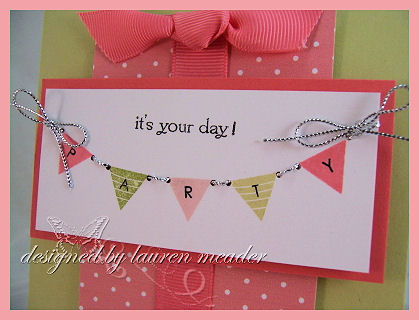
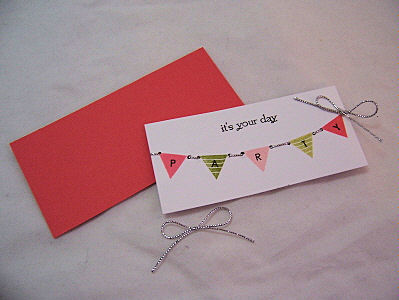
For the card!
Finished size- 4 1/2 X 5 1/2. Card base made with Spring Moss card-stock.
I followed the directions above, and created the exact same banner for this card.
I used the Pretty Pink Polka Dots, from the Pink Patterns Collection. I thought it made the perfect “gift”, tied nicely with my Berry Sorbet grosgrain.
The patterned paper is YUMMY!!! You know how much I LOVE pink!!
Once the reveal hits, you will be able to see just how much I enjoyed using it. FYI-MORE tutorial’s to follow too!
I LOVE the color’s and assortment of design’s offered in the set. I especially LOVE the option of buying 6×6 or the 12 x 12. As you can see by the photo, the paper is a Perfect Match (HE!HE!HE!) to the ribbon and ink.
One question I have been asked is how does the Berry Sorbet’s paper/ink/ribbon compare to Stampin’ Up! Groovy Guava-since that was not a color compared on Nichole’s original post.
Here is a photo:
Top Layer on Left is Papertrey Ink Berry Sorbet.
Bottom Layer on Right is Stampin Up! Groovy Guava

As you can see they are VERY different. Guava being more orange in tone.
Well that is it for me! I am so honored to have been able to take part in this today! I really hope you enjoyed my part of the peek!
Make sure you check Nichole’s blog each day till the release! There will be sneak peeks, as well as an additional daily sample, provided by an assigned Senior Design Team member!
Lisa’s stamped twill-HERE
and
Pine’s scrap page-HERE
Till tomorrow!
Out of the box-long winded but worth it! ENABLER ALERT!
Mar 11, 2008 Author: mytime | Filed under: CardsOh my word-its ONLY Tuesday? Seriously! This time change is really killing me. Im in the mode where I say-I know the clock says 6 am, but its really only 5am. This whole spring ahead is for the birds!
Oh the week has already been so long :C It’s practically in REWIND.
My body hurt SO BAD from all that work yesterday that my limbs were throbbing! It woke me up from a sound sleep. WOW! I think I REALLY need to get into a serious workout regimen. Oh yeah, and some Motrin.
For all who have asked, my finger has been OK! When I painted I just kept it straight on the roller. I really didn’t have to use it. It doesn’t hurt anymore at all. Unless you were to squeeze it-then we may have a problem.
Anyways, I want to share a few cards with you today that I actually MAILED!!!!! WOW!! THAT is a miracle. I did of course MAKE them specifically for each recipient.
Now since this behavior, of actually “mailing cards”, is out of the norm for me (LOL! :D) I figured I’d create some cards with an “out of the box” theme!
I HOPE you will try one this week too. It makes a simple card a real WOW! Send me a link if you do.
Now I don’t mean OH WOW! Super cool, revolutionary idea, but one I LOVE and don’t use often enough! Also the images I purchased really made this work. I really went on a SPENDER BENDER at this stamp store in Concord NH, called Arts Plus.
 Peacock of color
This card was done using 2 new Hero Arts images! I fell in LOVE with them!!! LOVE!!!!! Now I am going to post about these stamps for this card, as well as some past one’s! I know I got loaded with emails about certain images, that I failed to LINK! Sorry!!! I know I HATE when I need to know WHO makes WHAT and I can’t find it.
This card uses the Ornate Bird—–>HERE, and Flower Flourish—–>HERE
This was for the woman Ilysa who made Alexa the Prayer Bottle from Polymer Clay. She makes them, then sends them to Cancer patients! What a wonderful thing to do.
I have been wanting a “peacock” sort of image for FOREVER-no idea WHY I just did! This one was just gorgeous.
I had to use one of my favorite colors-purple, and teal with olive. Its a stunning combo. Oneof my cards like 2 years ago was picked for the SCS Color challenge! It was a color combo inspired by a tampon commercial!!! SERIOUSLY!!! I went there! AND Im happy I did, because I truly love the combo.
Anyway-I colored my image with markers first, then stamped my bird onto my card base. This card is 4 1/2 squared. Then I re-stamped it onto some white Eclipse tape (this works WAY better than sticky notes), and yes is a must have! I did the same with the flower flourish. Masked over the images. I then stamped my square from the Borders & Corners set. I chose to use the sentiment from a SU! SAB set. Colored in the border, and added some dazzling diamonds to the bird. The flower center, and bird wing has a rhinestone added-then DONE!!! Ribbon is from Michaels-paper is Martha Stewart!
Now I got alot of emails about the little owl I used ——> HERE. This is it—–>HERE
Here is the birdcage, I used —>HERE
OK WARNING! ENABLER ALERT!!
Now upon linking the next set for the card I did you HAVE to check—–>THIS<—–out!!! CUTE or what?! I need them all! LOL!
Anyway I got this Flourishes set, and had to make like a hundred cards!
Anyway-I love it, and came up with this-
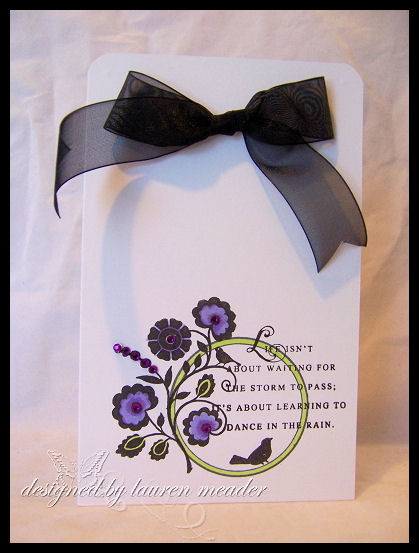 Weather the Storm
Yes, I was into purple that day! The flower center’s all have rhinestone’s.
This card didn’t need masking due to the image style.
I stamped the circle from the Border’s and Corner’s set, using GRAY!!! Now this is a great tip if you are stamping OVER the image! Its a subtle difference, and you wont see the LINES from it in the MAIN image! This allowed my sentiment to be seen, even if the letter of a word crossed over the circle border!! Clear as mud? The sentiment is from the Everyday Blessing’s set. Even if you aren’t a big “Cross” fan, the sentiments alone are worth every penny!
This was a tall card-6 X 4 1/4. I loved the simplicity of it.
TOMORROW I will share 2 more cards-one is out of the box style, and the other is general. They both have the same combo of colors-Pomegranate and olive! VERY pretty!!
So I hope you will check in with me again then.
On another note: If you are STILL reading…………………………….
I was tagged by Tracy, so here are 7 RANDOM Facts about me-
1) I collect Wheaton Glass bottles! You can view some on EBay—–>HERE, if you want to see them. I have a huge collection 😀 I started collecting them about 4 years ago and have over 100! They can really be worth a pretty penny for some, and I do have a few that are worth quite a bit! My favorite piece is a ruby red glassdecanter, with a heart and birds on the front. I also have a few blue glass pieces that I cherish. Each one is different! It has to have the Wheaton signature on the bottom to be a REAL Wheaton. There are many places that reproduced them. We live 20 minutes from “Antique Alley” and I have scored quite a few from there. Onve I went to a yard sale, and got a big box of miniature Wheaton bottles-for a $1!!! They obviously had NO CLUE that they were sitting on a gold mine!
2) I always wanted to take a photography class! I use to want to be a photographer and thought it would be so fun to get a REALLY nice camera, and take photos. BUT since getting into stamping-and HATING to photograph my stuff, that most likely will not happen. I may take a graphic desing class-SOMEDAY!! We will see.
3) I am really bad about remembering to post tags and awards!!! SORRY!! My brain works like a million miles a minute, and I always just forget :C I am also bad about tagging! I sometimes feel like I could hurt someone’s feelings by NOT including them in the “game”, plus I get really busy and don’t honestly get to blog hop that much :C
4) I cut my own hair! When I do-because its naturally curly, I just part it in the middle, then take about 2 fingers from the bottom a chop!!!! Since its curly you can’t tell if iuts choppy or uneven! LOL! I do like to get it done every now and again but rarely have time.
5) I HATE most store brand food. I don’t care what people say, some of it DOES have a different taste! Such as peanut butter, store brand chocolate and cereal. There are some other items too, that I am failing to remember right now. I won’t eat them, and it drives Jason CRAZY!!!!! Even some CHIPS are nasty!
6) I am a shop-aholic. OK so this isn’t shocking. When Im sad, upset, happy-whenever! I got this inherited from my grandmother. She taught me young. When I was like 5 we would go spend the day shopping at Sears, and other stores. She would buy me like $500 (yes 20 years ago-$500 I’ll never forget those totals cause I would say “Grandpa is going to KILL you!!!”) worth of clothing. Sears would see her come in, and they knew her by FIRST NAME!! “Well Hello Ann, how are you today?”
CRAZY!! I think it began from there. It felt SO good to do that! Of course “I” dont spend that kind of money but that feeling is the same. I LOVE the $1 spots! I can spend $50 at the dollar store. Jason will say $50!! Im like yeah, but I got 50 things!! How cool is that! I also am known many places by first name because I shop there frequently :C YIKES!
7) My girls middle names are from their Grandmother’s. Alexa s after my mother’s mom, and Amber is Jason’s mother’s mom. I think its a nice form of respect.
When it came to Noah on the other hand-I just said you know what I like the name Riley-so that is what Im going with! Jason’s family has a tradition that the son takes the father’s FIRST name, as his middle name. I was NOT naming Noah -Noah Jason Meader! NOPE! Sorry!
WHEW! Super long post. Sorry about that.
Anyway if you haven’t (and I know you probably have) check out the Papertrey sneak peeks! Oh yeah, and feel free to list 7 facts about yourself here if you like!
Till Tomorrow!!!
WHAT was I thinking? NSR (non-stamp related)
Mar 10, 2008 Author: mytime | Filed under: My family stuffOh man. I hurt. But I feel so happy that I wanted to share it.
Do you ever get an idea for a project (OK non card project), and once your decide to put that project in motion you CAN’T wait?
Maybe its my OCD? I always make “lists” of things to do, and cross off as I go. I get a thrill everytime something is accomplished.
Well “I” got the bright idea to re-do the kids rooms Sunday afternoon. Just sitting there looking at all their CRAP!
So we went and bought what I thought was needed.
UGH!! WHAT WAS I THINKING?
I felt the rooms needed a make-over, a face lift of sorts. Also it wastime for my quarterly room review! This is when I got through all their toys and weed out what we don’t need, won’t use, and have wrecked or outgrown.
Since getting this “idea”, I was told by Jay we would execute it this weekend. Together we we purge, organize, paint, move furniture scrub every little thing owned.
Girls room first-repaint, new bedding, curtains decor-you get the idea. Amber needs a big girl bed-she is in a toddler bed now.
Well I woke up, had a good cup of coffee, and instead of stamping “I” spent the ENTIRE day puring, organizing, moving furniture, washing everything-walls, windows blinds nick-knacks you name it, and YES! Painted the entire room myself-all done and put back together, before Jay even got home!
The room looks so clean-and sweet. Once I finish the last details it will be perfect.
Now I hurt…………………………….everywhere!
Their room is now a pretty SOFT yellow, with like a Pink Passion and touch of orchid opulence!
Its a girly room-with alot less clutter, and their Princess and other girly things look great!
This weekend we will get Amber’s bed and a new rug. I also want to get 2 plastic picket fence panels to use as their headboards-then hang a flower garland across them.
Then-onto Noahs room! I am tempted to do his tomorrow-BUT I need to go to Target first to get his room decor stuff.
Despite the pain, I feel SO much better now that most of the work is over!
OK Sorry to ramble-I just had to let out a huge sigh and relish in my accomplishment of the day.
I also got the houser cleaned and dinner made-now THAT is a true miracle. Tomorrow is definitely Pizza night! Oh yeah and totally a stamp day-all three have school! YEAH!!!!
Well thanks for reading-if you did! LOL!
EDITED TO ADD: I will share photo’s once I get Amber’s bed and and the carpet 😀 Oh yeah- and its not anything like a pottery barn catalog! I wouldn’t be able to let them play in it if it was! LOL! So sometime next week I should be DONE getting the accessories
Punched Paper Challenge
Mar 10, 2008 Author: mytime | Filed under: CardsWell I hope you are up for a little challenge!!! This should slap you out of “no mojo” mode if you feel like you are in a bit of a rut.
We all have patterned paper-probably tons more than we could ever use in a lifetime-yet we always buy more! LOL! OR you could totally make your own patterned paper (wow! remember those days? LOL!) for this as well.
Some pattern’s become your most favorite, and cherished. Other’s not so much. Either way there is a great use for all those scraps.
I always like to find new ways to highlight or use my things. I also like to pack a lot of “punch” (no pun intended) with a clean and simple-yet finely detailed card.
I was messing around the other night with this idea, and executed 3 looks. I hope YOU will try this out, since it is a ton of fun!
CHALLENGE :
You need to create an open space-be it with punches, or using a hobby blade/paper snips to cut out part of an image, and layer behind it with patterned paper! Be sure you use dimensionals to get that LOOK! Its very important.
See my samples below-or think: instead of paper piecing the object-cut it out, and layer the paper behind it.
Card 1- Have Faith
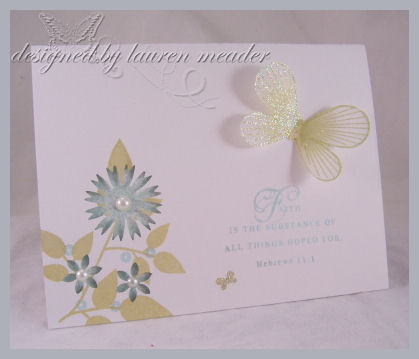
I made this for a friend who is going through a difficult time right now, and I think this message will help her.
This card was done using-Beautiful Blooms, Butterfly Kisses, and Everyday Blessings.
I stamped the leaves in the corner using Spring Moss ink-then used some various paper punches for my flower’s. After they were punched, I layered Everyday Blessings paper underneath, using dimensionals! Added some pearls to the centers. REALLY PRETTY in person.
The butterfly was done using Craft ink-on vellum card-stock-then embossed with iridescent ice EP. Its just gorgeous floating there!
I then realized I wasn’t sure I LOVED the flowers-I liked them-didn’t LOVE them. SO I amde another!
Card 2-With gratitude

Now this one is a little different-ALL the smae elements-stamps ink and technique, just the flowers are more round, like one of the flowers in the set, and I used the dotted image for the butterfly wings.
The butterfly is also “floating”-and shimmery-the photo just didn’t pick it up! Poor lighting today. Sorry-too lazy to get my photo set up out.
I just really LOVE this card.
Then I figured I needed to try something a bit different so I did this one-
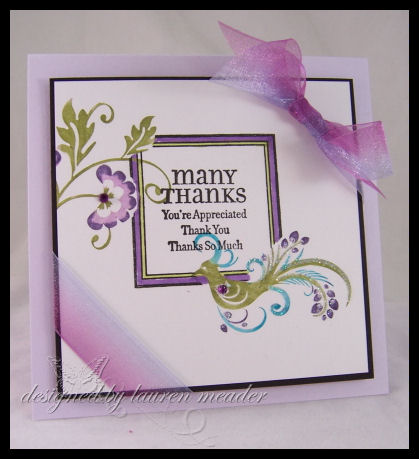
Card 3-So Many ways to say Thank You
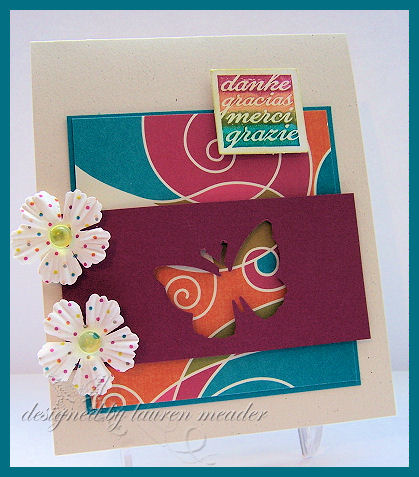
I just got this paper from Verve Visual-which I believe was discontinued my them.
Anyway-I liked the colors and pattern, and thought it would be PERFECT, for my UBER cool, big butterfly punch by EK Success. AND it was! I was thrown off by NOT using WHITE-but natural ivory.
I used the colors in the paper, and colored my sentiment from the Thank You set by Green Grass, using markers by SU! You can never have too many thank-you cards.
The flowers are Prima Got Prints, and match perfectly too. It was a card that came together very quickly.
So that is it! I hope you enjoyed today’s post.
If you have time try it out. Send us all a link here so we can check in on you and see how it turned out. I’d love to hear what you think of it.
Till tomorrow!
My Etsy

Who I Designed For
Blogroll
- Alicia
- Alli Miles
- Ally Blankenship
- Amber
- Andi @ crafts on a whim
- Angel R
- Angie Z
- Anne Kranitz
- Becky O
- Bee
- Beth Silaka
- Bethany Paull
- Beverly Nash
- Bobbie
- Cambria
- Cammie
- Card of the Week
- Card Positioning System (CPS)
- Cards for Cancer
- Catherine Doucette
- Charmaine
- Cheryl Sims
- Chriss Rollins
- Christina
- Christine Ewing
- Christine Wooden
- Colleen Schaan
- Craft Critique
- Craft Gossip
- Crystal
- Dawn Easton
- Emily Giovanni
- Geny
- Holly
- Igne Groot
- Inspirational Craft Blogs
- Irene
- Jami Sibley
- Jeanne Streiff
- Jen del Muro
- Jeni Bond
- JenMarie
- Jenn Balcer
- Jenn Diercks
- Jenn O
- Jennifer E
- Jennifer Mick
- Jennifer Pereda
- Jennifer-Sweet Treat
- Joanne Basile
- Jodi Collins
- Julia Stainton
- Julie Masse
- Karen
- Kathryn Berthiaume
- Katie Cotton
- Kelley Holland
- Kendra
- Kim Scholfield
- Kris’s Color Stripes! Get inspired here
- Kristen Dubosque
- Kristin Eberline
- Kristine
- Laura @ Sunshine Stamper
- Laura Turnmire
- Laurie Schmidlin
- Lesa Rapp
- Linda Duke
- Linda-LSN
- Lindsey Botkin
- Lisa (lakind scs)
- Lisa Kind
- Lori Craig
- Maggie
- Mara Campbell
- Maria
- Maria Levine
- Mary
- MaryJo
- Melanie M
- Monique Hansen
- Moxie Fab World
- Pam Imholz
- PaperCrafts Connection
- Peppers and Pollywogs Kids party site
- Rebecca Grohall
- Rita
- Robyn
- Rose Ann
- Sarah Vrolyk
- Sharon Harnist
- Sharon Johnson
- Sharon Rivera (a chemisrty with paper)
- Sherrie
- Sophia Landry
- Storage Units, Ink, & More Blog
- Sue Berker
- Susan (Rainy)
- Tangii Crane
- Tracy
- Tricia Traxler
- Trudee
- Velta
- VivLyn
- Zena
MTME Pretty Palette Color Team
MTME Pretty Patterns Sketch Team
My Time Made Easy TM LLC
Shop till you drop!
Lauren Meader
About Me
Copyrighted material
Subscribe To My Blog
Pages
- About me
- Alexa’s Story!
- My Crafty Corner!
- My Time Made Easy™ LLC
- Our Make A Wish Trip to Disney!
- Resume/Publication List
Calendar
Archives
- August 2013
- July 2013
- June 2013
- May 2013
- April 2013
- March 2013
- February 2013
- January 2013
- December 2012
- November 2012
- October 2012
- September 2012
- August 2012
- July 2012
- June 2012
- May 2012
- April 2012
- March 2012
- February 2012
- January 2012
- December 2011
- November 2011
- October 2011
- September 2011
- August 2011
- July 2011
- June 2011
- May 2011
- April 2011
- March 2011
- February 2011
- January 2011
- December 2010
- November 2010
- October 2010
- September 2010
- August 2010
- July 2010
- June 2010
- May 2010
- April 2010
- March 2010
- February 2010
- January 2010
- December 2009
- November 2009
- October 2009
- September 2009
- August 2009
- July 2009
- June 2009
- May 2009
- April 2009
- March 2009
- February 2009
- January 2009
- December 2008
- November 2008
- October 2008
- September 2008
- August 2008
- July 2008
- June 2008
- May 2008
- April 2008
- March 2008
- February 2008
- January 2008
- December 2007
- November 2007
- October 2007
- September 2007
- August 2007
- July 2007
- June 2007
- May 2007
- April 2007
- March 2007
- January 2007
Categories
- About Me
- All That Scraps
- blogger challenge
- camera/photo play
- Cards
- Contests
- family stuff
- FOR SALE
- Home decor/3-D items
- How to FAKE it!
- Introduction
- JUGS Challenge
- JustRite Stampers
- Lizzie Anne Designs
- My family stuff
- My Stamping Space
- My Time Made Easy
- My Time To Color Challenge
- My Time to Create Challenge
- My Timeless Template Challenge
- My Timeless Templates
- Mytime Mail
- MYTIME MOVIE/VIDEOs
- Papertrey Newsletter
- Pink Cat Studio
- Pretty Palette Challenge
- Pretty Patterns Sketch
- Product Opinions and Must haves
- Recipe's
- Saturday Sketch
- Smilebox Creations
- Stampavie
- Tutorials
- Uncategorized
- videos
Most Popular
- Create your own Onesie Card Tutorial-and important NOTE! PLEASE READ (2529)
- Saturday Sketch-Boxed bag holder (2333)
- Going GREEN! Fancy Flower Flourish-Closure Video (1478)
- Fabulous Favorite - Giveaway! (1336)
- a Prayer Request (1232)
- QUICK-Easter Baskets from Nestabilities-PTI style-and blog challenge (1063)
- Teaser Sketch (999)
- February Release Giveway! (and a little peek) (996)
- Group Post and Rambling Rose Video Tutorial (985)
- GIVEAWAY! Who wants it all?! (895)
Recent Comments (RSS)
- 첫충사이트: 완전히 흥미로운 블로그 게시입니다. 저는
- sarah: Wow, Lauren, what a stunning
- hedie: خرید راهبند
- 야동: Love to read it,Waiting For
- 야동: This seller is in a
- 바카라사이트: 여기 처음 왔어요. 나는이 게시판을
- 야동티비: I was surfing the Internet
- 바카라사이트: 비슷한 주제에 대한 흥미로운 정보를
- 바카라사이트: "여기에 제공해 주신 귀중한 정보와
- 온라인홀덤: 유익한 웹 사이트를 게시하는 데
Copyright © 2007 - My Time, My Creations, My Stampendence - is proudly powered by WordPress
This blog has been Tweaked and Designed by Sara Williams