Product Review on Scor-Pal-and a cute coverlet gift!
Sep 11, 2007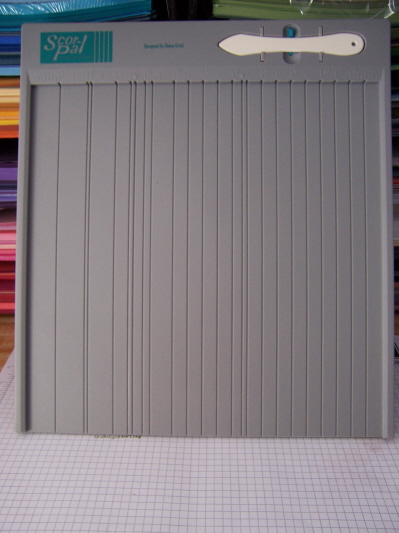 Its been a while since I posted a review and I’ve gotten alot of questions about the Scor-Pal since posting my Window Box Tutorial link , and my Make your own envelopes link.
What is the Scor-Pal?
Well in my own words, its a lightweight, heavy duty plastic board, with deeply etched grid lines, that enable’s you to make nice, deep, straight, crisp scores on the lightest weight paper, to the heavy duty cardstock without problems! You don’t even have to move your paper-unless you need to score going the other direction!
This tool was designed by Diana Crick, and can be seen HERE. It costs $39.95 plus S/H for US.
It arrives with instructions and a mini tutorial when you get it!
There are lots of great tutorials on the site, with photos, and step by step directions, which are very helpful. I myself an a very visual person! I often dont need directions but can figure it out by examining it. Must be my nursing skills shining through! LOL! More tutorials are planned in the future, which I think its neat for her to be so concerned that you get the maximum use from your Scor-Pal once its purchased! Alot of places dont care to continue to entertain uses for their product once its in your home.
Let me start by saying that before getting a Scor-Pal, I rarely scored my cards! I would often just fold them in half-then use a Pampered Chef stoneware scrapper (if even that) to get a crisp seam.
The result of that-due to heavy weight cardstock, would often be a cracked looking seam, sometime’s a bit crooked, and I would have to turn the card-inside out! NOT COOL!
The other way I would score my own designed boxes and whatnot was using my Fiskars Paper Trimmer
It had a scoring blade, that you could attach to the rail. While I didnt mind using that from time to time, it was annoying to change out the cutting blade, then keep sliding my paper along the the measurements I needed scored!
This is where the Scor-Pal comes in. I am now wondering HOW I made all that stuff I did without it! Since getting it, it has saved me time, and frustration, and gives me a real professional crisp line.
I planned on putting it under my desk after using it, but it hasn’t left my workspace since day 1.
I LOVE the fact that I dont have to even pick up my paper ONCE! I just score along the grid.
The grooves are deep, so no slipping out as you run your Scor-Tool down the line. I really like the little holder provided at the top of the Scor-Pal that holds that little Scor-Tool. I am one who would DEFINITELY “misplace” it if I didnt have that little holder! LOL!
It even had a button that allows you to POP it out of the holder! So no breaking those nails or getting annoyed that its “stuck” in there.
There is also a special slot under the Scor-Pal for another Scor-Tool! You can never have enough of those right? LOL!
The Scor-Tool in itself is cool because it’s shape makes it easy to grasp, and of course it fits perfectly in the grooves. It just has a nice “feel” to it, and isn’t made of anything that leaves those shiny marks on your paper like other tools might.
OK Now for the ONLY part Im not thrilled about. It really does need a few more scored grooves. Like at 1/4, 1/2 and 3/4 inch. You can of course start to score at the 1/2 inch mark, which you can find at the far end- 11 1/2 mark. This gives you that 1/2 groove. But there really is no beginning 1/4 or even 3/4 inch mark.
I have moved my cardstock along the Scor-Pal to get a groove where I need it, and at this point I’m OK with that.
I was told that a NEW Scor-Pal is in the works with MORE grooves! YEAH!!!
Diana is great about listening to what people think, and want.
At this point I use this tool EVERY time I stamp now! I feel like it was money well spent. Since I work on several design teams just mediocre work doesn’t cut it. Even if I weren’t I think we are always looking for ways to improve the overall appearance of our items.
I’m open to any feedback or questions you have!
Hope you get to try one out, or if you have one, lets hear your opinion on it!
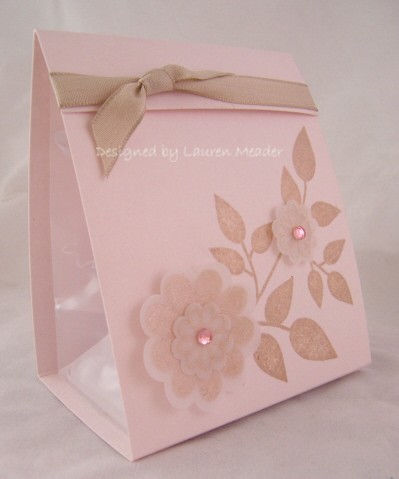
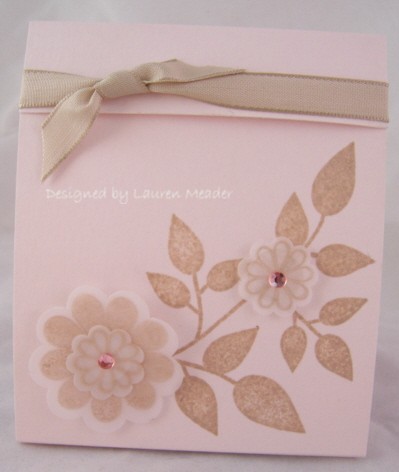
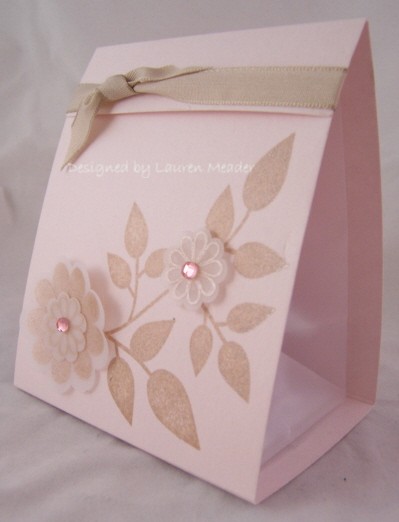
Here I would like to share a quick bag cover I made using the NEW! Paper Trey set Beautiful Blooms.
Click on photos to enlarge. I just cut the top off one of her frosted Tin Tie Top Bags, and made a cute coverlet. The top flap slides under the ribbon to keep it closed! How cute would these be for gifts or favors at a Bridal Shower or Wedding even!
Thanks for looking!

My Etsy

Who I Designed For
Blogroll
- Alicia
- Alli Miles
- Ally Blankenship
- Amber
- Andi @ crafts on a whim
- Angel R
- Angie Z
- Anne Kranitz
- Becky O
- Bee
- Beth Silaka
- Bethany Paull
- Beverly Nash
- Bobbie
- Cambria
- Cammie
- Card of the Week
- Card Positioning System (CPS)
- Cards for Cancer
- Catherine Doucette
- Charmaine
- Cheryl Sims
- Chriss Rollins
- Christina
- Christine Ewing
- Christine Wooden
- Colleen Schaan
- Craft Critique
- Craft Gossip
- Crystal
- Dawn Easton
- Emily Giovanni
- Geny
- Holly
- Igne Groot
- Inspirational Craft Blogs
- Irene
- Jami Sibley
- Jeanne Streiff
- Jen del Muro
- Jeni Bond
- JenMarie
- Jenn Balcer
- Jenn Diercks
- Jenn O
- Jennifer E
- Jennifer Mick
- Jennifer Pereda
- Jennifer-Sweet Treat
- Joanne Basile
- Jodi Collins
- Julia Stainton
- Julie Masse
- Karen
- Kathryn Berthiaume
- Katie Cotton
- Kelley Holland
- Kendra
- Kim Scholfield
- Kris’s Color Stripes! Get inspired here
- Kristen Dubosque
- Kristin Eberline
- Kristine
- Laura @ Sunshine Stamper
- Laura Turnmire
- Laurie Schmidlin
- Lesa Rapp
- Linda Duke
- Linda-LSN
- Lindsey Botkin
- Lisa (lakind scs)
- Lisa Kind
- Lori Craig
- Maggie
- Mara Campbell
- Maria
- Maria Levine
- Mary
- MaryJo
- Melanie M
- Monique Hansen
- Moxie Fab World
- Pam Imholz
- PaperCrafts Connection
- Peppers and Pollywogs Kids party site
- Rebecca Grohall
- Rita
- Robyn
- Rose Ann
- Sarah Vrolyk
- Sharon Harnist
- Sharon Johnson
- Sharon Rivera (a chemisrty with paper)
- Sherrie
- Sophia Landry
- Storage Units, Ink, & More Blog
- Sue Berker
- Susan (Rainy)
- Tangii Crane
- Tracy
- Tricia Traxler
- Trudee
- Velta
- VivLyn
- Zena
MTME Pretty Palette Color Team
MTME Pretty Patterns Sketch Team
My Time Made Easy TM LLC
Shop till you drop!
Lauren Meader
About Me
Copyrighted material
Subscribe To My Blog
Pages
- About me
- Alexa’s Story!
- My Crafty Corner!
- My Time Made Easy™ LLC
- Our Make A Wish Trip to Disney!
- Resume/Publication List
Calendar
Archives
- August 2013
- July 2013
- June 2013
- May 2013
- April 2013
- March 2013
- February 2013
- January 2013
- December 2012
- November 2012
- October 2012
- September 2012
- August 2012
- July 2012
- June 2012
- May 2012
- April 2012
- March 2012
- February 2012
- January 2012
- December 2011
- November 2011
- October 2011
- September 2011
- August 2011
- July 2011
- June 2011
- May 2011
- April 2011
- March 2011
- February 2011
- January 2011
- December 2010
- November 2010
- October 2010
- September 2010
- August 2010
- July 2010
- June 2010
- May 2010
- April 2010
- March 2010
- February 2010
- January 2010
- December 2009
- November 2009
- October 2009
- September 2009
- August 2009
- July 2009
- June 2009
- May 2009
- April 2009
- March 2009
- February 2009
- January 2009
- December 2008
- November 2008
- October 2008
- September 2008
- August 2008
- July 2008
- June 2008
- May 2008
- April 2008
- March 2008
- February 2008
- January 2008
- December 2007
- November 2007
- October 2007
- September 2007
- August 2007
- July 2007
- June 2007
- May 2007
- April 2007
- March 2007
- January 2007
Categories
- About Me
- All That Scraps
- blogger challenge
- camera/photo play
- Cards
- Contests
- family stuff
- FOR SALE
- Home decor/3-D items
- How to FAKE it!
- Introduction
- JUGS Challenge
- JustRite Stampers
- Lizzie Anne Designs
- My family stuff
- My Stamping Space
- My Time Made Easy
- My Time To Color Challenge
- My Time to Create Challenge
- My Timeless Template Challenge
- My Timeless Templates
- Mytime Mail
- MYTIME MOVIE/VIDEOs
- Papertrey Newsletter
- Pink Cat Studio
- Pretty Palette Challenge
- Pretty Patterns Sketch
- Product Opinions and Must haves
- Recipe's
- Saturday Sketch
- Smilebox Creations
- Stampavie
- Tutorials
- Uncategorized
- videos
Most Popular
- Create your own Onesie Card Tutorial-and important NOTE! PLEASE READ (2529)
- Saturday Sketch-Boxed bag holder (2333)
- Going GREEN! Fancy Flower Flourish-Closure Video (1478)
- Fabulous Favorite - Giveaway! (1336)
- a Prayer Request (1231)
- QUICK-Easter Baskets from Nestabilities-PTI style-and blog challenge (1063)
- Teaser Sketch (999)
- February Release Giveway! (and a little peek) (996)
- Group Post and Rambling Rose Video Tutorial (985)
- GIVEAWAY! Who wants it all?! (895)
Recent Comments (RSS)
- 야동: Love to read it,Waiting For
- 야동: This seller is in a
- 바카라사이트: 여기 처음 왔어요. 나는이 게시판을
- 야동티비: I was surfing the Internet
- 바카라사이트: 비슷한 주제에 대한 흥미로운 정보를
- 바카라사이트: "여기에 제공해 주신 귀중한 정보와
- 온라인홀덤: 유익한 웹 사이트를 게시하는 데
- 홀덤나라: 나는 당신의 블로그를 정말 좋아합니다.
- lisa: Technology, too, has left an
- 주소모음: 흠 !! 이 블로그는 정말
Copyright © 2007 - My Time, My Creations, My Stampendence - is proudly powered by WordPress
This blog has been Tweaked and Designed by Sara Williams
12 Responses for "Product Review on Scor-Pal-and a cute coverlet gift!"
Lauren, These are absolutely beautiful!
I have made several pouches with cello bags
for gifts put this just really steps it up a notch.
Thanks for sharing…
Wow, Lauren! I love it – simply beautiful! TFS on the Scor-Pal – you may have pushed me over the edge on that one!
These are stunningly beautiful! Now I need another toy!!
Wonderful Lauren! This is on my wishlist and thankfully a local Online Supplier here carries them at par with the US! YAH! I’ll be visiting her later this week!
Great review! I love my Scor-Pal as well! Your project is so lovely!
I also own a scor-pal and LOVE it — I do agree about the added grooves — and I am BUMMED that I might have to spend another $40 to get one (I really, really use that beginning flap of 1/4 or 1/2 or 3/4 inch a LOT…)
Maybe Diana will give a discount to folks who bought one and are going to “upgrade” ;^)* Let her know that there are several of us out there, I am sure!
Warm hugs for writing this — it is a MUST HAVE tool, I think!
Oh, one more feature that is not mentioned is how LIGHT this product is — sooooo easy to take with you to a workshop or crop… I like to support it with some stacks of 12×12 paper (which are not light) but it is not a heavy board, like some of the other scoring boards out there.
I am thrilled you all love your Scor-Pal. Yes there will be a special price for previous Scor-Pal owners. We are offering it at $20.00, the wholesale price plus shipping.
As to 1/4″ and 3/4″ scores it is important to become comfortable with the 1/8″ markings at 0-1″ and 11″ -12″. By lining up the edge of the paper to these markings instead of the side fence virtually all scoring measurement are possible.
Happy Scoring,
Diana
Thank you for the info. Im really interested in getting one now. Laurie
I have to go check this new scor pal! Laurie
[…] out of my skin when it arrived yesterday. You can see my previous review of the Scor-Pal–> HERE IF you were on the fence. Makes a great Christmas gift too. So put in on that […]
It is a product which came in the renaissance period in Italy where are was growing with
fast pace. When this happens, the round is essentially over, as the miner can no longer dig, and the scrolling screen quickly overtakes
him. I wager most of the packed house at HP Pavilion had been watching
the band for a good part of that.
Leave a reply